Contents |
Introduction
This explains how to set up a sample Cookbook database and use it in building a Rails application with RadRails, and is adapted from the Rolling with Ruby on Rails tutorial from ONLamp.
For more detailed information about using RadRails for specific tasks, see the individual Help topics on the RadRails main page.
Creating the Application
- Switch to the RadRails perspective (by default Studio is in the Aptana perspective)
- Select File | New Project and, in the New Project Wizard, choose Rails Project
- Enter Cookbook as the Project name
- Choose SQLite3 or MySQL as the database and choose a different location for the project, if necessary, but otherwise leave all the other properties at their default value
- Click Finish
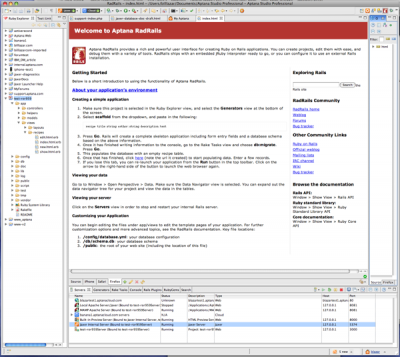
RadRails creates a Cookbook project, a new Mongrel server, launches the server and opens the default Rails homepage.
You should see something similar to the image below if everything was created and configured correctly:
Creating the Database Connection
In this tutorial we'll use a MySQL database and assume you have it installed and running locally.
- Open the Databases perspective
- In the Databases View, click the Add Connection toolbar icon to open the Database Connections wizard
- Type in localhost as the connection name
- Update the connection string from the default (jdbc:mysql://<host>:3306/<database>) to jdbc:mysql://localhost:3306/<database> - Where <database> is the name of the MySQL database you have already created and plan to use for your Rails application during development.
- Enter your username and password
- Click Test connection to make sure you entered everything properly
- Click Finish
Configure Your Rails App to Use the Database
- Switch to the RadRails perspective
- In the Ruby Explorer View, navigate to this project, expand the /config folder and open database.yml
- For each application environment update the values as appropriate
- Make sure the adapter is specified as mysql and host is localhost (or localhost:port_number if MySQL is not running on 3306)
- On some operating systems and depending on how you installed MySQL, you may need to specify socket instead of host—for example if you use MAMP on Mac OS X, you will generally specify socket: /Applications/MAMP/tmp/mysql/mysql.sock and not host
- In the Rake Tasks view, select the db:create task and click Go to create the three databases
Sample Cookbook database.yml (using MAMP)
development:
 adapter: mysql
 database: cookbook_development
 username: root
 password: xxx
 timeout: 5000
 socket: /Applications/MAMP/tmp/mysql/mysql.sock

# Warning: The database defined as "test" will be erased and
# re-generated from your development database when you run "rake".
# Do not set this db to the same as development or production.
test:
 adapter: mysql
 database: cookbook_test
 username: root
 password: xxx
 timeout: 5000
 socket: /Applications/MAMP/tmp/mysql/mysql.sock

production:
 adapter: mysql
 database: cookbook
 username: root
 password: xxx
 timeout: 5000
 socket: /Applications/MAMP/tmp/mysql/mysql.sock
Generating an Application Scaffold
For this exercise we'll use the Scaffold generator supplied with Rails in order to focus on more important first lessons; however once you are comfortable developing in Rails you will probably find yourself developing personal practices that do not include this generator.
The Scaffold generator creates many of the core resources related to a single entity in your application so for Recipe you get:
- a model: cookbook/app/models/recipe.rb
- a controller: cookbook/app/controllers/recipes_controller.rb
- a migration: cookbook/db/migrate/xxx_create_recipes.rb (where xxx is a timestamp based on when you generate the files, e.g., 20080910175017_create_recipes.rb)
- a set of views: cookbook/app/views/recipes/*.html.erb (edit, index, new and show)
- a set of test scripts: /cookbook/test/fixtures/recipes.yml, /cookbook/test/functional/recipes_controller_test.rb and /cookbook/test/unit/recipe_test.rb
- a helper: /cookbook/app/helpers/recipes_helper.rb
The routes file (/cookbook/config/routes.rb) is updated, with a map.resources :recipes added at the top of the file.
To generate these resources:
- Go to the Generators view
- Select the Scaffold generator
- In the parameters field enter: Recipe title:string instructions:text
- Click Go--Studio will switch to the Console view and show you the files and folders created as well as any error messages
Creating the Recipes Table with a Migration
Open /cookbook/db/migrate/xxx_create_recipes.rb in the Ruby Explorer and you should see:
class CreateRecipes < ActiveRecord::Migration
 def self.up
    create_table :recipes do |t|
     t.string :title
     t.text :instructions

     t.timestamps
   end
 end

 def self.down
   drop_table "recipes"
 end
end
To run the migration and create the Recipes table in the cookbook_development database:
- Switch to the Rake Tasks view
- Select db:migrate from the dropdown list of tasks and click Go
If you switch back to the Databases perspective you should see Recipes in localhost -> cookbook_development -> TABLES.
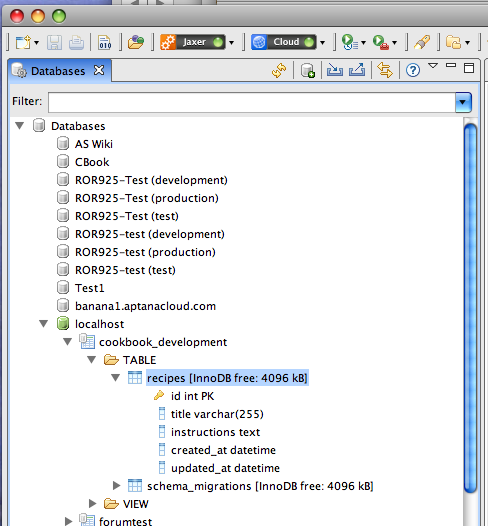
Switch back to the RadRails perspective.
A Look at the Recipe Model
The model can be found in the Ruby Explorer in /cookbook/app/models/recipe.rb, which should contain:
class Recipe < ActiveRecord::Base
end
Leave the model unchanged.
Inside the Recipes Controller
Let's look at the generated controller (/cookbook/app/controllers/recipes_controller.rb).
Because we used the Scaffold generator Rails includes all the methods needed for basic CRUD operations (create, read, update and delete) plus a list view (the index method), all of them capable of responding to requests for either HTML or XML. For each of the operations an HTML view file was also generated (the .html.erb files in /cookbook/app/views/recipes), with the exception of delete, which is covered with a link in the index view. XML requests are serviced by returning one recipe (new and edit) or multiple recipes (index) as XML streams.
A Sample Recipe XML Response
<recipe>
   <title>Toast</title>
  <instructions>Open the bag of bread, take out a slice, pop it in the toaster, turn on the toaster and wait for it to pop up.</instructions>
</recipe>
The Views
Starting the Rails server: Click on the cookbook project folder in the Ruby Explorer and then click the Run As toolbar icon. Unfortunately we haven't yet configured something to be the app's default page so you'll see the same start page as before, but we can get to any recipe view by changing the embedded browser's URL.
- Index view: add recipes to the URL (make it http://127.0.0.1:3000/recipes) and you get an empty list
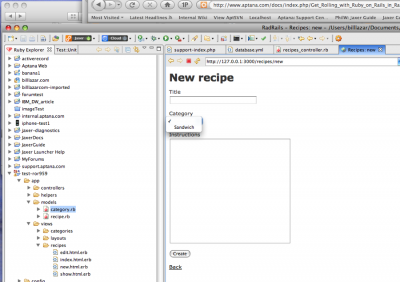
- New: click the New recipe link or add /new to the URL (make it http://127.0.0.1:3000/recipes/new)
- Edit: Go back to the list view and add edit to the URL (make it http://127.0.0.1:3000/recipes/edit)
Oh wait, that was a trick! There are no recipes to edit yet, of course, but even if there were you must pass an ID in the URL so the app knows which recipe to let you edit.
- Go to the New Recipe page and add a recipe.
- After clicking Submit, the app displays the Show page; note the URL, which is /recipes/1
- If you click the edit link now, the URL is /recipes/1/edit
- Click the Back link to see the recipe list featuring your newly-added one

The action links at the right end of the row let you see, change or delete a recipe.
To make the recipe list the app default view (that is, load at http://127.0.0.1:3000):
- Delete /cookbook/public/index.html
- Open /cookbook/config/routes.rb
- Find the commented out line
map.root :controller => "welcome" - Uncomment the line, change "welcome" to "recipes" and save the file.
Recipe Categories
Adding Categories to the Cookbook
Once you start building a Rails app, chances are you'll find the need for additional tables and fields because of new requirements or better understanding of the application.
Since categories are an entity equivalent to recipes in our system, use the scaffold generator again to create the basic entities. The parameter should be Category name:string. We only need the name since Rails automatically creates the ID primary key field as well as the timestamp fields. This gets you the same set of files as listed previously, model, controller, helper, migration, views and tests.
The Rails Way to add fields to an existing model is by creating a new migration that uses a special file naming scheme informing Rails of the migration's purpose, using this naming pattern: AddFieldname1Fieldname2Fieldname3ToModelName.
In this case we want to call the migration AddCategoryToRecipe, so the parameter to the migration generator is: AddCategoryToRecipe category_id:int
Switch to Rake Tasks and have it execute the db:migrate task to create the Categories table and add the category ID field to Recipes.
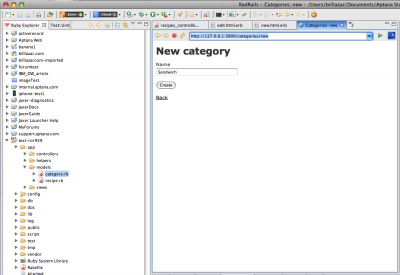
We Need Those Categories Stat!
For the rest of this tutorial to work we need to open the New Category view and add (at least) one category. So run the app again, if you stopped it, point the browser to http://127.0.0.1:3000/categories/new and enter a category, such as Sandwich.
The AddCategoryToRecipe Migration
class AddCategoryToRecipe < ActiveRecord::Migration
 def self.up
   add_column :recipes, :category_id, :int
 end

 def self.down
   remove_column :recipes, :category_id
 end
end
Assigning a Category to each Recipe
Creating a simple recipe/category relationship--a recipe can only be assigned to one category--in the application is done through a simple update to the recipe model.
- Open cookbook/app/models/recipe.rb (or switch to the editor tab if you still have it open from before)
- Add the code
belongs_to :categoryto the file so your code is:
class Recipe < ActiveRecord::Base
  belongs_to :category
end
- In the models folder, open category.rb
- Add the code
has_many :recipesto your file so that your code is:
class Category < ActiveRecord::Base
  has_many :recipes
end
A more advanced relationship, where recipes can belong to multiple categories, is not much more difficult but will not be covered in this tutorial. Essentially you create a third table, to store unique combinations of recipe and category ID, and then use a has_and_belongs_to_many statement in both models.
Rails validates the association so recipes cannot be saved without assigning a category.
Next, add in the to_s method as shown:
class Category < ActiveRecord::Base
  has_many :recipes

  def to_s
    "#{name}"
  end
end
The to_s method means that calls to a category object will return the category's name, rather than requiring you to put an explicit call to name, such as recipe.category rather than recipe.category.name.
Third, update the Recipes controller to get a list of categories to use in the recipe edit view:
- In /cookbook/app/controllers/recipes_controller.rb
- Add the line
@categories = Category.find(:all)as the last line in the new and edit methods:
 # GET /recipes/new
 # GET /recipes/new.xml
 def new
   @recipe = Recipe.new
   @categories = Category.find(:all)

   respond_to do |format|
     format.html # new.html.erb
     format.xml  { render :xml => @recipe }
   end
 end

 # GET /recipes/1/edit
 def edit
   @recipe = Recipe.find(params[:id])
   @categories = Category.find(:all)
 end
The views must also be updated with a category select widget so add the following code block to /cookbook/app/view/recipes/edit.html.erb and /cookbook/app/view/recipes/new.html.erb:
 <p>
   <%= f.label :category %><br />
   <%= select "recipe", "category_id", Category.find(:all).collect {|p| [ p.name, p.id ] }, {:include_blank => true} %>
 </p>
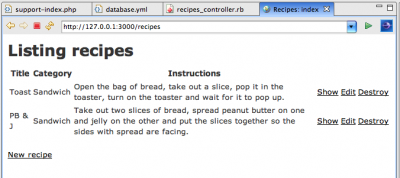
Displaying Category in the Recipes List
Since the recipe list view was generated before the category relationship was created the list doesn't show a recipe's category.
This is easily corrected:
- Open /cookbook/app/view/recipes/index.html.erb
- ?In the table header row add
<th>Category</th> - In the
for recipe in @recipesloop add the line<td><%=h recipe.category.name %></td>to get the code below:
<h1>Listing recipes</h1>

<table>
 <tr>
   <th>Title</th>
   <th>Category</th>
   <th>Instructions</th>
 </tr>

<% for recipe in @recipes %>
 <tr>
   <td><%=h recipe.title %></td>
   <td><%=h recipe.category.name %></td>
   <td><%=h recipe.instructions %></td>
   <td><%= link_to 'Show', recipe %></td>
   <td><%= link_to 'Edit', edit_recipe_path(recipe) %></td>
   <td><%= link_to 'Destroy', recipe, :confirm => 'Are you sure?', :method => :delete %></td>
 </tr>
<% end %>
</table>

<br />

<%= link_to 'New recipe', new_recipe_path %>