Since Windows doesn't ship with Ruby, Ruby on Rails, Apache or MySQL the first thing you need to do is install a package which provides them. You can install each piece separately but for simplicity you may prefer to use an all-in-one package such as Bitnami RubyStack or XAMPP; in this tutorial we'll use RubyStack though other than using different paths to the apps set in the next to last step there's no practical difference in what you do.
1) Install RubyStack (to: C:\RubyStack)
2) Install Aptana Studio to: C:\Aptana Studio (Don't put it in C:\Programs\Aptana Studio because Vista's security rules will cause you trouble later on)
3) Set the Aptana Vista Config by renaming C:\Aptana Studio\configuration\config_vista\config_vista.ini to config.ini and copying it over the default config.ini in C:\Aptana Studio\configuration
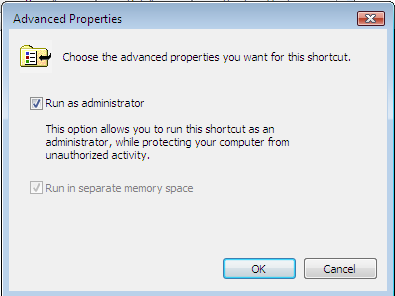
4) Add Aptana Studio to the Quick Launch bar or create a shortcut to it on Desktop. Right click on what you made, select Properties, click the Advanced button and check Start with Administrator rights (illustrated below)
5) Start Aptana Studio and install all updates, then restart as requested
6) Install RadRails from My Aptana Plugins and restart as requested
7) Modify the relevant Preferences:
- Ruby -> Installed Interpreters -> Add C:\RubyStack\ruby\
- Ruby -> Rake -> set rake path to C:\RubyStack\ruby\bin\rake
- Rails -> Configuration -> set rails path to C:\RubyStack\ruby\bin\rails and mongrel path to C:\RubyStack\ruby\bin\mongrel_rails
8) Open the Aptana RadRails Perspective and start working!

