
Contents |
Introduction
This explains how to set up a sample Cookbook database and use it in building a Rails application with RadRails, and is adapted from the Rolling with Ruby on Rails tutorial from ONLamp.
For more detailed information about using RadRails for specific tasks, see the individual Help topics on the RadRails main page.
Prerequisite: Configuring the Eclipse SQL Explorer plug-in for RadRails
Creating the Database Connection
In this tutorial we'll use a MySQL database and assume you have it installed and running locally.
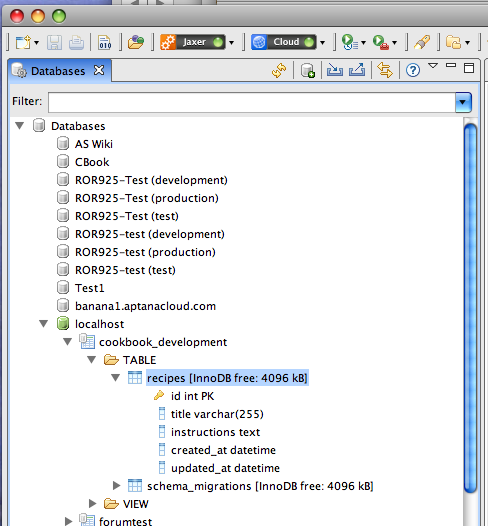
- Open the Databases perspective
- In the Databases View, click the Add Connection toolbar icon to open the Database Connections wizard
- Type in localhost as the connection name
- Update the connection string from the default (jdbc:mysql://<host>:3306/<database>) to jdbc:mysql://localhost:3306/<database>
- Enter your username and password
- Click Test connection to make sure you entered everything properly
- Click Finish
Configure Your Rails App to Use the Database
- Switch to the RadRails perspective
- In the Ruby Explorer View, navigate to this project, expand the /config folder and open database.yml
- For each application environment update the values as appropriate
- Make sure the adapter is specified as mysql and host is localhost (or localhost:port_number if MySQL is not running on 3306)
- On some operating systems and depending on how you installed MySQL, you may need to specify socket instead of host—for example if you use MAMP on Mac OS X, you will generally specify socket: /Applications/MAMP/tmp/mysql/mysql.sock and not host
- In the Rake Tasks view, select the db:create task and click Go to create the three databases
Sample Cookbook database.yml (using MAMP)
development:
 adapter: mysql
 database: cookbook_development
 username: root
 password: xxx
 timeout: 5000
 socket: /Applications/MAMP/tmp/mysql/mysql.sock

# Warning: The database defined as "test" will be erased and
# re-generated from your development database when you run "rake".
# Do not set this db to the same as development or production.
test:
 adapter: mysql
 database: cookbook_test
 username: root
 password: xxx
 timeout: 5000
 socket: /Applications/MAMP/tmp/mysql/mysql.sock

production:
 adapter: mysql
 database: cookbook
 username: root
 password: xxx
 timeout: 5000
 socket: /Applications/MAMP/tmp/mysql/mysql.sock
Generating an Application Scaffold
For this exercise we'll use the Scaffold generator supplied with Rails in order to focus on more important first lessons; however once you are comfortable developing in Rails you will probably find yourself developing personal practices that do not include this generator.
The Scaffold generator creates many of the core resources related to a single entity in your application. For Recipe you get:
- a model: cookbook/app/models/recipe.rb
- a controller: cookbook/app/controllers/recipes_controller.rb
- a migration: cookbook/db/migrate/xxx_create_recipes.rb (where xxx is a timestamp based on when you generate the files, e.g., 20080910175017_create_recipes.rb)
- a set of views: cookbook/app/views/recipes/*.html.erb (edit, index, new and show)
- a set of test scripts: /cookbook/test/fixtures/recipes.yml, /cookbook/test/functional/recipes_controller_test.rb and /cookbook/test/unit/recipe_test.rb
- a helper: /cookbook/app/helpers/recipes_helper.rb
To generate these resources:
- Go to the Generators view
- Select the Scaffold generator
- In the parameters field enter: Recipe title:string instructions:text
- Click Go--Studio will switch to the Console view and show you the files and folders created as well as any error messages
Creating the Recipes Table with the Migration
Open /cookbook/db/migrate/xxx_create_recipes.rb in the Ruby Explorer and you should see:
class CreateRecipes < ActiveRecord::Migration
 def self.up
    create_table :recipes do |t|
     t.string :title
     t.text :instructions

     t.timestamps
   end
 end

 def self.down
   drop_table "recipes"
 end
end
To run the migration and create the Recipes table in the cookbook_development database:
- Switch to the Rake Tasks view
- Select db:migrate from the dropdown list of tasks and click Go
If you switch back to the Databases perspective you should see Recipes in localhost -> cookbook_development -> TABLES.
Switch back to the RadRails perspective.
The Recipe Model
The model can be found in the Ruby Explorer in /cookbook/app/models/recipe.rb, which should contain:
class Recipe < ActiveRecord::Base
end
For now leave it as is.
The Recipes Controller
- In the Ruby Explorer, navigate to cookbook/app/controllers and open recipe_controller.rb.
- After the first line in the file, press Enter to create a new line and add the following code:
scaffold :recipe
The contents of your recipe_controller.rb file should be:
class RecipeController < ApplicationController
  scaffold :recipe
end
- Save your changes.
- Check the "new recipe" page in your browser.
- If your browser is not running, go to the Servers View and right-click the CookbookServer then select Start from the context menu. Once the server is running, right-click CookbookServer again, and select Launch Browser from the context menu.
- In the browser preview, navigate to http://localhost:[port]/recipe/new and press Return.
Your page should look similar to the example below:

- Add description and date columns to the recipes table:
- Copy and paste the following code into your SQL Editor:
alter table `recipes`

 add column `description` varchar(255) DEFAULT NULL,

 add column `date` date DEFAULT NULL;
- Click the Execute button
 to add the columns to the recipes table.
- Copy and paste the following code into your SQL Editor:
- Refresh your browser preview. It should now look like the image below:
</li>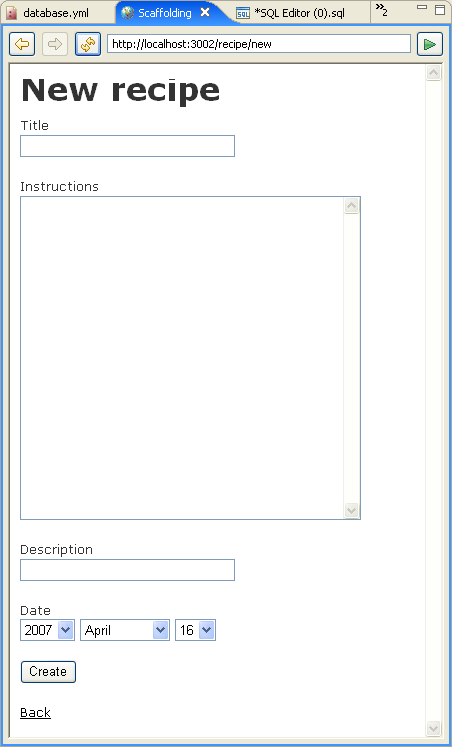
- Test your database by entering data for a sample recipe and click the Create
button to create a recipe. You should see something similar to the "example"
recipe below.
</li>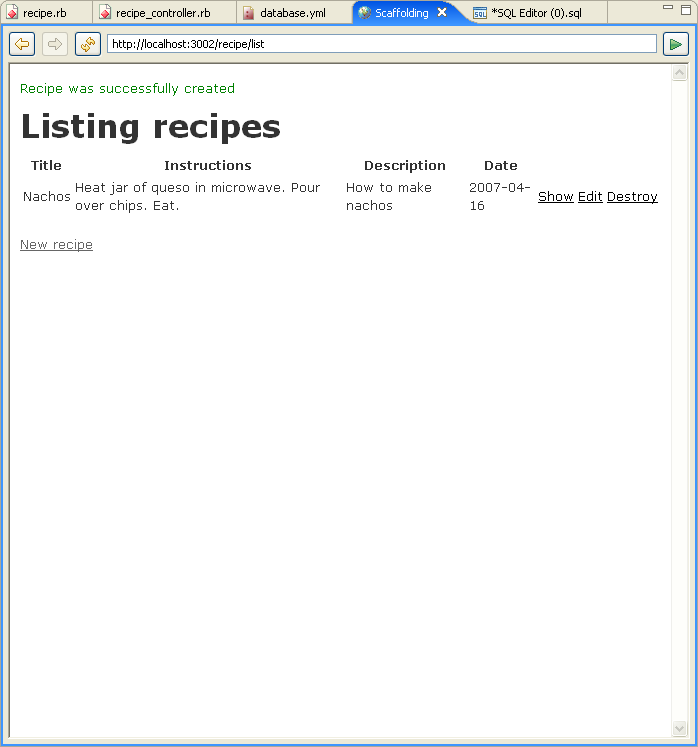
</ol>
Creating Actions and Views
To create actions and Views for your Cookbook database:
- If you are not already in the RadRails perspective, switch to the RadRails perspective in Eclipse.
- In the Rails Navigator View, navigate to cookbook > app > controllers and open the recipe_controller.rb file for editing.
- Add a list definition to the recipe_controller.rb file. The contents of your file should be the same as the code excerpt
below:
class RecipeController < ApplicationController
  scaffold :recipe

  def list
  end
end
- Create a new file to manage listing for the database:
- In the Rails Navigator View, navigate to cookbook> app > views and right-click the recipe folder then select New > File from the context menu.
- Name the new file list.rhtml and click the Finish button to create the new file.
- Paste the following code into your list.rhtml file and save your changes:
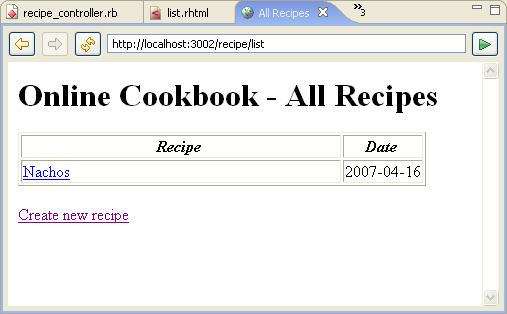
<html>
<head>
<title>All Recipes</title>
</head>
<body>
<h1>Online Cookbook - All Recipes</h1>
<table border="1">
<tr>
<td width="80%"><p align="center"><i><b>Recipe</b></i></td>
<td width="20%"><p align="center"><i><b>Date</b></i></td>
</tr>
<% @recipes.each do |recipe| %>
<tr>
<td><%= link_to recipe.title, :action => "show", :id => recipe.id %></td>
<td><%= recipe.date %></td>
</tr>
<% end %>
</table>
<p><%= link_to "Create new recipe", :action => "new" %></p>
</body>
</html>
- Open your recipe_controller.rb file again, and add the line
@recipes=Recipe.find_allto the list definition, as shown below:class RecipeController < ApplicationController scaffold :recipe def list @recipes = Recipe.find(:all) end endWhen called, this lists all of the recipes in the database.
- Save your changes.
- Refresh your browser. Your page should look like the page below:
Adding Categories to the Cookbook
To add recipe categories to your Cookbook:
- In Eclipse, switch to the SQL Explorer perspective.
- Create the categories table.
- In your SQL editor, select the cookbook database from the drop-down list at the top of the editor.
- Copy and paste the following code into the SQL editor:
CREATE TABLE `categories` (
  `id` int(11) NOT NULL AUTO_INCREMENT,
  `name` varchar(50) NOT NULL,
  PRIMARY KEY (`id`)
) ENGINE=InnoDB DEFAULT CHARSET=utf8;
- Click the Execute button to create the table.
- Refresh the database by right-clicking your database in the Database Structures
View and selecting Refresh from the context menu.
If you expand the Tables node, you will now see the Categories table.
- Create a Category controller:
- In Eclipse, switch to the RadRails perspective.
- Click the Generators tab to go to the Generators View.
- In the Generators View, select controller from the drop-down list on the left.
- Below that drop-down box, choose the Create option.
- In the drop-down box on the right, type Category.
- Click the Go button to create the Category controller.
- Create a Category model:
- In Eclipse, switch to the RadRails perspective.
- Click the Generators tab to go to the Generators View.
- In the Generators View, select model from the drop-down list on the left.
- Below that drop-down box, choose the Create option.
- In the drop-down box on the right, type Category.
- Click the Go button to create the Category model.
- In the Rails Navigator View, navigate to cookbook > app > controllers and open the category_controller.rb file for editing.
- In the line below the class declaration, add the code
scaffold :categoryso that your code looks like the example below:class CategoryController < ApplicationController scaffold :category end
- Save your changes.
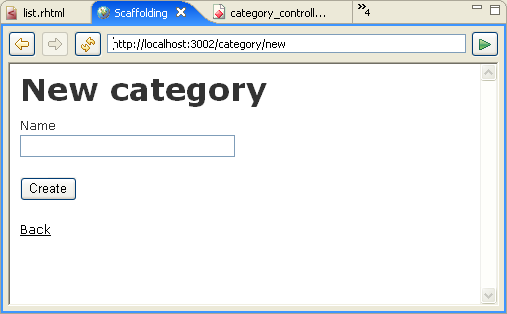
- In your RadRails browser, go to the URL http://localhost:[port]/category/new. Your page should look similar to the one below:
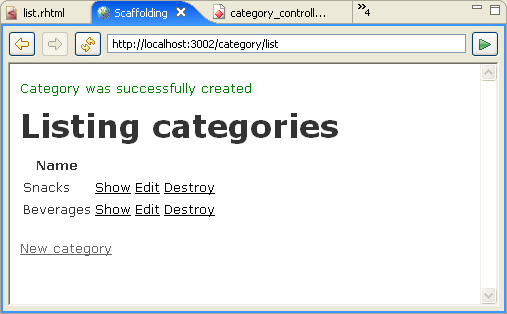
- Use the New Category page in your browser to create a "Snacks"
and a "Beverages" category. Once you use the form to create each
of these categories, your page should look like the image below:
Assigning a Category to each Recipe
To assign a category to each recipe in the cookbook database:
- In Eclipse, switch to the SQL Explorer perspective.
- Add the category_id field to the recipes table:
- In the SQL Editor, select the Cookbook database from the drop-down list and copy and paste in the following code:
alter table `recipes`

 add column `category_id` int(11) DEFAULT NULL;
- Click the Execute button to update the table.
- In the Database Structures View, right-click the Cookbook database and select Refresh from the context menu to refresh the database.
- In the SQL Editor, select the Cookbook database from the drop-down list and copy and paste in the following code:
- In Eclipse, switch to the RadRails perspective.
- Update the recipe model:
- In the Rails Navigator View, navigate to cookbook > app > models and open the recipe.rb file for editing.
- Add the code
belongs_to :categoryto the recipe.rb file so that your code looks like the example below:class Recipe < ActiveRecord::Base belongs_to :category end
- Save your changes.
- In the models folder, open the category.rb file for editing.
- Add the code
has_many :recipesto your file so that it looks like the example below:class Category < ActiveRecord::Base has_many :recipes end
- Save your changes.
- Edit the "edit recipe" action:
- In the Rails Navigator View, navigate to cookbook > app > controllers, and open the recipe_controller.rb file for editing.
- Copy and paste the edit definition from the code sample below into your
recipe_controller.rb file:
class RecipeController < ApplicationController scaffold :recipe def list @recipes = Recipe.find(:all) end def edit @recipe = Recipe.find(@params["id"]) @categories = Category.find(:all) end end - Save your changes.
- Create a new file for editing recipes:
- In the Rails Navigator View, navigate to the cookbook > app > views > recipe folder, right-click the folder and create a new file called edit.rhtml.
- Copy and paste the following HTML code into the edit.rhtml file:
<html> <head> <title>Edit Recipe</title> </head> <body> <h1>Edit Recipe</h1> <form action="../update/<%= @recipe.id %>" method="POST""> <input id="recipe_id" name="recipe[id]" size="30" type="hidden" value="<%= @recipe.id %>" /> <p><b>Title</b><br> <input id="recipe_title" name="recipe[title]" size="30" type="text" value="<%= @recipe.title %>" /> </p> <p><b>Description</b><br> <input id="recipe_description" name="recipe[description]" size="30" type="text" value="<%= @recipe.description %>" /> </p> <p><b>Category:</b><br> <select name="recipe[category_id]"> <% @categories.each do |category| %> <option value="<%= category.id %>" <%= ' selected' if category.id == @recipe.category_id %>> <%= category.name %> </option> <% end %> </select></p> <p><b>Instructions</b><br> <textarea cols="40" id="recipe_instructions" name="recipe[instructions]" rows="20" wrap="virtual"> <%= @recipe.instructions %> </textarea> </p> <input type="submit" value="Update" /> </form> <a href="/recipe/show/<%= @recipe.id %>"> Show </a> | <a href="/recipe/list"> Back </a> </body> </html> - Save your changes.
- Edit a recipe:
- Go to your browser preview and go to the URL http://localhost:[port]/recipe/list.
- Click the link to one of your recipes, click the Edit link on the recipe page, and change the recipe category for that recipe.
- Repeat assigning a category to each recipe that you have in your database.
- Make category_id a required field for all recipes:
- Switch to the SQL Explorer perspective.
- Copy and paste the following code into the SQL Editor:
alter table `recipes`

 modify `category_id` int(11) NOT NULL AFTER `id`;
- Select the Cookbook database in the SQL Editor, and click the Execute button
to update the table.
Displaying Categories in a list of all Recipes
To display categories in a list of all recipes:
- In Eclipse, switch to the RadRails perspective.
- In the Rails Navigator View, navigate to the cookbook > app > views > recipe folder, and open the list.rhtml file for editing.
- Copy and paste the code sample below, and use it to replace the current
code in the list.rhtml file.
<html>

<head>

<title>All Recipes</title>

</head>

<body>

<h1>Online Cookbook - All Recipes</h1>

<table border="1">

 <tr>

 <td width="40%"><p align="center"><i><b>Recipe</b></i></td>

 <td width="20%"><p align="center"><i><b>Category</b></i></td>

 <td width="20%"><p align="center"><i><b>Date</b></i></td>

 </tr>

 <% @recipes.each do |recipe| %>

 <tr>

 <td><%= link_to recipe.title, :action => "show", :id => recipe.id %></td>

 <td><%= recipe.category.name %></td>

 <td><%= recipe.date %></td>

 </tr>

 <% end %>

</table>

<p><%= link_to "Create new recipe", :action => "new" %></p>

</body>

</html>
- Go to the URL http://localhost:[port]/recipe/list in your browser, and you should see that the Category field has been added to each recipe.