Introduction
You can use Studio 3.0.0 or later to create and manage Alloy projects.
Creating an Alloy Project
To create a new Alloy project, start Studio, then
- From the menu, select File > New > Mobile Project. The New Mobile Project wizard appears.
- Select Alloy in the Available Templates box, then click the Next button.
- Complete all of the fields, then click the Finish button.
A new skeleton Alloy project will be generated. Note that the Resources folder is hidden from the App and Project Explorer.
Creating a Controller
To create a new controller with a view and style,
- Right-click on your project in the App or Project Explorer.
- Select New > Alloy Controller. The New Controller dialog box appears.
- In the Controller name textbox, enter the name of the controller. A warning appears if a duplicate exists.
- Click the OK button.
This creates app/controllers/<name>.js, app/styles/<name>.tss, and app/views/<name>.xml.
Creating a Model
To create a new model,
- Right-click on your project in the App or Project Explorer.
- Select New > Alloy Model. The New Model dialog box appears.
- In the Model name textbox, enter the name of the model. A warning appears if a duplicate exists.
- In the Adapterdrop-down box, select the type of storage.
- For sql, in the Schema table, enter the names and data types of the database schema.
- Click the OK button.
This creates app/models/<name>.js.
Creating a Migration
To generate a standalone migration for a specific model,
- Right-click on your project in the App or Project Explorer.
- Select New > Alloy Migration. The New Migration dialog box appears.
- In the Migration name textbox, enter the name of the model that needs a database migration file.
- Click the OK button.
This creates a timestamp-ordered migration file for the model specified,
that is, app/migrations/DATETIME_<name>.js
Creating a Widget
To create a basic widget,
- Right-click on your project in the App or Project Explorer.
- Select New > Alloy Widget. The New Widget dialog box appears.
- In the Widget name textbox, enter the name of the migration. A warning appears if a duplicate exists.
- Click the OK button.
This creates a default widget in the projects's app/widgets path, generating a configuration file, controller, style and view: app/widgets/<name>/widget.json, app/widgets/<name>/controllers/widget.js, app/widgets/<name>/styles/widget.tss, and app/widgets/<name>/views/widget.xml. Additionally, the widget is automatically added as a dependency in the
Alloy project's configuration file config.json.
Starting with Studio 4.1.0, after you create a Widget, you can create additional
controllers, styles and views for your widget. Right-click on the
widget folder (not the ./app/widgets/ folder but its subfolders) and select New, then choose either Widget Controller, Widget Style or Widget View.
Navigating easily among Alloy element files
When developing an Alloy project you will frequently need to switch between
the related controller, view, and style files (foo.js, foo.xml, and foo.tss, for example). Studio provides keyboard shortcuts and menu commands for switching
quickly among those files.
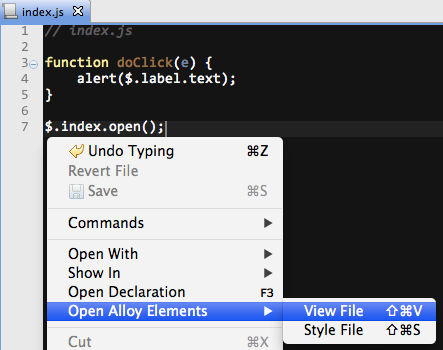
To navigate Alloy elements using menu commands:
- Open an Alloy element file (
foo.js, for example). - Right-click in the editor window and select Open Alloy Elements.
- From the context menu, select the related Alloy element file that you want to open: Controller File, View File, or Style File.
Which menu options appear depends on the type of file you're currently editing. For example, if you're editing an Alloy view (.xml) file the context menu will contain Controller File and Style File options; if you're viewing an Alloy style (.tss) file the menu will contain Controller File and View File options.
You can also use the following equivalent keyboard shortcuts:
|
Keyboard shortcut
|
Opens
|
|---|---|
| Cmd+Shift+C (Mac), Ctrl+Shift+C (Window) | Controller file |
| Cmd+Shift+S (Mac), Ctrl+Shift+S (Window) | Style file |
| Cmd+Shift+V (Mac), Ctrl+Shift+V (Window) | View file |
Building and Running an Application

To launch an Alloy project in run mode, first select the project in the Project Explorer view, then in the global tool bar, select Run from the Launch Mode drop-down list and a device from the Target drop-down list. If the Launch Automatically option is enabled under the Target drop-down list, the application will be automatically launched after the target is selected. If not, you need to click the Launch button to start the build process.
Using Content Assistance
Studio 3.1.0 and later supports content assistance with Alloy files. Currently, code completion is available for the XML tags and attributes (Titanium properties and events with "on") with the Alloy View XML files; element, class and ID attributes for TSS files, and for the JavaScript code with Alloy Controllers. Just start typing a name for an ID, element, class or attribute and a pop-up should appear with suggestions.
For Alloy Controllers, if you type in an element referenced by an id attribute in the associated view file, a pop-up should appear providing assistance for that object. For example, if you have the following defined in markup:
<Alloy> <Window id="win" class="container"> <Label id="label">Foo</Label> </Window></Alloy> |
In the associated controller file, if you type $.win. (with the trailing period), properties and methods for a Ti.UI.Window
class pop-up, and if you type $.label., properties and methods for a Ti.UI.Label class pop-up. You need
to type the entire name to receive assistance.
For TSS files, if you type in an element referenced by an id or class attribute
in the associated view file, a pop-up should appear providing assistance
for that object. For example, using the previous markup example,
in the associated TSS file, if you type ".container":{ , properties for a Ti.UI.Window class pop-up, and if you type "#label":{, properties for a Ti.UI.Label class pop-up. You can also type the
element name. You need to type the entire name of the element, class
or ID to receive assistance.
Debugging Alloy Code
Refer to the Alloy Debugging and Troubleshooting guide.