Introduction
In Android, applications and application components cannot directly communicate with each other. In order to communicate with another application, create an intent and start a new activity with the intent. An intent is a message sent to the Android OS. Android directs the message to an application or application component based on the intent's settings.
Intents can be used to start an activity, start a service or start a broadcast. This document discusses how to use an intent to start an activity.
- To use an intent to start a service, see Android Services.
- To use an intent to start a broadcast or to create a broadcast receiver, see Android Broadcast Intents and Receivers.
- To receive intents from other applications, see Android Intent Filters.
Intent types
There are two kinds of intents:
- Explicit intents specify the application to start. When creating the intent, specify the application's package name and class when creating the intent. Explicit intents are normally used to start components within your own application.
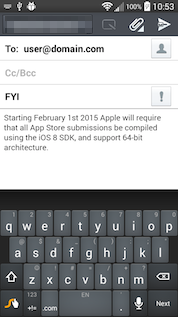
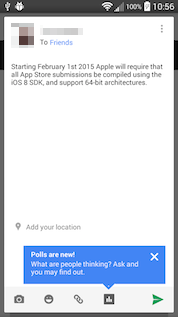
- Implicit intents do NOT specify the application to start. Instead, they declare a general action. The user can decide which application to start if multiple applications can handle the action or a default application has not been selected by the user. For example, if a user opens their browser and highlights some text, the user can share that text with other Android apps, such as an e-mail application, SMS application or a social networking application.
|
The user highlights the text and |
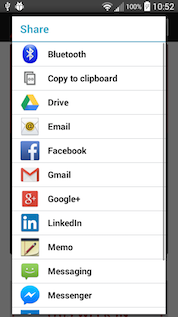
The Share dialog appears and the user can select the application to send the text to, such as... |
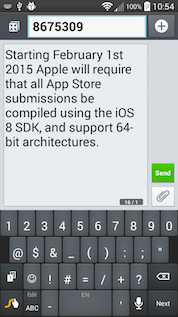
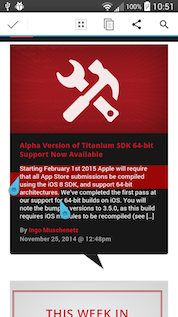
...an e-mail application, | ...an SMS application | ...or a social networking application like Google+. |
|
|
|
 |
 |
|
Create an intent
To create an intent, use the Titanium.Android.createIntent() method to create an Intent object. Pass the method a dictionary with
the following properties:
action: Action to associate with the intent. Specify one of theTitanium.Android.ACTION_*constants. The most commonly used actions are:Titanium.Android.ACTION_SEND: Send data to an application.Titanium.Android.ACTION_VIEW: View data in an application.
flags: Optional flags to set to modify the behavior of the intent. Bitwise-OR theTitanium.Android.FLAG_*constants with theIntentobject'sflagproperty rather than specifying them during creation.data: Optional data URI to pass to an application's activity.type: Optional MIME type for the intent.
The following example creates an intent to view the data URI:
var intent = Ti.Android.createIntent({ action: Ti.Android.ACTION_VIEW,}); |
Create an explicit intent
To create an explicit intent, in addition to the previously mentioned
intent properties, you need to also set the packageName and className properties, or the url property, but not both.
className: Name of the class. For the main activity of a Titanium project, this is the name of the activity prefixed with project's application ID (orpackageName). The name of the main activity is the name of the application/project with only the first letter capitalized andActivityappended to the end of it. For example, if the name of the project isMyAppand the application ID iscom.appcelerator.testapp, the class name will becom.appcelerator.testapp.MyappActivity. You can also find the name of the main activity in thebuild/android/AndroidManifest.xmlfile after you build your application.packageName: Package name of the application. For Titanium project's, this is the project's application ID located in thetiapp.xmlfile.url: URL of the JavaScript activity file to launch.
The following example creates an intent to launch the main activity of the MyApp application:
|
1
2
3
4
5
6
7
|
var intent = Ti.Android.createIntent({ action: Ti.Android.ACTION_MAIN, className: 'com.appcelerator.testapp.MyappActivity', packageName: 'com.appcelerator.testapp'});// Tells the OS to reset the activity if needed or launch the application
if it has not already been launchedintent.flags |= Ti.Android.FLAG_ACTIVITY_RESET_TASK_IF_NEEDED | Ti.Android.FLAG_ACTIVITY_SINGLE_TOP; |
If the application uses a JavaScript activity, add the activity to the tiapp.xml file in order to define the activity as part of the application. Create
an <activities> element as a child of the <android> element, then create an <activity> element, as a child of the <activities> element, and assign the url attribute to the URL of the JavaScript file to define it as an Android
activity.
|
1
2
3
4
5
6
7
|
<ti:app> <activities> <activity url="activity.js"/> </activities> </android></ti:app> |
Add extra data
To send extra data with the intent, which can be used by the activity,
use the Intent's putExtra() method. Pass the method the name of the data as the first parameter
and the data to add as the second parameter. The application can
also specify one of the Titanium.Android.EXTRA_* constants to use one of the Android-defined extra data fields.
The following example adds a custom field called "timestamp"
to the intent and the Android-defined EXTRA_TEXT data:
intent.putExtra('timestamp', new Date());intent.putExtra(Ti.Android.EXTRA_TEXT, 'Some text that we want to share'); |
Add a category
To add a category to an intent, use the Intent's addCategory() method. A category provides additional details about the purpose
of the intent. Note that most categories are only useful for intent
filters. Pass the method one of the following Titanium.Android.CATEGORY_* constants:
Titanium.Android.CATEGORY_DEFAULT: Do not use category filtering.Titanium.Android.CATEGORY_BROWSABLE: Activity can be opened by a browser when clicking a link.Titanium.Android.CATEGORY_TAB: Activity should be opened in a tab.Titanium.Android.CATEGORY_ALTERNATIVE: Activity should be considered as an alternative option, usually displayed in the options menu.Titanium.Android.CATEGORY_SELECTED_ALTERNATIVE: Activity should be considered as an alternative option, usually displayed in a dialog.Titanium.Android.CATEGORY_LAUNCHER: Activity is the application's initial activity and is listed in the OS's application launcher.Titanium.Android.CATEGORY_INFO: Provides information about the application package.Titanium.Android.CATEGORY_HOME: Home activity.Titanium.Android.CATEGORY_PREFERENCE: Activity is a preference panel.Titanium.Android.CATEGORY_TEST: Activity is for testing purposes.
Start an activity with an intent
To start an activity (application or application component), call the application's
current Activity's startActivity() or startActivityForResult() method. To get the current activity, use the activity property of either the currently opened Window or TabGroup, or if the
activity does not have an open Window or TabGroup, use the Titanium.Android.currentActivity property.
- The
startActivity()method starts an Activity by passing it only an intent object. - The
startActivityForResult()method starts an Activity by passing it an intent object and a callback function to handle the response returned by the activity when it finishes. Use this method if the application wants to communicate between two activities.
The following example starts an activity (another application) to view the data URI:
|
1
2
3
4
5
|
var intent = Ti.Android.createIntent({ action: Ti.Android.ACTION_VIEW,});win.activity.startActivity(intent); |
The following example starts an activity to let the user choose a contact.
After the user successfully selects a contact and the activity completes,
a new intent is created to view the contact using the result of the first
activity. Note that the URI returned by first intent is a content
provider URI (content://) and the contact information cannot be directly accessed by a Titanium
application using the URI. If the application needs to retrieve and
manipulate the data, you need to create a native Android module to handle
content provider URIs, or in this case, the application can use the Titanium.Contacts API to directly retrieve the contact data.
|
1
2
3
4
5
6
7
8
9
10
11
12
13
14
15
16
17
|
// Create an intent to choose a contactvar intent = Ti.Android.createIntent({ action: Ti.Android.ACTION_GET_CONTENT, type: 'vnd.android.cursor.item/contact'});// Start an activity and execute the callback when the result returnswin.activity.startActivityForResult(intent, function (e) { // If successful, open the selected contact if (e.resultCode == Ti.Android.RESULT_OK && e.intent.data) { var newIntent = Ti.Android.createIntent({ action: Ti.Android.ACTION_VIEW, data: e.intent.data }); win.activity.startActivity(newIntent); }}); |
Force an intent chooser
If the user selects a default application to handle a specific action,
the Share dialog will not appear. If the application needs to explicitly show
a dialog to the user to allow them to choose from a list of applications,
create an intent chooser using the Titanium.Android.createIntentChooser() method. Pass the method the Intent object the application would use to start an activity as the first parameter.
Pass a string to display as the title of the dialog as the second
parameter. Both parameters are required. This method returns
an Intent object, which is used to start an activity.
The following example creates an intent chooser that displays "Send Message" as the title of the dialog.
var chooser = Ti.Android.createIntentChooser(intent, "Send Message");win.activity.startActivity(chooser); |
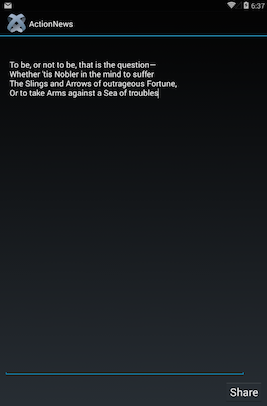
Example
This example shows a very common and effective use of Intents. This examples uses an Android Intent to share text with any apps on the Android device that accept text intents.
First, create an implicit intent that sends text data. When creating
the intent, set the action property to the Ti.Android.ACTION_SEND constant and the type property to the text/plain MIME type. The following intent tells Android the application wants
to send plain text data.
var intent = Ti.Android.createIntent({ action: Ti.Android.ACTION_SEND, type: "text/plain"}); |
Next, the application needs to send the text data with the intent. Use
the intent's putExtra method to send extra data with the intent. Pass the method the Ti.Android.EXTRA_TEXT constant as the first parameter and the string to share as the second
parameter. The EXTRA_TEXT constant signifies the intent is passing a standardized Android format
with the intent.
intent.putExtra(Ti.Android.EXTRA_TEXT, 'Some text that we want to share'); |
Use the intent's addCategory method to specify the Ti.Android.CATEGORY_DEFAULT category, which indicates not to use any category filtering.
intent.addCategory(Ti.Android.CATEGORY_DEFAULT); |
Finally, pass the intent to the application's current Activity's startActivity() method. The application can use the activity property of either a Window or TabGroup object. Note that to invoke
any methods on an activity, the application needs to wait until the Window
or TabGroup is open.
// Wait for the Window or TabGroup to open before invoking any methods
                              on the activity
win.activity.startActivity(intent); |
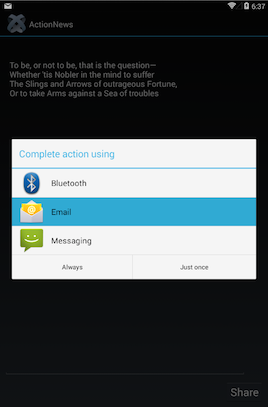
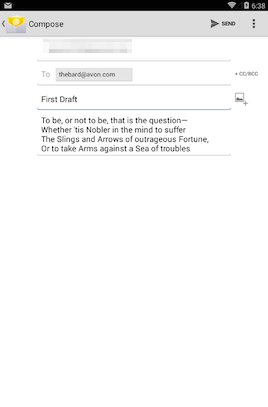
When the intent is sent, the OS should display a list of applications to launch if it has multiple applications that can receive text intents. If there are not many applications installed on the device or if the user selected a default application to handle text, the default application will be launched.
 |
 |
 |
Complete code
|
1
2
3
4
5
6
7
8
9
10
11
12
13
14
15
16
17
18
19
20
21
22
23
24
25
26
27
28
29
30
31
32
33
34
35
36
37
38
39
40
41
42
|
var win = Ti.UI.createWindow();var label = Ti.UI.createLabel({ text: 'Say Something!', color:'white', font: { fontSize:'20dp', fontWeight:'bold' }, height:'Ti.UI.SIZE', top:'5dp'});var textarea = Ti.UI.createTextArea({ width:'90%', top:'44dp', bottom: '70dp', left:10, right:10});var button = Ti.UI.createButton({ title:'Share', font: { fontSize:'24dp' }, bottom:'10dp', right:10});button.addEventListener('click', function(e) { var intent = Ti.Android.createIntent({ action: Ti.Android.ACTION_SEND, type: "text/plain" }); intent.putExtra(Ti.Android.EXTRA_TEXT, textarea.value); intent.addCategory(Ti.Android.CATEGORY_DEFAULT); win.activity.startActivity(intent);});win.add(label);win.add(textarea);win.add(button);win.open(); |