To configure a create a user flow:
- Click the Create Flow icon associated with creating a simple user.
The API Orchestration user interface is displayed. - Select and pull the simpleusers flow-node onto the flow editor from the Models list. Note that the Start flow-node is automatically connected to the input of the simpleusers flow-node.
- Name the flow-node: Create user
- Select the
createmethod. - Select Parameters.
- Configure the data parameter. If selector is selected from the selector drop-down menu, as you begin typing in the data parameter field, a drop-down menu of valid or previously used selector options is displayed. You may optionally choose a selector from the list, or continue typing to manually configure the parameter. For additional selector auto-complete information, refer to Manage Nodes. For additional information on the Model flow-node and General flow-node configuration parameters, refer to Flow Orchestration.
- Select Outputs.
- Configure the next output. As you begin typing in the next field, a drop-down menu of valid or previously used output options is displayed. You may optionally choose an output from the list, or continue typing to manually configure the parameter.
- Select and pull a Set Context flow-node onto the flow editor from the Core list.
- Name the flow-node: Set header location
- Select Parameters.
- Configure the value parameter. If selector is selected from the selector drop-down menu, as you begin typing in the value parameter field, a drop-down menu of valid or previously used selector options is displayed. You may optionally choose a selector from the list, or continue typing to manually configure the parameter. For additional selector auto-complete information, refer to Manage Nodes. For additional information on the Model flow-node and General flow-node configuration parameters, refer to Flow Orchestration.
- Select Outputs.
- Configure the next output. As you begin typing in the next field, a drop-down menu of valid or previously used output options is displayed. You may optionally choose an output from the list, or continue typing to manually configure the parameter.
- Connect the next output of the Create user flow-node to the input of the Set header location flow-node. For additional information on connecting flow-nodes in a flow, refer to Manage Nodes.
- Select and pull an HTTP flow-node onto the flow editor from the Core list.
- Name the flow-node: Create succeeded
- Select Parameters.
- For the status parameter, select number and enter
201in the field. - Leave the body parameter disabled.
- Enable and configure the headers parameter. If selector is selected from the selector drop-down menu, as you begin typing in the headers parameter field, a drop-down menu of valid or previously used selector options is displayed. You may optionally choose a selector from the list, or continue typing to manually configure the parameter. For additional selector auto-complete information, refer to Manage Nodes. For additional information on the Model flow-node and General flow-node configuration parameters, refer to Flow Orchestration.
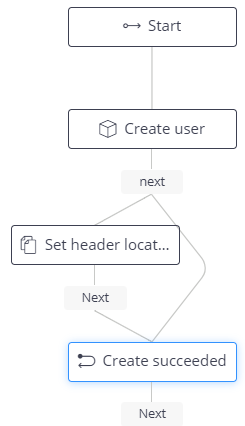
- Connect the next output of the Create user flow-node to the input of the Create succeeded flow-node. For additional information on connecting flow-nodes in a flow, refer to Manage Nodes.
- Connect the next output of the Set header location flow-node to the input
of the Create succeeded flow-node. For additional information on connecting
flow-nodes in a flow, refer to Manage Nodes. The completed flow is displayed.
- Click Save.
- On the next screen, click Proceed. The server will be restarted and the Create a user flow will be saved and enabled.