Queries Overview
To access the Queries Overview screen, select the Queries tab on the Dashboard home screen.
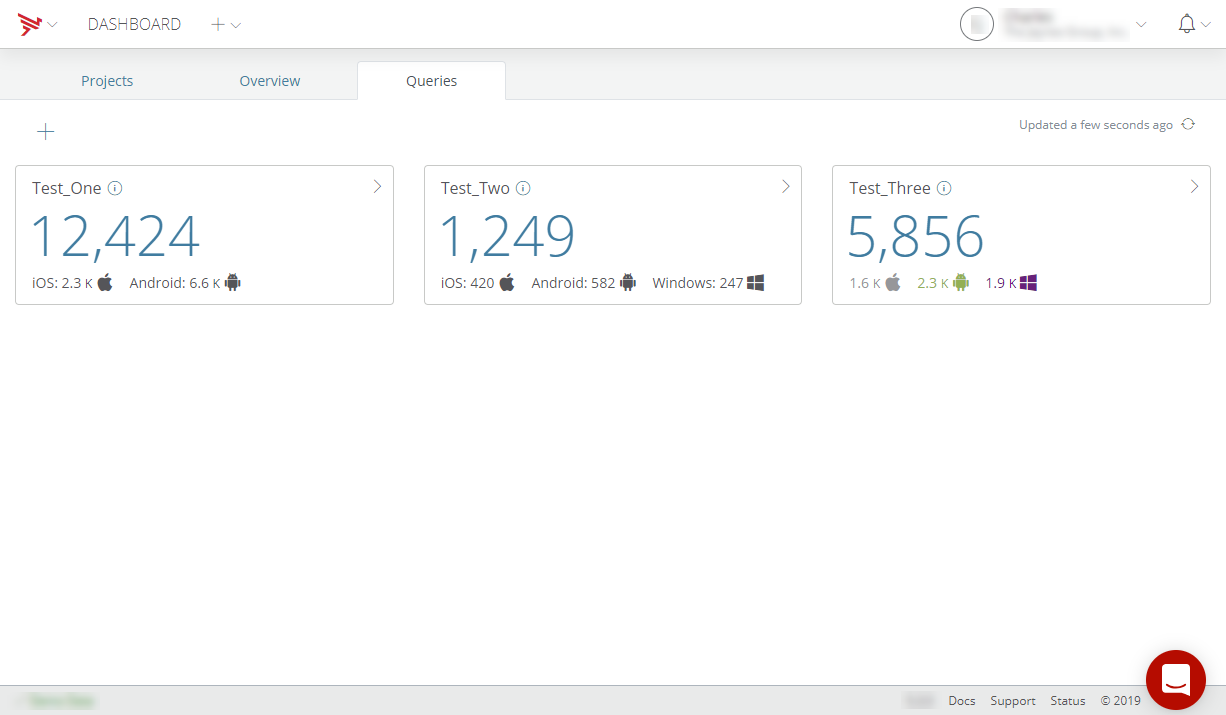
Note that if you have not created any custom queries, selecting the Queries tab will transfer you to the Queries screen. The Queries screen enables creating, previewing, editing, saving, and deleting custom analytics queries. You can also filter custom queries. To access the Queries screen from the Queries Overview screen, click the Plus icon or click on a custom query tile. To navigate from the Queries screen to the Queries Overview screen, select All Queries from Saved Queries drop-down menu.
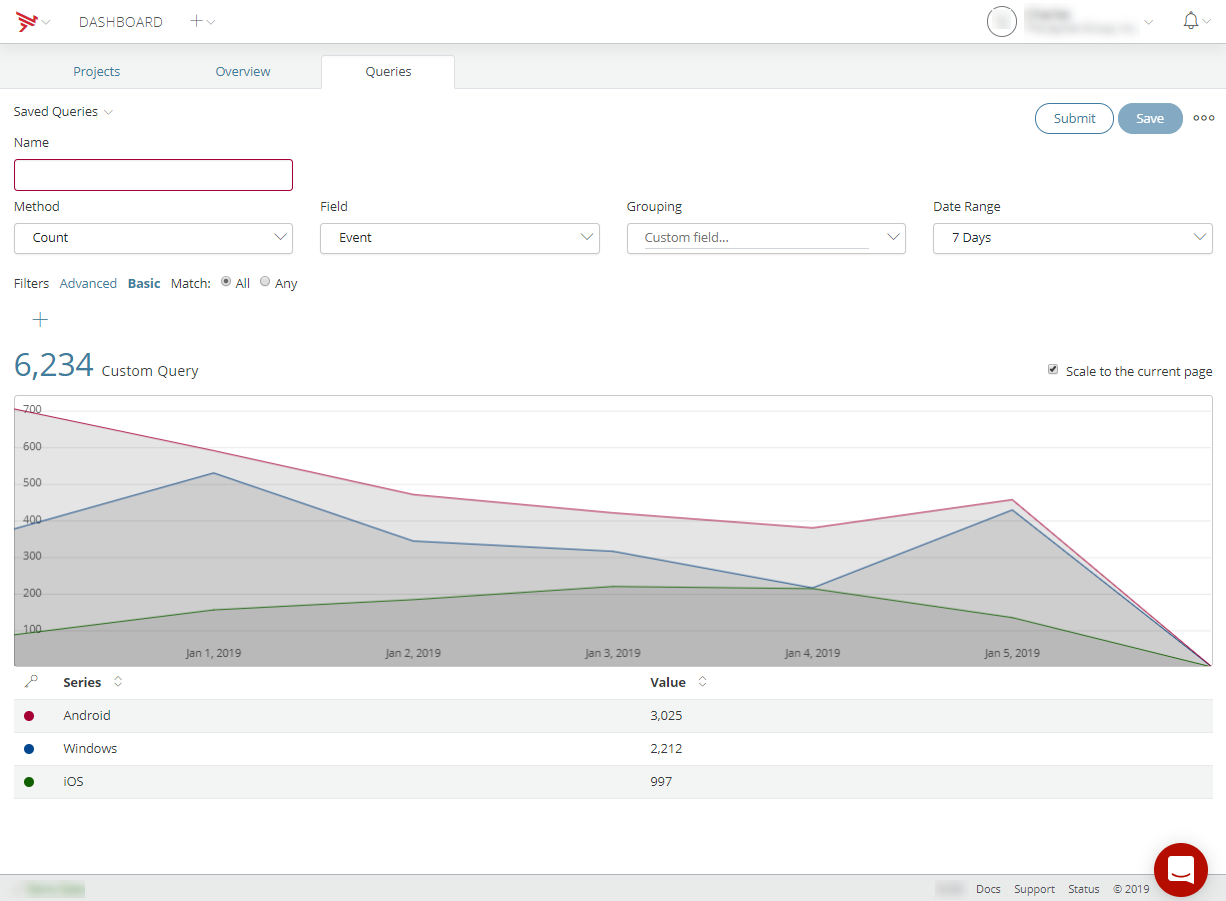
Creating Queries
To create a custom query:
- Enter a query name in the Name field.
- Select a Method. The Method drop-down menu selections are:
- Count
- Cardinality
- Average
- Sum
- Min
- Max
- Select a Field. The Field drop-down menu selections are:
- Custom - If selected, enter the custom field information.
- Event
- Application
- Platform
- Environment
- Country
- Session
- Session Length
- Select a Grouping. The Grouping drop-down menu selections are:
- Custom - If selected, enter the custom grouping information.
- Event
- Application
- Platform
- Environment
- Country
- Session
- Session Length - If selected, enter an Interval. The entered interval specifies the range to use when grouping numeric values.
- Location
- Select a Date Range. The Date Range drop-down menu selections are:
- Custom - If selected, select a custom date range.
- Number of Months
- Number of Days
- Number of Hours
- Number of Minutes
- Custom - If selected, select a custom date range.
- (Optional) Click Submit to preview your custom query. The Custom Query section will be updated to display your custom query analytics preview.
- Click Save to save to save your custom query. Your custom query will be saved, the Saved Queries drop-down menu will be updated to include your saved custom query, the Custom Query section will be updated to display your custom query analytics, and your custom query will be available on the Queries Overview screen.
Previewing Queries
To preview a custom query and not save it, click Submit. The Custom Query section will be updated to display your custom query analytics.
Saving Queries
To save a custom query, click Save. Your custom query will be saved, the Saved Queries drop-down menu will be updated to include your saved custom query, the Custom Query section will be updated to display your custom query analytics, and your custom query will be available on the Queries Overview screen.
Clearing Queries
To clear the custom query selections and fields, click Clear.
Editing Queries
To edit a custom query:
- Select the custom query to edit from the Saved Queries drop-down menu or from the Queries Overview screen.
- Edit the Method, Field, Grouping, and Date Range selections as needed.
- (Optional) Click Submit to preview your custom query changes. The Custom Query section will be updated to display your custom query analytics changes.
- Click Save to save your custom query changes. The Custom Query section will be updated to display your custom query analytics changes.
Deleting Queries
To delete a custom query:
- Select the custom query to delete from the Saved Queries drop-down menu or from the Queries Overview screen.
- Click the Delete icon.
- Enter the name of the query to delete in the Delete Confirmation screen.
- To confirm the query deletion, click I understand that this is a permanent and irreversible action. Continue.
Filtering Queries
You can filter queries using either basic filtering or advanced filtering.
Basic Filtering
To configure basic filtering:
- Select Basic.
- For Match, select either All or Any.
- Click the Plus icon to add a basic filter.
- Select what to filter. The what to filter drop-down menu selections are:
- Custom - If selected, enter the custom field information.
- Event
- Application
- Platform
- Environment
- Country
- Session
- Session Length
- Select a filter operand. The filter operand selections are:
- Equals
- Not
- Starts with
- Ends with
- Greater than
- Greater than or equal to
- Less than
- Less than or equal to
- Complete the operand field.
- (Optional) To add additional filters, click the Plus icon.
Advanced Filtering
To configure advanced filtering:
- Select Advanced.
- Enter a JSON coded filter in the code field. Note that the code field will be highlighted unless valid filter code is entered.
Delete Filters
To delete a basic filter, select the Delete icon associated with the basic filter to delete.