Objective
In this section, you will learn about the Google Play program requirements and the steps you must take to publish an app to Google Play.
Contents
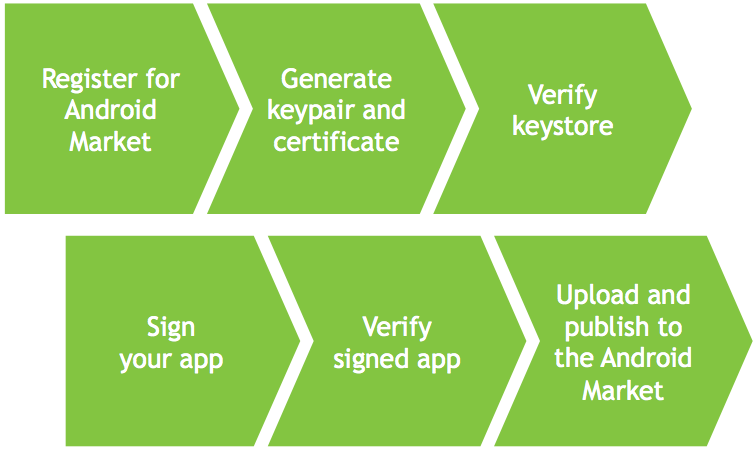
The diagram below illustrates the steps involved in publishing to Google Play. Though, if you look carefully you'll see that two of the steps verify the work you do in other steps. The steps are:
- Register with Google Play
- Generate a keypair and certificate
- Verify your keystore
- Build and sign your app
- Verify your app is signed correctly and ready to be uploaded
- Upload the app and publish it to Google Play
Register with Google Play
To publish apps in Google Play, you will need a Google account. This could be your personal Gmail account or you could register a new account for your company. Then, you must sign up for the Android developer program by visiting play.google.com. Google charges a one-time $25 fee, which in their words, "encourage[s] higher quality products on the market (e.g. less spammy products)."
To sell apps (charge, not give them for free), you'll need to register for a Google Checkout account as well. Visit https://play.google.com/apps/publish, click on Edit profile, and then click "Setup a Merchant Account at Google Checkout." You'll need to supply various bits of business information, including banking and legal details. Setup and approval is relatively quick. Once you're registered, you'll be able to set prices for your app in various currencies and participate in Google's In-App Billing program.
Generate a keypair and certificate
You'll need to digitally sign your app before uploading it to Google Play.
To do this, you'll need to generate a keypair and certificate. You'll do
this once for each app you publish by using the keytool command, which is supplied with the Java SDK. In generic form, the syntax
is:
keytool -genkeypair -v -keystore path/file_name -alias alias_name -keyalg
RSA -sigalg SHA1withRSA -validity 10000 |
There are two bits in that you'll need to supply. The first is the path/file_name which you use to specify the keystore in which your keypair and certificate
will be stored. Each keystore file can store many unrelated certificates.
So typically, you'd put the keystore file in your home (your user) directory
so that it's reasonably secure and backed up with the rest of your data.
The alias_name is the label that identifies which keys you're storing (and which you'll
be retrieving later). Set that something specific to your app.
For example, if you were to execute the keytool command from your home directory for an app named HelloWorld, you might
enter:
keytool -genkeypair -v -keystore android.keystore -alias helloworld -keyalg
RSA -sigalg SHA1withRSA -validity 10000 |
The key algorithm (keyalg) must be RSA for Google Play and the validity period must be 10000 (days)
or longer. That works out to 25 years or so, which is the validity period
that Google Play system requires. They want to make sure you can provide
upgrades to your app for a very long time.
The self-signed certificate algorithm (sigalg) must be SHA-1 (SHA1withRSA) if you are running your application on devices running Android 4.3.x and
prior. Android 4.4 and later supports both SHA-1 (SHA1withRSA) and SHA-256 (SHA256withRSA). If you do not supply the sigalg option, the default value varies with the JDK version you are using. For
JDK 1.6, the default algorithm is SHA-1 (SHA1withRSA), and for JDK 1.7, the default algorithm is SHA-256 (SHA256withRSA).
You will be prompted for your name, company name, and locality information, which is used to build the certificate. You'll also be prompted for a password. Make sure you record or remember that password! You'll need to use this same certificate to sign your code each time you update your app. If you don't have that password, you won't be able to release an update. Check out Google Play sometime. You're sure to find "new" apps that should have been upgrades. In many cases, those are from developers who forgot their keystore passwords and had to release a whole new version. In doing so, their old users never get update notifications and the app probably loses some of its userbase.
Verify your keystore
Because the certificate is so crucial to publishing (and later updating)
your app, we teach "verification" as a separate step. Once you've
generated your keypair and certificate, you should verify your keystore
to ensure that the algorithm is correct, validity period is sufficient,
and that you remember your alias and password correctly. Again, you'll
do so with the keytool command:
keytool -list -v -keystore path/file_name |
You'll be prompted for your password. The command will list each of the aliases contained in the file and its associated certificate information. Make sure that contact info is correct and make sure the certificate is valid for 25 years or more from the date it was created.
Build and sign your app
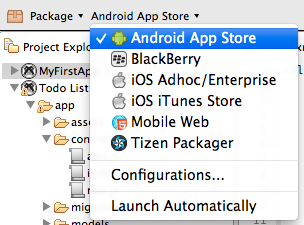
Once you've generated your certificate, you can build and sign your app. To package your application for distribution, first select the project in the Project Explorer view, then in the global tool bar, select Publish from the Launch Mode drop-down list and Android App Store from the Target drop-down list. If the Launch Automatically option is enabled under the Target drop-down list, the application will be automatically launched after the device is selected. If not, you need to click the Launch button to start the build process.
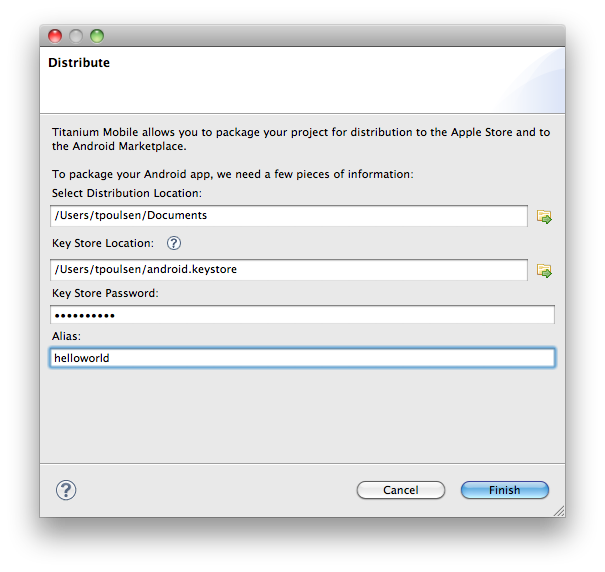
The Distribute wizard appears asking you to fill in key pieces of information:
- Distribution Location: Path where the Android application package (APK) file will be copied to.
- Keystore Location: Path to your keystore file that is used to sign your application. Click the New button to create a new keystore.
- Keystore Password: Password to your keystore.
- Key Alias: Alias associated with your application's certificate.
Click the Publish button once you have entered all of the above information. Studio builds your application and generates an APK file in the specified location.
After you publish an application for the first time, the next subsequent invocation of the Distribute wizard may not ask you for the same exact information and uses your previous settings.
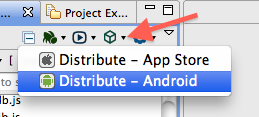
Prior to Studio 3.2.0:
From the menu as shown, choose Distribute - Android to bring up the dialog box shown in the second screenshot. In this dialog, you enter the path to where you want the final APK file stores, the path to your keystore file, the keystore password, and the alias associated with your app's certificate. Click Finish and Studio will build your app and sign it with your certificate (rather than the development certificate used during testing).
Build and sign your app using the CLI
To use the Titanium CLI to package your Android application, after you have created your keystore, run the following command:
appc run -p android -T dist-playstore [-K <KEYSTORE_FILE> -P <KEYSTORE_PASSWORD>
-L <KEYSTORE_ALIAS> -O <OUTPUT_DIRECTORY>] |
If you omit any of the optional parameters, you will be prompted by the CLI to enter these values.
Verify your app is signed correctly and ready to be uploaded
Before uploading, you should verify that the APK file was created and signed correctly. You'll do so with another Android SDK command-line tool. At the command prompt, enter:
jarsigner -verify -verbose path/yourapp.apk |
where path/yourapp.apk is the path and file name associated with your app's APK file. You should
see the "jar verified" message at the end of a long list of APK
file contents. Now you're ready to publish your app.
Upload the app and publish it to Google Play
Visit https://play.google.com/apps/publish and log onto your Google Play account. Click Upload Application to begin the publishing process. Be prepared with the following required assets:
- Minimum of two (2) screenshots of your app
- In one of these sizes: 320 x 480, 480 x 800, or 480 x 854
- 24-bit PNG or JPEG (no alpha)
- Full bleed, no border in art
- You may upload screenshots in landscape orientation. The thumbnails will appear to be rotated, but the actual images and their orientations will be preserved.
- One (1) high resolution app icon – 512 x 512, 32-bit PNG or JPEG
- Title (your app's name)
- Description, 4000 characters max. Make this "SEO friendly" as it will help drive downloads of your app.
- Promo text, 80 characters max. This is the brief summary that appears in some listings pages. Be as SEO friendly as you can in the space permitted.
- Application Type and Category, which you'll choose from Google Plays's predefined lists.
- Content Rating – you'll choose from High, Medium, Low, and Everyone. This rating helps filter inappropriate apps from those who don't want to see such content.
- Contact information – you'll need to provide some way for customers to reach you. This information will be shown to potential buyers.
You should read, and then you'll have to check the boxes indicating you agree to the Google Play's terms and conditions. There are many additional assets you could provide, such as videos and larger promotional graphics. You can set a price and currency options for your app if you've set up a Google Checkout account.
Capturing screenshots with DDMS
As noted above, you'll need at least two screenshots to publish your app. You can grab those with DDMS. With your Android device connected or emulator running, open ddms and select your device in the top-left pane. Choose Device, Screen Capture. Save two representative screenshots to your desktop or home directory. Close ddms. Disconnect your device following your operating system’s procedure for safely removing USB devices.
References
- Google Play Developer Program Policies
- Google Play for Developers: Graphic Assets for your Application
- Google Play
Summary
In this section, you learned how to publish your Android app. You learned how to generate the keypair and certificate required to sign your app. You saw how to build and sign your distribution-ready APK file. And finally, you examined Google Play requirements and learned how you'd upload and publish your app.