Introduction
To distribute an application on the Windows Store (for x86-based applications) and Windows Phone Store (for ARM-based applications), you need to:
- Create an application in the Windows Dev Center.
- Update information in your
tiapp.xmlfile based on the IDs and fields from the Windows Dev Center. - Generate APPX file(s) of your Titanium projects.
- Start an application submission and upload your APPX file(s) with the submission.
Create an Application
To submit an application to the Windows Store or Windows Phone Store, you need to create an application project in the Windows Dev Center.
If you have not created an application yet:
- Log into https://dev.windows.com.
- Click Dashboard in the top-right corner.
- Click Create a new app in the left navigation.
- Enter a name for your application and click Reserve app name.
The Windows Dev Center will create a new application in your dashboard.
The process will generate IDs and other fields that will need to
be updated in the tiapp.xml file.
Update the tiapp.xml File
Titanium uses the settings in the tiapp.xml file to package your project. Some of these settings must match
the settings generated by the Windows Dev Center. Specifically, the
<name/>, <id/>, <publisher/> and the ti.windows.publishername app property elements.
- Open the project's
tiapp.xmlfile. - Locate the <name> element. The node text of the element must match the name of the application in the Windows Dev Center.
- Locate the
<publisher>element. The node text of the element must match the Publisher display name of your Microsoft Developer account. - Locate the
<property name="ti.windows.publishername">element. If you do not have the element in yourtiapp.xmlfile, add it. The node text for the element must match the Windows publisher ID of your Microsoft Developer account (or the Package/Identity/Publisher of the application). - Add the
<id>element to the<windows>element. The node text of the element must match thePackage/Identity/Nameof the application, which was generated when you created the application in the Windows Dev Center Dashboard.
To retrieve your Windows publisher ID and Publisher display name:
- Log into https://dev.windows.com.
- Click Dashboard in the top-right corner.
- Click Account settings in the left navigation.
The publisher ID will be under the Account details section as the Windows publisher ID field, and the publisher display name will be under the Contact info section as the Publisher display name field.
To retrieve the Package/Identity/Name and Package/Identity/Publisher fields:
- Log into https://dev.windows.com.
- Click Dashboard in the top-right corner.
- Click the application project in the left navigation.
- Expand App management and click App identity.
<ti:app> <name>FooApp</name> <!-- Prior to Release 5.1.0, set the Package/Identity/Name of the application
to the top-level id element --> <!-- <id>12345FooInc.FooApp</id> --> <publisher>FooInc</publisher> <property name="ti.windows.publishername">CN=11111111-2222-3333-4444-555555555555</property> <windows> <!-- Since Release 5.1.0, set the Package/Identity/Name of the application
to the windows id element --> <id>12345FooInc.FooApp</id> </windows></ti:app> |
Package for Windows Phone Store
Before creating an APPX file for the Windows Phone Store, you need to set your publisher ID in either the CLI or Studio.
Set the Publisher ID
Package for Windows Phone Store with Studio
To package with Studio:
- Select the project in the Project Explorer view.
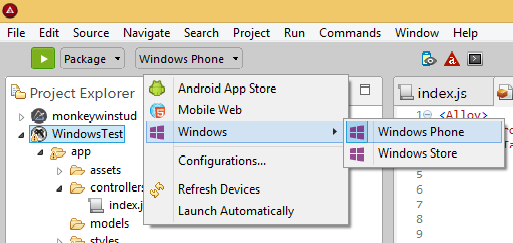
- In the global tool bar, select Package from the Launch Mode drop-down list.
- Select Windows > Windows Phone from the Target drop-down list.
- If the Launch Automatically option is enabled under the Target drop-down list, the application will be automatically launched after the device is selected. If not, you need to click the Launch button to start the build process.
Studio will prompt you to enter a location to copy the generated APPX file to.
Package for Windows Phone Store with the CLI
To package an APPX file for the Windows Phone Store, run:
appc run -p windows -T dist-phonestore -O <OUTPUT_DIRECTORY> |
Package for Windows Store
Before creating an APPX file for Windows Store, you need to create a signing certificate in PFX format. The CLI will prompt you to create one if you do not specify one in the command options. Studio will prompt you to either create or select a PFX file.
Package for Windows Store with Studio
To package with Studio:
- Select the project in the Project Explorer view.
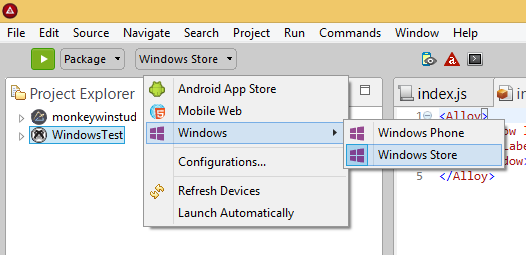
- In the global tool bar, select Package from the Launch Mode drop-down list.
- Select Windows > Windows Store from the Target drop-down list.
- If the Launch Automatically option is enabled under the Target drop-down list, the build process will automatically start. If not, you need to click the Launch button to start the build process.
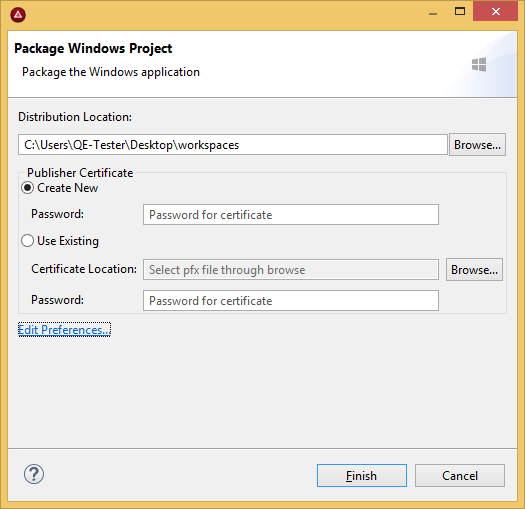
Studio will prompt you to enter a location to copy the generated APPX file to and to either create or specify a PFX file for signing the package.
To create a new certificate, select Create New and enter a password for the certificate. During the certificate creation process, the Certificate Import wizard will be launched. You will be prompted to enter the same password in subsequent dialogs. Click OK or Next when prompted.
To specify a certificate to use, select Use Existing, enter the location of the certificate and enter the password used to create the certificate.
Package for Windows Store with the CLI
If you need to generate a certificate, run the following CLI command:
C:\Users\JoeUser\Documents\Appcelerator_Studio_Workspace\WindowsApp>
                              appc run -p windows -T dist-winstore -O dist
Appcelerator Command-Line Interface, version 4.1.0Copyright (c) 2014-2015, Appcelerator, Inc. All Rights Reserved.Where is the pfx file used to sign the app? (leave blank to generate):What is (or will be) your PFX password?: **** |
The CLI will launch the Windows certificate tools in the background and prompt you to create a password for the certificate.
You will be prompted to enter the same password in subsequent dialogs and to generate some files. Click OK or Next when prompted. The CLI will generate three files in the project directory:
generated.cer: public certificategenerated.pfx:PFX file for signing the packagegenerated.pkv: private key
After the certificate is generated, the CLI will automatically create and sign the APPX file.
To package an APPX file for the Windows Store after you have generated the certificate, run:
appc run -p windows -T dist-winstore -R <PFX_CERTIFICATE_FILE> -P
<PFX_PASSWORD> -O <OUTPUT_DIRECTORY> |
Submit an Application
Once you have created your APPX file(s), start the application submission process.
In the Windows Dev Center Dashboard:
- Click your application.
- Click Submission in the left navigation.
- Click Start your Submission.
Complete the following fields in each category, then click Submit to the Store to start the certification process.
For more information about the submission and certification process, see Windows Dev Center: App submissions.
Pricing and availability
The only required field is to select the price of your application.
You may optionally select or change the default values for which countries your application are available in, the application visibility in the store and when the application can be available in the store.
App properties
You are required to select a category and subcategory.
You may optionally select or change the defaults for the age range, game ratings, hardware requirements and app declaration.
Packages
Upload your APPX file(s). The APPX file(s) will be validated. If
you receive any validation errors, you may need to update the settings
in your tiapp.xml file.
For Windows Store app, you have the option of setting minimum system requirements
Description
You are required to enter a description and upload one screenshot of your application. All other fields are optional.
The following table describes the image assets you may upload with your application. Only the screenshots are required for application submission.
|
Type
|
Dimensions (pixels)
|
File Type
|
File Size
|
Notes
|
|---|---|---|---|---|
| Desktop screenshot |
|
PNG | < 2MB | May submit up to 9 |
| Mobile screenshot |
|
PNG | < 2 MB | May submit up to 8 |
| App tile icon |
300 x 300 | PNG | For Windows Phone and earlier | |
| Promotional artwork |
|
Used to showcase your application in the store. May submit only one image per file size. It is highly recommended to submit a 2400 x 1200 image, which the Microsoft team will resize and crop for promotional layouts. |
Notes for certification
This category is optional.