Introduction
Enterprise app stores are private app stores where access to applications is controlled by the company. Employees must be authenticated to download and install internally developed applications. Appcelerator Studio allows you to package Android and iOS applications and upload them to a Mobile Application Management platform that can be published to an enterprise app store. You can publish your application to AirWatch's or MobileIron's platform.
AirWatch Platform
Before publishing to AirWatch, you need install the AirWatch plugin on Appcelerator Studio. After the plugin is installed, start the publishing process from the right-click context menu. You need to create an AirWatch publish target. A publish target consists of a host URL, username, password and API key associated with an alias. You can create one during the Target step of the Publish to AirWatch wizard.
You also need the following items to package an application:
- For Android applications, generate a keypair and certificate to sign your applications. For help, see Distributing Android apps: Generate keypair and certificate.
- For iOS applications, create a distribution certificate and provisioning profile to sign your application. For help, see Distributing iOS apps.
Install the AirWatch Plugin
Appcelerator Studio requires AirWatch integration to be installed as a separate plugin. To install the plugin:
- Launch Appcelerator Studio.
- From the menu bar, select Help > Install New Software... The Install wizard appears.
- Click Add. A dialog appears asking for the name and location of the update site.
- For Name, enter 'AirWatch' or something similar.
- For Location, copy and paste one of the the following URLs:
- Release Candidate Build: http://preview.appcelerator.com/appcelerator/studio/airwatch/update/rc/
- Click OK.
- An item called AirWatch Integration should appear. Select to install it, that is, make sure the box is checked, then click Finish.
- Follow the rest of the wizard directions to install it. When prompted, restart Studio.
Obtain the Host URL and API Key
In order to publish to AirWatch, you need to obtain a REST API key and endpoint. Retrieve both pieces of information from the AirWatch Web Console.
- Login to the AirWatch Web Console.
- In the left navigation bar, click Groups & Settings and select All Settings to open the Settings dialog.
- Under the System section, click Advanced, then select API > REST.
- Make sure Enable API Access is checked if it is not already enabled. Copy the API Key field. You need to paste the value to the API Key field when registering an AirWatch target.
- Click Site URLs in the left navigation bar under the System section.
- Copy the host name of the REST URL field (without the protocol and any
paths). You need to paste the value to the Host URL field when registering
an AirWatch target. By default, the hostname is
apidev-as.awmdm.com.
Publish to AirWatch
To publish an application to AirWatch:
- In the Project Explorer view, right-click the project to package.
- Select Publish > AirWatch > Publish.... to open the Publish to AirWatch wizard.
- In the Target step:
- Select the platform to deploy to, either Android or iOS.
- Select a Publish Target. If you have not created a publish target, click Register Existing... to open the Register AirWatch target dialog to enter your AirWatch information. Click OK when you are finished.

- Click Next.
- In the Configuration step, enter a name, version number and description for your application, then
click Next. Some of these fields will be auto-populated by existing information from
the
tiapp.xmlfile. - In the Platform step:
- For Android applications, enter the following information:
- Android SDK Version: Select the version of the tools to build your application.
- Distribution Location: Path where the Android application package (APK) file will be copied to.
- Keystore Location: Path to your keystore file that is used to sign your application. Click the New button to create a new keystore.
- Keystore Password: Password to your keystore.
- Keypair password: Password for the keystore private key.
- Key Alias: Alias associated with your application's certificate.
- For iOS applications, select the Distribution Certificate, Keychain, Provision Profile and SDK Version to use.
- Click Next.
- For Android applications, enter the following information:
- In the Summary step, review the information you entered. To restart the wizard after you start the publishing process, check Restart.
- Click Publish.
After Appcelerator Studio finishes uploading your application, Studio opens the AirWatch Web Console in your default browser. Use the web console to manage the distribution of your application, then users can use the AirWatch application to download it.
MobileIron Platform
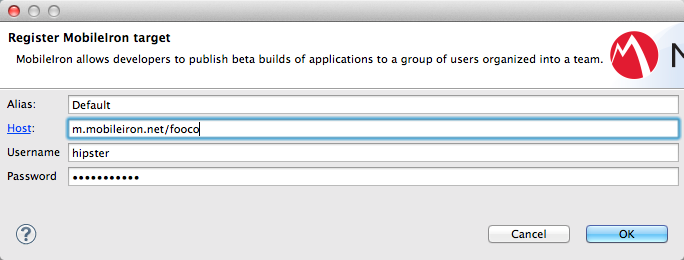
Before publishing to MobileIron, you need install the MobileIron plugin on Appcelerator Studio. After the plugin is installed, start the publishing process from the right-click context menu. You need to create an MobileIron publish target. A publish target consists of a host URL, username and password with an alias. You can create one during the Target step of the Publish to MobileIron wizard.
You also need the following items to package an application:
- For Android applications, generate a keypair and certificate to sign your applications. For help, see Distributing Android apps: Generate keypair and certificate.
- For iOS applications, create a distribution certificate and provisioning profile to sign your application. For help, see Distributing iOS apps.
Install the MobileIron Plugin
Appcelerator Studio requires MobileIron integration to be installed as a separate plugin. To install the plugin:
- Launch Appcelerator Studio.
- From the menu bar, select Help > Install New Software... The Install wizard appears.
- Click Add. A dialog appears asking for the name and location of the update site.
- For Name, enter 'MobileIron' or something similar.
- For Location, copy and paste one of the the following URLs:
- Release Candidate Build: http://preview.appcelerator.com/appcelerator/studio/mobileiron/update/rc/
- Click OK.
- An item called MobileIron Integration should appear. Select to install it, that is, make sure the box is checkmarked, then click Finish.
- Follow the rest of the wizard directions to install it. When prompted, restart Studio.
Publish to MobileIron
To publish an application to MobileIron's Enterprise App Storefront:
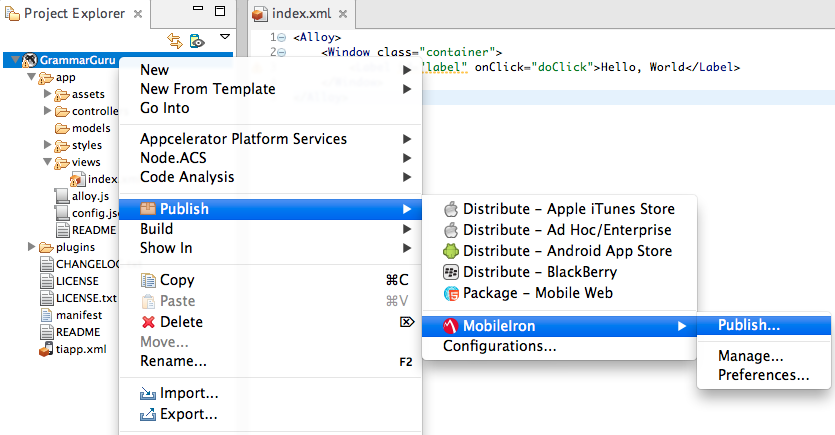
- In the Project Explorer view, right-click the project to package.
- Select Publish > MobileIron > Publish.... to open the Publish to Mobile Iron wizard.
- In the Target step:
- Select the platform to deploy to, either Android or iOS.
- Select a Publish Target. If you have not created a publish target, click
Register Existing... to open the Register MobileIron target dialog to enter your MobileIron information. Click OK when you are finished.
- Click Next.
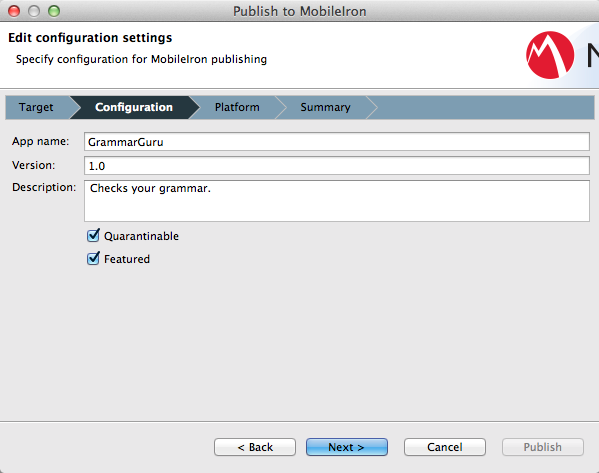
- In the Configuration step:
- Enter a name, version number and description for your application. Some
of these fields will be auto-populated by existing information from the
tiapp.xmlfile. - To remove the application if a policy is broken or a device is signed out in multi-user mode, check Quarantinable.
- To highlight the app in the featured list, check Featured.
- Click Next.
- Enter a name, version number and description for your application. Some
of these fields will be auto-populated by existing information from the
- In the Platform step:
- For Android applications, enter the following information:
- Android SDK Version: Select the version of the tools to build your application.
- Distribution Location: Path where the Android application package (APK) file will be copied to.
- Keystore Location: Path to your keystore file that is used to sign your application. Click the New button to create a new keystore.
- Keystore Password: Password to your keystore.
- Keypair password: Password for the keystore private key.
- Key Alias: Alias associated with your application's certificate.
- For iOS applications, select the Distribution Certificate, Keychain, Provision Profile and SDK Version to use.
- Click Next.
- For Android applications, enter the following information:
- In the Summary step, review the information you entered. To restart the wizard after you start the publishing process, check Restart.
- Click Publish.
After Appcelerator Studio finishes uploading your application, Studio opens the MobileIron Admin portal in your default browser. Use the portal to manage the distribution of your application, then users can use the MobileIron application to download it.