Chapters
Aptana Studio 3 is shipped with a built-in support for Git source control.
Getting Started with Git
It may be helpful to review tutorials on getting started with Git outside the IDE as a general primer on how it works and how to get it installed.
- http://help.github.com/ - Github's help docs, which are a great starting place.
- http://cworth.org/hgbook-git/tour/
Installation
For Mac OS X, you can install via macports as the 'git-core' package, or just grab the binaries at http://code.google.com/p/git-osx-installer/downloads/list?can=3.
Windows
We pre-package Portable Git with Studio 3 for Windows. We recommend that you use the pre-packaged Portable Git, as we've ensured it works properly with our git support and also works with our embedded Terminal view/editor. If you have installed Rails using Rails Installer, it also installs a version of PortableGit that you can use instead.
Re-Installing Portable Git
If you happen to have skipped the git installation to begin with, and now need to install it after the fact:
- Open up the file WORKSPACE_DIR\.metadata\.plugins\org.eclipse.core.runtime\.settings\com.aptana.git.ui (it may be something like: C:\Users\username\Documents\Aptana Studio 3 Workspace\.metadata\.plugins\org.eclipse.core.runtime\.settings)
- Delete the line "ignore_no_git=true"
- Restart Studio
Importing an existing Git repository
To clone (or "import") a git repository, select File > Import... or right-click in the Project or App Explorer and Choose Import... Then select the Git > Git Repository as New Project entry. This will present a very basic dialog asking you to enter the Git source URI and the destination. The source URI is the same you'd pass in the command line as the first argument to 'git clone'.
Importing and forking a Github repository
To fork and clone a Github project, select File > Import... or right-click in the Project or App Explorer and Choose Import... Then select the Git > Fork Github repository entry.
Creating a new Git repo for an existing project
Project Explorer
Inside the Project Explorer, Git actions live under the right-click "Team" menu.
- Click Team > Share Project...
- Select location and click Create
App Explorer
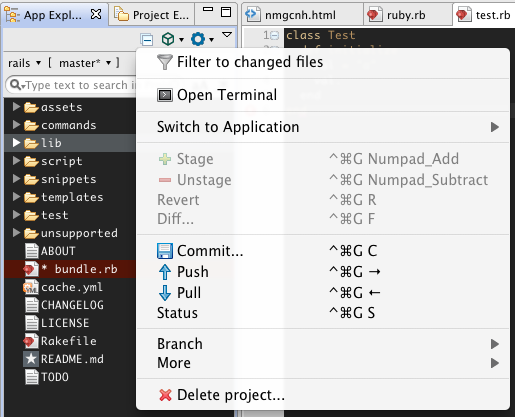
Inside the App Explorer, the git actions generally live under the gear toolbar menu. Click the arrow to the right of the gear menu and choose Initialize Git Repository. This will run 'git init .' inside the project and then attach our git support to the project.
Git Actions
Studio provides a number of elements in the user interface to ease working with Git
Staging/Unstaging files
Staging changes will cue up the changes for commit. Unstaging removes the change from this list and won't be committed.
Reverting files
Reverting will discard any unstaged changed to a file.
Committing
When committing, a dialog will apear that allows you to easily stage/unstage files and enter a commit message.
In the context of the commit dialog, Ctrl+Enter (or Cmd+Enter on Mac) will invoke the "commit" action. If there are still unstaged files left, committing will not close the dialog.
Push/Pull
These specific actions will run and open a console view to show output, whereas most other commands will run silently. Files mentioned (by a non-truncated path) in pull output will have hyperlinks added which will open the mentioned file in the IDE.
Branch-related actions
If you're running a branch-related git command that requires you to choose a branch (i.e. merge, switch, delete), a menu will appear next to your mouse cursor allowing you to select the branch, or use the 1-9 keyboard shortcut to choose the corresponding branch.
Tag actions
In the Create Tag dialog, the "commit to tag" field allows users to input any valid ref to tag. Typically a user would want to tag HEAD, which is the default. However, this field also has a pulldown to select commits from the history. It also supports Ctrl+Space (Cmd+Space on Mac) to invoke content assist to search commits based on the prefix. This allows you to enter a word or words in the subject line of a past commit (the first line of the commit message), hit Ctrl+Space and get suggested any commits where that string exists.
Git UI modifications
Our Git support will make git-specific modifications to the UI for related projects and files. In particular, unstaged files will typically be shown with a red background color in Project and App Explorer; staged will show with a green BG. Files with any uncommitted changes will show with a * (asterisk) "dirty" indicator, and folders will show the dirty indicator when any file inside it's hierarchy is dirty. Projects will show the current branch inside square brackets to the right of the project name inside the Project Explorer. The branch name will be followed by a + or - and number if there are committed changes to be pushed or pulled from a corresponding remote.
To control the colors used for staged/unstaged files, please see Themes#TokenNames
Preferences
Preferences for the git support can be found under Preferences > Team > Git. This allows you to explicitly override the detected git executable location, as well as turn off auto-attaching our git support to new/imported projects with git repos attached (typically disabled if users prefer to use egit). You can also turn off our calculation of pull indicators in the App Explorer for branches if there are performance issues, or you use a passphrase for your SSH key and keep getting prompted.
Keyboard shortcuts
All git commands share a common keybinding prefix. On Mac that is Control+Command+G, on other systems it's Shift+Alt+G. Entering this command keybinding will pop up a tooltip to allow you to choose the specific action you want and will show the extra key in it's binding (i.e. Control+Command+G,R is Revert).
App Explorer-specific functionality
We've made the App Explorer tie into our Git support to make it even easier to deal with a single project attached to git. Specifically, the view contains a branch drop-down menu after the project selector. This branch menu will list all of the local branches available, and will mark branches containing changes using the * (asterisk) "dirty" indicator. We also show left/right arrows as indicators if there are changes to push or pull to remotes.
Additionally, all the git operations are found under the gear toolbar menu
- as well as in the right-click context menu under Team.