Introduction
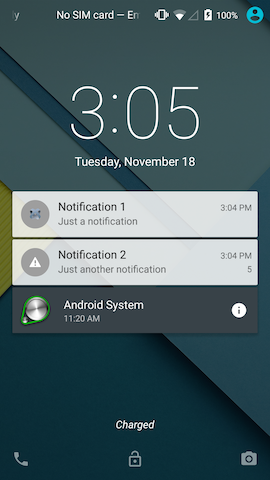
Local notifications alert the user that something is happening to your application while it is in the background. On Android, notifications appear in the notification drawer until the user clears them and on the lock screen for devices running Android 5.0 or greater. The application can also play a sound or vibrate to alert the user there is a new notification, customize the notification layout from the basic title, text and icon layout; and use the devices default alert settings or override them. Note that the user can filter or turn notifications on and off from Settings.
|
Lock Screen (Android 5.0 and greater) |
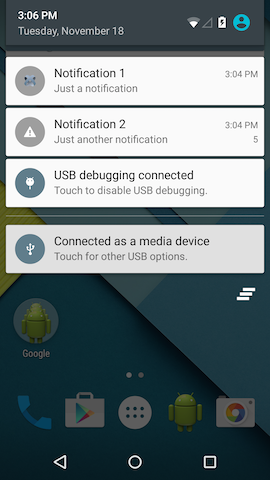
Notification Drawer |
Configure notification settings
Starting with Android 4.1, the user can turn notifications on and off per application, and on devices running Android 5.0 (API 21) and greater, decide how to filter notifications based on the visibility setting of the notification set by the application.
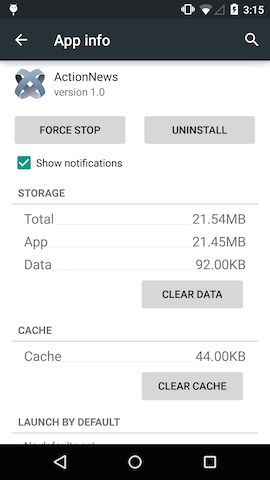
For devices running Android 4.1 or greater, to turn notifications on or off:
- Open Settings
- Under the Device group, tap Apps.
- Tap the application you want to configure notifications for.
- Check or uncheck the Show notifications checkbox to turn notifications on or off, respectively.
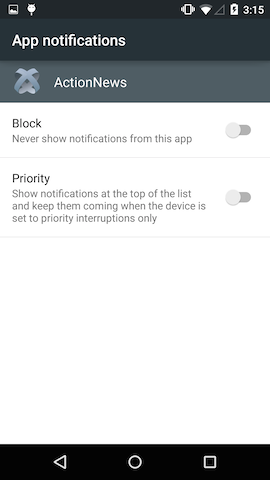
Additional Android 5.0 and greater options
For devices running Android 5.0 or greater, you can also control notifications from the Sound & notification screen and control the visibility of notifications in the lock screen.
To turn notifications on or off, or to display application notifications when the device is set to priority interruptions only:
- Open Settings
- Under the Device group, tap Apps.
- Tap App notifications.
- Tap the application you want to configure notifications for.
- Tap Block to turn notifications on or off.
- Tap Priority to display notifications when the device is set to priority interruptions only.
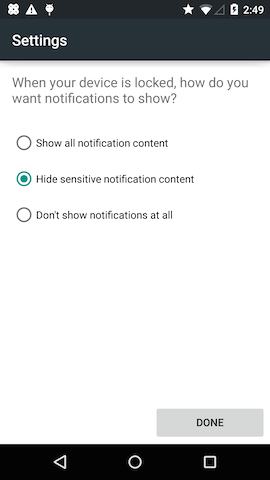
To control the visibility of notifications in the lock screen, the user must set a pattern, PIN or password, then the user will be presented the option to filter notifications:
- Open Settings
- Under the Personal group, tap Security.
- Tap Screen lock.
- Choose either Pattern, PIN, or Password.
- After you enter a pattern, pin or password, the user can filter notifications
in the lock screen:
- Select Show all notification content to always display notifications in the lock screen.
- Select Hide sensitive notification content to let the application control which notifications to display based
on the
visibilityproperty. - Select Don't show notifications at all to no display any notification in the lock screen.
- Tap Done.
Create a notification
To create a notification, use the Titanium.Android.createNotification() method. Pass the method a dictionary of properties, which are described
below.
Basic layout
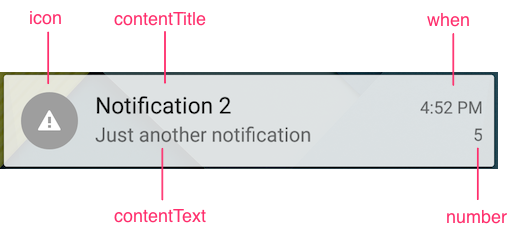
By default, a notification contains an icon, title, message, and an optional timestamp and badge number.
Specify the following properties to modify the basic layout of the notification:
contentIntent: Intent to execute if the user taps the notification. By default without an intent attached to the notification, if the user taps on a notification, it does nothing and stays in the notification drawer. See the Respond to a Notification section for further details.contentText: message displayed in the notification.contentTitle: Title of the notification.icon: Image file to display in the notification. Place the image file in either:
- a density-specific folder (or use
res-nodpifor all densities) in/app/assets/android/imagesfor Alloy project or/Resources/android/images/for Classic projects, then reference the image file using only the/imagespath, for example,/images/filename.png. - the
/platform/android/res/drawable/folder and reference the image file by removing its extension and prefixing it with theTi.App.Android.R.drawablenamespace, for example,Ti.App.Android.R.drawable.filename.
- a density-specific folder (or use
number: Badge number to display in the notification.when: Timestamp to display in the notification. Does NOT schedule the notification.
For example, the code below creates the notification pictured above. A
blank intent is attached to the notification, so when the user taps the
notification, it will be removed from the drawer. Note that by default,
the notification's flags property (see description in the Other customizations section) is set to Titanium.Android.FLAG_AUTO_CANCEL, which automatically clears a notification when the intent is executed.
|
1
2
3
4
5
6
7
8
9
10
11
|
var notification = Titanium.Android.createNotification({ contentTitle: 'Notification 2', contentText : 'Just another notification', // Blank intent that will remove the notification when the user taps it // Do not override the default value of the 'flags' property contentIntent: Ti.Android.createPendingIntent({intent: Ti.Android.createIntent({})}), // Image file located at /platform/android/res/drawable/warn.png icon: Ti.App.Android.R.drawable.warn, number: 5, when: new Date()}); |
Sound
To play a sound when the notification first appears, assign the Notification object's sound property a sound file to play. Place the file in the /platform/android/res/raw/ folder. Reference the file by using the Ti.Filesystem.getResRawDirectory() method to retrieve the location of the file, then append the filename
to the end, for example, Ti.Filesystem.getResRawDirectory() + 'sound.wav'.
By default, the sound plays each time the application calls the notify() method. To override this behavior, add the Titanium.Android.FLAG_ONLY_ALERT_ONCE constant to the Notification object's flags property.
|
1
2
3
4
5
6
7
8
9
10
|
var notification = Titanium.Android.createNotification({ contentTitle: 'Notification 2', contentText : 'Just another notification', contentIntent: Ti.Android.createPendingIntent({intent: Ti.Android.createIntent({})}), icon: Ti.App.Android.R.drawable.warn, number: 5, when: new Date().getTime(), // Sound file located at /platform/android/res/raw/sound.wav sound: Ti.Filesystem.getResRawDirectory() + 'sound.wav',}); |
Custom layout
To use a custom layout for a notification:
- Create an Android XML Layout and save it to
/platform/android/res/layout/. - Create a
Titanium.Android.RemoteViewsobject using the XML layout. Reference the layout file by removing the file extension and prefixing it with theTitanium.App.Android.R.layoutnamespace. Once theRemoteViewsobject is created, you can modify its layout or bind intents by calling otherRemoteViewsmethods on the object. - Assign the
RemoteViewsobject to theNotificationobject'scontentViewproperty.
Example
To create the following notification that displays a message with two buttons:

-
Create an XML layout that uses a
LinearLayoutto display aTextViewand twoButtonwidgets:/platform/android/res/layout/customview.xml12345678910111213141516171819<?xmlversion="1.0"encoding="utf-8"?>android:layout_width="match_parent"android:layout_height="match_parent"android:orientation="horizontal"><TextViewandroid:id="@+id/message"android:layout_width="wrap_content"android:layout_height="wrap_content"android:textSize="18dp"android:text="Default text"/><Buttonandroid:id="@+id/okbutton"android:layout_width="wrap_content"android:layout_height="wrap_content"android:text="OK"/><Buttonandroid:id="@+id/cancelbutton"android:layout_width="wrap_content"android:layout_height="wrap_content"android:text="Cancel"/></LinearLayout> -
In the application, create a
RemoteViewsobject using the XML layout as a reference, then modify theRemoteViewsby changing the default text and bindingPendingIntentsto the buttons:/Resources/app.js123456789101112131415var customView = Ti.Android.createRemoteViews({layoutId: Ti.App.Android.R.layout.customview});// Blank intents (example) that will remove the notification when the user taps one of themvar downloadIntent = Ti.Android.createPendingIntent({intent: Ti.Android.createIntent()});var cancelIntent = Ti.Android.createPendingIntent({intent: Ti.Android.createIntent()});// Reference elements in the layout by prefixing the IDs with 'Ti.App.Android.R.id'customView.setTextViewText(Ti.App.Android.R.id.message, "Update available!");customView.setTextViewText(Ti.App.Android.R.id.okbutton, "Download");customView.setOnClickPendingIntent(Ti.App.Android.R.id.okbutton, downloadIntent);customView.setTextViewText(Ti.App.Android.R.id.cancelbutton, "Not now");customView.setOnClickPendingIntent(Ti.App.Android.R.id.cancelbutton, cancelIntent); -
Finally, assign the
RemoteViewsobject to theNotificationobject'scontentViewproperty./Resources/app.jsvarnotification = Titanium.Android.createNotification({contentView: customView});
Other customizations
defaults: Set to one of the following constants or bitwise-OR the values together to use the device's default notification settings:
-
Titanium.Android.DEFAULT_ALL: Use all of the device's default settings. -
Titanium.Android.DEFAULT_SOUND: Use the device's default notification sound. -
Titanium.Android.DEFAULT_VIBRATE: Use the device's default vibrate setting. -
Titanium.Android.DEFAULT_LIGHTS: Use the device's default LED setting.
-
deleteIntent: Intent to execute if the user taps the clear all notifications button in the notification drawer.flags: Additional flags to set on the notification to modify its behavior. Set to one of the following constants or bitwise -OR the constants together:-
Titanium.Android.FLAG_AUTO_CANCEL: Clear the notification if the user taps it. Requires that thecontentIntentproperty to be set or else the notification will not be cleared. -
Titanium.Android.FLAG_INSISTENT: Repeat the sound until the notification is canceled or removed from the notification drawer. -
Titanium.Android.FLAG_NO_CLEAR: Do not remove the notification from the notification drawer if the user taps the remove all notification button. -
Titanium.Android.FLAG_ONGOING_EVENT: Indicates if the notification is in reference to an ongoing event. -
Titanium.Android.FLAG_ONLY_ALERT_ONCE: If the notification is present in the notification drawer, do no replay the sound, vibrate or flash the LED again. -
Titanium.Android.FLAG_SHOW_LIGHTS: Set if you want to use the LED with the notification. Need to also set the notification's LED properties. Note that most devices will not allow you to control the LED.
-
priority: set to one of the following constants to determine where the notification is displayed in the drawer. Requires Titanium SDK 4.0.0 and greater and only works on devices running Android 4.1 and greater.
-
Titanium.Android.PRIORITY_MAX: Use for urgent or time-critical notifications, for example, turn-by-turn directions or emergency alerts. Notifications will appear at the very top of the notification drawer. -
Titanium.Android.PRIORITY_HIGH: Use for high priority notifications like real-time chat messages. -
Titanium.Android.PRIORITY_DEFAULT: Default priority if it does no fit into another priority category. -
Titanium.Android.PRIORITY_LOW: Use for low priority notifications like software updates. -
Titanium.Android.PRIORITY_MIN: Use for expired events. Note that the user will not be alerted to the notification (sound, vibration, etc.) and a notification icon will not appear in the status bar, but the notification will appear in the drawer.
-
tickerText: Text to display in the status bar when the notification first appears. This features does not work on devices running Android 5.0 (API 21) and later.
Android 5.0 and greater customizations
The following properties are available for devices running Android 5.0 and greater and requires Titanium SDK 4.0.0 and greater:
category: Set to one of the following constants if the notification falls into one of the pre-defined notification categories. Android uses the category to determine where and how it should be displayed.
-
Titanium.Android.CATEGORY_ALARM -
Titanium.Android.CATEGORY_CALL -
Titanium.Android.CATEGORY_EMAIL -
Titanium.Android.CATEGORY_ERROR -
Titanium.Android.CATEGORY_EVENT -
Titanium.Android.CATEGORY_MESSAGE -
Titanium.Android.CATEGORY_PROGRESS -
Titanium.Android.CATEGORY_PROMO -
Titanium.Android.CATEGORY_RECOMMENDATION -
Titanium.Android.CATEGORY_SERVICE -
Titanium.Android.CATEGORY_SOCIAL -
Titanium.Android.CATEGORY_STATUS -
Titanium.Android.CATEGORY_TRANSPORT
-
visibility: Set to one of the following constants to filter notifications in the lock screen:
-
Titanium.Android.VISIBILITY_PUBLIC: All information is displayed in the lock screen. -
Titanium.Android.VISIBILITY_PRIVATE: Only the application name and icon appear in the lock screen with the message: "Contents hidden". -
Titanium.Android.VISIBILITY_SECRET: The notification is not displayed in the lock screen.
-
Send a notification
To send a notification, use the Titanium.Android.NotificationManager.notify() method. Pass the method a numeric ID as the first argument
to identify it if it needs to be removed and the notification object as
the second argument. This method sends the notification immediately.
Ti.Android.NotificationManager.notify(1, notification);// Pass '1' to the Titanium.Android.NotificationManager.cancel method if
you need to clear the notification programmatically |
Update a notification
To update a notification that is currently being displayed, use the Notification object's setLatestEventInfo() method. Pass the method an updated or the existing title,
message and intent. You need to pass the method all three parameters.
// Update the title and message but keep the existing intentnotification.setLatestEventInfo('Wake me up', 'Before you go go', notification.contentIntent); |
Remove a notification
If the application needs to remove a notification it sent from the notification drawer, it can either selectively choose which notification(s) to remove or remove all previously sent notifications.
To remove all notifications, call the Titanium.Android.NotificationManager.cancelAll() method.
To remove a specific notification, call the Titanium.Android.NotificationManager.cancel() method and pass it the ID that was assigned to it by the Titanium.Android.NotificationManager.notify() call.
// Remove all notifications sent by the applicationTitanium.Android.NotificationManager.cancelAll();// Remove a specific notification sent by the applicationTitanium.Android.NotificationManager.cancel(1); |
Respond to a notification
By default, when a user taps a notification, it does nothing. In
order to perform an action when the user taps the notification, assign
a Titanium.Android.PendingIntent object to the Notification's contentIntent property. For more information about Intents, see Android Intents.
For example, if you want to launch the application when the user taps the
notification, the application needs to create an intent that launches the
main activity of your application. To create an Intent, use the Titanium.Android.createIntent() method and pass the method a dictionary with the following properties:
action: Assign it aTitanium.Android.ACTION_*constant which specifies the action to execute. For this example, assign itTi.Android.ACTION_MAINto launch the main activity.className: Name of the main activity of the application prefixed with project's application ID (orpackageName). The name of the main activity is the name of the application/project with only the first letter capitalized andActivityappended to the end of it. For example, if the name of the project isMyAppand the application ID iscom.appcelerator.testapp, the class name will becom.appcelerator.testapp.MyappActivity. You can also find the name of the main activity in thebuild/android/AndroidManifest.xmlfile after you build your application.packageName: Project's application ID located in thetiapp.xmlfile.
After creating an Intent, modify its flags by bitwise-OR-ing the Ti.Android.FLAG_ACTIVITY_SINGLE_TOP and Ti.Android.FLAG_ACTIVITY_RESET_TASK_IF_NEEDED constants. These constants tell the intent not to launch the application
if it is already open and resets the activity to its initial state if needed,
respectively.
Use the intent's addCategory() method to add the Ti.Android.CATEGORY_LAUNCHER category to indicate that the activity is listed in the application launcher.
Pass the intent to the Titanium.Android. createPendingIntent() method to create a PendingIntent, which can be assigned to the Notification's contentIntent property.
|
1
2
3
4
5
6
7
8
9
|
var intent = Ti.Android.createIntent({ action: Ti.Android.ACTION_MAIN, className: 'com.appcelerator.testapp.MyappActivity', packageName: 'com.appcelerator.testapp'});intent.flags |= Ti.Android.FLAG_ACTIVITY_RESET_TASK_IF_NEEDED | Ti.Android.FLAG_ACTIVITY_SINGLE_TOP;intent.addCategory(Ti.Android.CATEGORY_LAUNCHER); notification.contentIntent = Ti.Android.createPendingIntent({intent: intent}); |
Schedule a notification
To schedule a notification in the future, the application can create an Android service using a JavaScript context. The service runs in the background at a regular intervals. The service will need to wait for the appropriate time to create and send the notification allowing the notification to be sent while the application is in the background. For more information about Android Services, see Android Services.
To create a service that sends a notification at a specific time:
-
In a separate JavaScript file, code the creation of the notification. After the notification is sent, be sure to stop the service since it will no longer be needed and to stop it from sending the same notification again.
Resources/ExampleService.js123456789101112131415161718// Retrieves a reference to the service and its intentvarservice = Ti.Android.currentService,serviceIntent = service.getIntent(),// Information passed in from the intenttimestamp =newDate(serviceIntent.getStringExtra('timestamp'));// Wait for right moment to create and send the notificationif(newDate() > timestamp) {// Create a notificationvarnotification = Ti.Android.createNotification({...});// Send the notificationTi.Android.NotificationManager.notify(1, notification);// Stop the service once the notification is sentTi.Android.stopService(serviceIntent);} -
Add the
<services>tag to the<android>section of thetiapp.xmland add a<service>tag as a child of the<services>tag. In the<service>tag, assign thetypeattribute tointervalto indicate the service runs at regular intervals and theurlattribute to the JavaScript file the application needs to run as a service.tiapp.xml12345678<ti:app><!-- the services tag must be added so that our service will run --><services><serviceurl="ExampleService.js"type="interval"/></services></android></ti:app> -
In the main application, create an intent by assigning the JavaScript file to the Intent's
urlproperty and start the service by passing the intent to theTitanium.Android.startService()method. The application needs to set the interval for the service by using the Intent object'sputExtra()method. You can also use this method to pass in data to the service. Pass the method the property name as the first argument and a value as the second argument. To set the service interval, set the property name tointervaland the value to how often to call the service in milliseconds.Resources/app.js12345678910111213// Create an intent using the JavaScript service filevarintent = Ti.Android.createServiceIntent({url :'ExampleService.js'});// Set the interval to run the service; set to five seconds in this exampleintent.putExtra('interval', 5000);// Send extra data to the service; send the notification 30 seconds from now in this exampleintent.putExtra('timestamp',newDate(newDate().getTime() + 30 * 1000));// Start the serviceTi.Android.startService(intent);
Example
In the following example, the main application passes the message and title of the notification to the service as well as when to send it. The service waits until the right moment to create and send the notification, then stops itself. Note that the service can only send one notification. The application can launch more service instances but all of them will be stopped when the first notification is sent.
|
1
2
3
4
5
6
7
8
9
10
11
12
13
14
15
16
17
18
|
var win = Ti.UI.createWindow();var btn = Ti.UI.createButton({ title : 'Add Notification'});btn.addEventListener('click', function(e) { var intent = Ti.Android.createServiceIntent({ url : 'ExampleService.js' }); intent.putExtra('title' , 'Richard III'); intent.putExtra('message' , 'Now is the winter of our discontent...'); intent.putExtra('timestamp', new Date(new Date().getTime() + 30 * 1000)); intent.putExtra('interval', 5000); Ti.Android.startService(intent);});win.add(btn);win.open(); |
|
1
2
3
4
5
6
7
8
9
10
11
12
13
14
15
16
17
18
19
20
21
22
23
24
25
26
27
28
29
30
31
|
var service = Ti.Android.currentService;var serviceIntent = service.getIntent();var timestamp = new Date(serviceIntent.getStringExtra('timestamp'));if (new Date() > timestamp) { // Grab extra data sent with the intent var title = serviceIntent.getStringExtra('title'); var message = serviceIntent.getStringExtra('message'); // Create an intent that launches the application var intent = Ti.Android.createIntent({ action : Ti.Android.ACTION_MAIN, className: 'com.appcelerator.testapp.MyappActivity', packageName: 'com.appcelerator.testapp' }); intent.flags |= Ti.Android.FLAG_ACTIVITY_RESET_TASK_IF_NEEDED | Ti.Android.FLAG_ACTIVITY_SINGLE_TOP; intent.addCategory(Ti.Android.CATEGORY_LAUNCHER); // Create notification var notification = Ti.Android.createNotification({ contentIntent : Ti.Android.createPendingIntent({intent : intent}), contentTitle : title, contentText : message, }); // Send the notification Ti.Android.NotificationManager.notify(1, notification); // Stop the service once the notification is sent Ti.Android.stopService(serviceIntent);} |
|
1
2
3
4
5
6
7
8
|
<ti:app> <!-- the services tag must be added so that our service will run --> <services> <service url="ExampleService.js" type="interval" /> </services> </android></ti:app> |