Objective
In this chapter, you'll learn how to use Titanium's Map API to visually represent location data via maps, routes, and annotations. In addition you'll learn best practices with respect to using the API. The context of location is one of the most powerful features of mobile apps, and soon you'll be equipped to visualize that data using native UI components through Titanium.
Content
- Displaying a MapView
- Handling MapView events
- Annotations
- Routes
- Android Maps API Key for Distribution
Displaying a MapView
The MapView is the core UI component of the Ti.Map module. It allows Titanium to make use of a mobile device's underlying
native maps to view geographic data and add annotations and routes. As
it is a native UI component, users will also have access to features like
scrolling and multi-touch zoom. In its most basic form, the MapView can simply display a basic map given a geographic position via latitude
and longitude.
|
1
2
3
4
5
6
7
8
9
10
11
12
13
14
15
16
17
18
19
20
21
22
23
24
25
26
27
28
29
|
const Map = require('ti.map');const win = Ti.UI.createWindow();const mapview = Map.createView({ mapType: Map.NORMAL_TYPE, region: {latitude:37.389569, longitude:-122.050212, latitudeDelta:0.1, longitudeDelta:0.1}, animate:true, regionFit:true, userLocation:false});mapview.addEventListener('complete', function(e) { Ti.API.info('complete'); Ti.API.info(e);});mapview.addEventListener('error', function(e) { Ti.API.info('error'); Ti.API.info(e);});mapview.addEventListener('loading', function(e) { Ti.API.info('loading'); Ti.API.info(e);});mapview.addEventListener('regionChanged', function(e) { Ti.API.info('regionChanged'); Ti.API.info(e);}); win.add(mapview);win.open(); |

As seen above, those few lines of code generate native maps on both iOS
and Android, respectively. Now that we have a basic map, let's discuss
some of the properties of the Ti.Map.MapView in order to see how it can be manipulated.
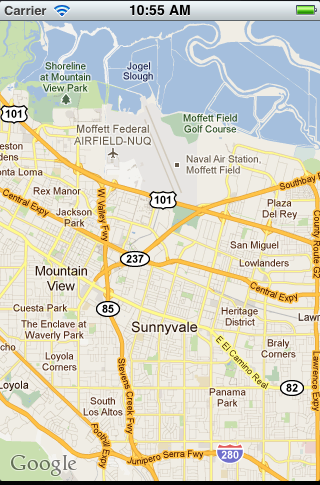
mapType- Indicates what type of map should be displayed. Below we see theTi.Map.NORMAL_TYPE,Ti.Map.SATELLITE_TYPE, andTi.Map.HYBRID_TYPErespectively.
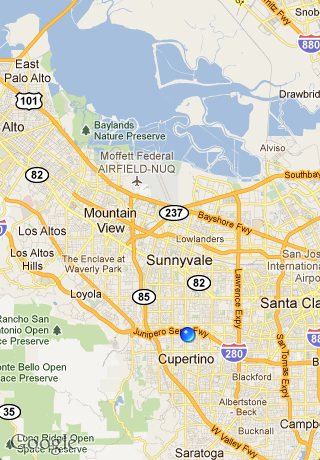

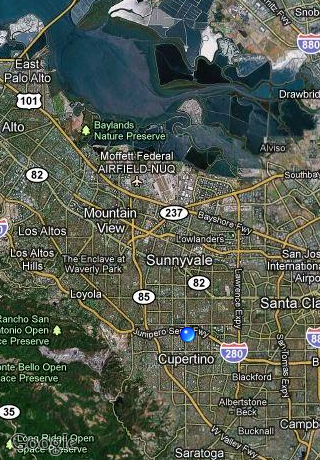
region- This is an object that contains the 4 properties defining the visible area of theMapView. Below we can see how the same latitude and longitude of aregioncan be represented with a different level of zoom via thelatitudeDeltaandlongitudeDeltaproperties.
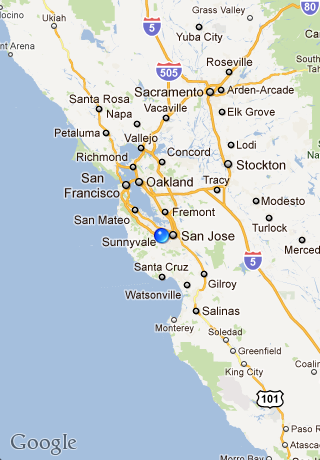
latitude- The latitude of your map's target regionlongitude- The longitude of your map's target regionlatitudeDelta- The measure of latitude north and south from your target region's latitude that will be visible in theMapView. The smaller the delta value, the closer the zoom on your map.longitudeDelta- The measure of longitude east and west from your target region's longitude that will be visible in theMapView
animate- A boolean that indicates whether or not map actions, like opening and adding annotations, should be animatedregionFit- A boolean that indicates if the map should attempt to fit theMapViewinto the region in the visible viewuserLocation- A boolean that indicates if the map should show the user's current device location as a pin on the map
There are 2 more components that add a significant amount of functionality
to your mapViews. They are annotations and routes. They allow us to add places of interest to our maps as well as plot paths
between them. We'll address each in the following sections. But let's first
discuss how we can handle events on our basic MapView.
Handling MapView Events
In addition to the typical touch interaction events that all views have,
MapViews have a couple more that give you more refined control. In many cases,
we want to know exactly how a user's interaction with our initial map has
changed its appearance. Also, having events that let us know when the map
is loading and completed allow us to make our location based apps more
responsive.
Here's the 3 events specific to MapView that give you that additional control, and one additional event for handling
mapping errors:
- complete - This event is fired when the
MapViewhas completed querying and rendering - loading - This event is fired when the
MapViewhas started querying for new data, as well as rendering the new map. This is typically the result of the user changing the visible region of the map. -
regionChanged - The event is fired when the visible region of our
MapViewhas changed. This can occur from programmatic changes, or from user interaction with the map. The new region data is returned in the following structure:12345678{latitude: 37.389569latitudeDelta: 0.1longitude: -122.050212,longitudeDelta: 1source: "[object TiMapView]",type: 'regionChanged'} - error - This event let's us know when ever there is an error encountered by the underlying native maps. Often times these errors are not critical, but need to be handled in order to preserve a quality user experience.
As mentioned, the most common way to trigger the above events is through
user interaction via scrolling and zooming. Let's change the MapView example code to handle all of the aforementioned events.
|
1
2
3
4
5
6
7
8
9
10
11
12
13
14
15
16
17
18
19
20
21
22
23
24
25
26
27
28
29
|
const Map = require('ti.map');const win = Ti.UI.createWindow();const mapview = Titanium.Map.createView({ mapType: Titanium.Map.NORMAL_TYPE, region: {latitude:37.389569, longitude:-122.050212, latitudeDelta:0.1, longitudeDelta:0.1}, animate:true, regionFit:true, userLocation:false});mapview.addEventListener('complete', function(e) { Ti.API.info('complete'); Ti.API.info(e);});mapview.addEventListener('error', function(e) { Ti.API.info('error'); Ti.API.info(e);});mapview.addEventListener('loading', function(e) { Ti.API.info('loading'); Ti.API.info(e);});mapview.addEventListener('regionChanged', function(e) { Ti.API.info('regionChanged'); Ti.API.info(e);});win.add(mapview);win.open(); |
Now we'll run the example again, this time zooming the map out after it renders.
And here is the event console output from this interaction.
|
1
2
3
4
5
6
7
8
9
10
11
12
13
14
15
16
17
18
19
|
[INFO] loading[INFO] { source = "[object TiMapView]"; type = loading;}[INFO] complete[INFO] { source = "[object TiMapView]"; type = complete;}[INFO] regionChanged[INFO] { latitude = "37.35867258291223"; latitudeDelta = "1.883241287989044"; longitude = "-122.049009169728"; longitudeDelta = "1.648237229196269"; source = "[object TiMapView]"; type = regionChanged;} |
Notice the order of events. loading is first, signifying that new map data needs to be queried. complete follows, letting us know that the preceding map query has completed. Finally,
we get the regionChanged event which gives us the new coordinates and deltas for the visible map
region. This is the typical flow for all map interactions.
So now that we can display a basic MapView and handle user interactions with it, let's take a look at how we can
use annotations and routes to further extend the MapView functionality.
Annotations
Annotations, created with the Ti.Map.createAnnotation() function, allow us to mark places of interest on our MapViews with "pins", images, and text. They can be added when a MapView is created via the annotations array property, or anytime afterwards with the Ti.Map.MapView.addAnnotation() function. Users can even interact with them to learn more about annotated
locations.
Adding an annotation to a MapView is simple. Let's modify the basic MapView example to see how we can add the Appcelerator headquarters, and a few
other locations, as annotations. To make things more interesting, we'll
use a number of the styling properties available to annotations through
the Titanium API.
|
1
2
3
4
5
6
7
8
9
10
11
12
13
14
15
16
17
18
19
20
21
22
23
24
25
26
27
28
29
30
31
32
33
34
35
36
37
38
39
40
41
42
43
44
45
46
47
48
49
50
51
52
53
54
55
|
const Map = require('ti.map');const win = Ti.UI.createWindow();const annotations = [ Map.createAnnotation({ latitude: 37.389569, longitude: -122.050212, title: 'Appcelerator HQ', subtitle: 'Mountain View, CA', animate: true, pincolor: Map.ANNOTATION_GREEN, leftButton: 'appcelerator.gif' }), Map.createAnnotation({ latitude: 37.331689, longitude: -122.030731, title: 'Apple HQ', subtitle: 'Cupertino, CA', animate: true, pincolor: Map.ANNOTATION_RED, rightButton: 'apple.png' }), Map.createAnnotation({ latitude: 37.422502, longitude: -122.0855498, title: 'Google HQ', subtitle: 'Mountain View, CA', animate: true, image: 'google.png', leftView: Ti.UI.createButton({ title: 'leftView', height: 32, width: 70 }), rightView: Ti.UI.createLabel({ text: 'rightView', color: '#fff' }) })];const mapview = Map.createView({ mapType: Map.NORMAL_TYPE, region: { latitude:37.389569, longitude:-122.050212, latitudeDelta:.05, longitudeDelta:.05 }, animate:true, regionFit:true, userLocation:false, annotations: annotations});win.add(mapview);win.open(); |
We just created an array full of annotations, then passed that array to
the MapView for use when it was created. Even if we had only one annotation, we still
need to pass it to the MapView as an entry in an array. With the array of annotations constructed, we
are ready to display them in a MapView. Here's what it looks like on Android and iPhone, respectively.
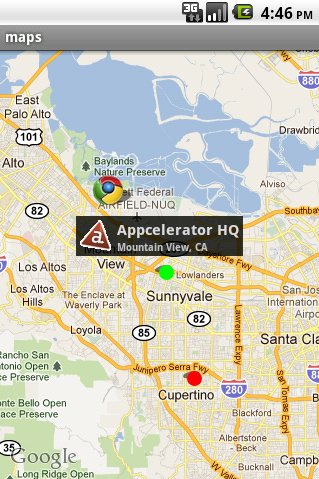
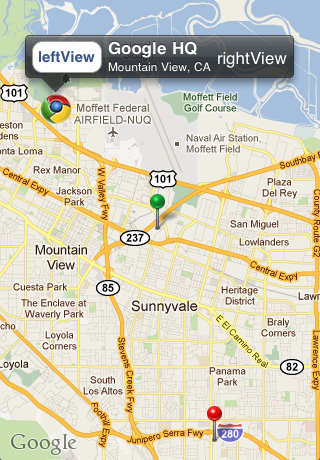
As we can see, there's many Annotation properties available for styling and interaction. We can add text, animations,
colors, and even more UI components through use of these properties. Let's
take a look at each of the properties used in this example.
animate- A boolean variable that indicates whether or not the annotation should be animated when it is added to theMapViewimage- The URL to an image to be used in place of the default pin imageleftButton- A button that will appear on the left side of your annotation when clicked. This property must have a value equal to the URL of an image, or to aTi.UI.iPhone.SystemButtonStyleconstant.leftView- A Titanium View object that will appear on the left side of your annotation when clicked. This property can be a single view like aTi.UI.ButtonorTi.UI.Label, or it can be a hierarchy of views.pincolor- The color of the default pin representing an annotation. It can have the following values:Ti.Map.ANNOTATION_GREENTi.Map.ANNOTATION_PURPLETi.Map.ANNOTATION_RED
rightButton- A button that will appear on the right side of your annotation when clicked. This property must have a value equal to the URL of an image, or to aTi.UI.iPhone.SystemButtonStyleconstant.rightView- A Titanium View object that will appear on the right side of your annotation when clicked. This property can be a single view like aTi.UI.ButtonorTi.UI.Label, or it can be a hierarchy of views.subtitle- The subtitle text that appears on your annotation when clickedtitle- The main title text that appears on your annotation when clicked
So now you know how to create a MapView, handle changes in its region, and add locations of interest via Annotations. There's one more bit of functionality: routes. In the next section we'll discuss routes, a feature that allows us to create paths between locations on a MapView.
Routes
Routes allow us to draw paths between locations on a MapView. These paths can be driving directions, bike paths, or any other reason
you have to connect point A to point B.
Routes are added to MapViews via the Ti.Map.MapView.addRoute() function. To use the addRoute() function, we pass it a properly structured route object that will then be represented on the MapView. The route object should take the following form:
|
1
2
3
4
5
6
7
8
9
|
{ name: 'route name', color: '#f00', width: 4, points: [ {latitude:50, longitude:50}, ... ]} |
While the name, color, and width fields are self-explanatory, the points array could use some additional detail. points holds the array of latitude and longitude coordinates that represent each
point in our route. As geometry dictates, you must have at least 2 points to draw a line,
or route in this case. Limitations on the number of points you can use
in a route are platform specific and are not governed by the Titanium API.
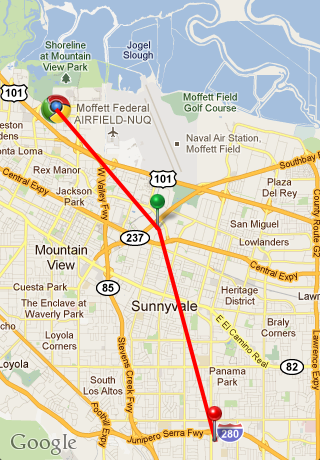
So let's go back to our MapView example one more time and add a route to it. We'll create a route that
connects the 3 locations we've already annotated. The route will go from
north to south, connecting each location with a red, 4 pixel wide line.
|
1
2
3
4
5
6
7
8
9
10
11
12
13
14
15
16
17
18
19
20
21
22
23
24
25
26
27
28
29
30
31
32
33
34
35
36
37
38
39
40
41
42
43
44
45
46
47
48
49
50
51
52
53
54
55
56
57
58
59
60
61
62
63
64
65
66
|
const Map = require('ti.map');const win = Ti.UI.createWindow();const annotations = [ Map.createAnnotation({ latitude: 37.389569, longitude: -122.050212, title: 'Appcelerator HQ', subtitle: 'Mountain View, CA', animate: true, pincolor: Map.ANNOTATION_GREEN, leftButton: 'appcelerator.gif' }), Map.createAnnotation({ latitude: 37.331689, longitude: -122.030731, title: 'Apple HQ', subtitle: 'Cupertino, CA', animate: true, pincolor: Map.ANNOTATION_RED, rightButton: 'apple.png' }), Map.createAnnotation({ latitude: 37.422502, longitude: -122.0855498, title: 'Google HQ', subtitle: 'Mountain View, CA', animate: true, image: 'google.png', leftView: Ti.UI.createButton({ title: 'leftView', height: 32, width: 70 }), rightView: Ti.UI.createLabel({ text: 'rightView', color: '#fff' }) })];const mapview = Map.createView({ mapType: Map.NORMAL_TYPE, region: { latitude:37.389569, longitude:-122.050212, latitudeDelta:.05, longitudeDelta:.05 }, animate:true, regionFit:true, userLocation:false, annotations: annotations});var route = Map.createRoute({ name: 'myroute', width: 4, color: '#f00', points: [ {latitude:37.422502, longitude:-122.0855498}, {latitude:37.389569, longitude:-122.050212}, {latitude:37.331689, longitude:-122.030731} ]});mapview.addRoute(route);win.add(mapview);win.open(); |
After we add the route to the existing MapView, we get the following map on iPhone.
Google Maps API Key for Android
Google requires a different Map API key for each certificate that signs an Android application. While Titanium automatically provides you with this key during development, you'll need your own when you build for distribution. API Keys can be obtained without a fee from Google. For a more in depth overview, read the Google Maps External Library overview.
In order to receive an API key that corresponds to your apps' certificate, you'll need to follow these steps:
1. Obtain the MD5 hash of your app's certificate from the keystore
Google uses the MD5 fingerprint of the certificate that signs your mobile application to generate a Maps API Key. This API Key is needed by Titanium when constructing the MapView. When your mobile application is run on the emulator or on a device, the underlying Maps implementation verifies that the API key used to pull map data matches the certificate which signed your application.
In order to get the MD5 hash of your distribution certificate, we run the
Java SDK keystore tool keytool from command line with the following parameters, explained below:
keytool -list -keystore YOUR_KEYSTORE -alias ALIAS -storepass STOREPASS |
YOUR_KEYSTORE- The full path to your app's keystore file. For more details on how a keystore is generated, please reference the Distributing Android apps chapter of this book, as well as the Android app signing documentation.ALIAS- The alias you assigned to your keystore when you created itSTOREPASS- The password you assigned to secure your keystore when you created it
Upon successful execution of this command you should receive an output
similar to the one below. The MD5 hash required is the Certificate fingerprint (MD5) field, which has been highlighted. Copy and/or save the value found in
this field.

2. Sign up for an Android Maps API Key
Once you have the MD5 fingerprint, log in with your Google (Gmail) account and visit the Android Maps API Key Signup form.
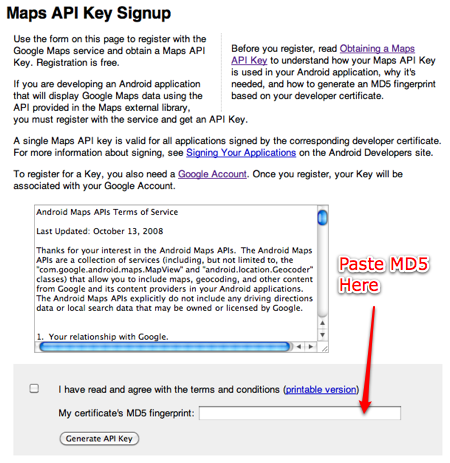
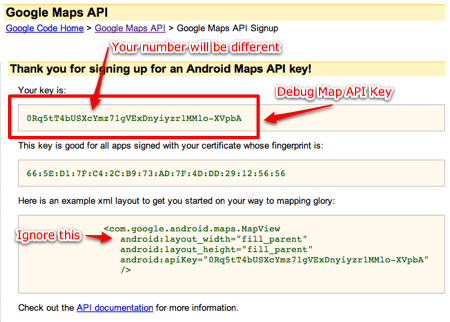
Paste in your fingerprint and agree to the terms. Press Generate API Key. You should see a result similar to the image below.
3. Put your API Key in tiapp.xml in the property ti.android.google.map.api.key
Once you have received your API key, you need only include it in your project's
tiapp.xml file to use it. To do so, we add an application property to the existing
file under the main <ti:app> element. The property will look like this:
<property name="ti.android.google.map.api.key">YOUR_ANDROID_MAPS_API_KEY</property> |
So if you were to include this in a basic tiapp.xml file, it would look something like this:
|
1
2
3
4
5
6
7
8
9
10
11
12
13
14
15
16
17
18
19
20
21
22
23
24
25
26
27
28
29
30
31
32
33
34
35
36
37
38
39
40
41
|
<?xml version="1.0" encoding="UTF-8"?> <deployment-targets> <target device="mobileweb">false</target> <target device="iphone">false</target> <target device="ipad">false</target> <target device="android">true</target> </deployment-targets> <id>com.maps</id> <name>maps</name> <version>1.0</version> <publisher>tlukasavage</publisher> <description>not specified</description> <copyright>2011 by tlukasavage</copyright> <icon>appicon.png</icon> <persistent-wifi>false</persistent-wifi> <prerendered-icon>false</prerendered-icon> <statusbar-style>default</statusbar-style> <statusbar-hidden>false</statusbar-hidden> <fullscreen>false</fullscreen> <navbar-hidden>false</navbar-hidden> <analytics>true</analytics> <guid>YOUR_GUID</guid> <iphone> <orientations device="iphone"> <orientation>Ti.UI.PORTRAIT</orientation> </orientations> <orientations device="ipad"> <orientation>Ti.UI.PORTRAIT</orientation> <orientation>Ti.UI.UPSIDE_PORTRAIT</orientation> <orientation>Ti.UI.LANDSCAPE_LEFT</orientation> <orientation>Ti.UI.LANDSCAPE_RIGHT</orientation> </orientations> </iphone> <modules/> <!-- Here's where we add the API key --> <property name="ti.android.google.map.api.key">YOUR_ANDROID_MAPS_API_KEY</property></ti:app> |
You are now ready to use the Google map views in your distributable Titanium app.
Summary
In this chapter we learned how to use the Ti.Map module to create, display, annotate, and navigate through maps. We used
Ti.Map.MapView to represent native maps in our mobile app. In addition we used Ti.Map.Annotations to mark places of interest on our maps, adding more detailed data to our
location based interactions. Finally, we learned how we can use routes to connect points of interest to our maps.