- Prerequisites
- Pull Request Process
- 1. Review and sign the Contributors License Agreement (CLA).
- 2. Find or create a JIRA ticket / GitHub issue to associate with your pull request.
- 3. Fork the Titanium SDK Repository on GitHub.
- 4. Clone, setup remotes, and branch.
- 5. Make your changes to the development branch.
- 6. Compile and test the modified titanium_mobile project.
- 7. Add or modify the API docs (if necessary)
- 8. Rebase your development branch with master (optional)
- 9. Submit pull request in GitHub.
- Frequently Asked Questions
So you want to make a contribution to the Titanium SDK? Got a bug you want to fix, or a feature you want to add? This is the guide that will help you do so. It'll walk you through all the necessary steps for creating a successful pull request against the titanium_mobile github repository.
Aside from functioning in an educational capacity, this guide also serves to make the process of integrating your pull requests a more uniform task for our platform engineers. Observing the steps in this guide for each pull request will:
- Make pull requests that are easier to integrate
- Define the expectations on those submitting pull requests
- Give you an opportunity to expedite the acceptance of your own pull requests. Complete, high quality pull requests will receive priority.
Prerequisites
- Familiarity with the open source Apache 2.0 license, the license that governs the Titanium Mobile SDK.
- A working knowledge of Git and Github
- A github.com account
You must also have all of the software required to build the Titanium SDK from source. For details, see Building the Titanium SDK From Source.
There are a number of GUI interfaces for git. This guide provides instructions for using git from the command line, but these can easily be adapted to other tools.
Pull Request Process
#1. Review and sign the Contributors License Agreement (CLA).
#2. Find or create a Jira ticket to associate with your pull request.
#3. Fork the Titanium SDK Repository on Github.
#4. Clone, setup remotes, and branch.
#5. Make your changes to the development branch.
#6. Compile and test the modified titanium_mobile project.
#7. Add or modify the API docs (if necessary).
#8. Rebase your development branch with the master (optional).
#9. Submit pull request in Github.
1. Review and sign the Contributors License Agreement (CLA).
To contribute to any of Appcelerator's open source projects, such as Titanium or Alloy, you must sign a standard Open Source Contributors License Agreement (CLA). As with most open source projects, legal issues regarding intellectual property rights require us to protect ourselves, our contributors and our users from any future ownership claims from third-parties.
The CLA is a simple form you can sign electronically by visiting the following URL:
You must first electronically sign the before you can contribute code, documentation or any other materials to the project. You are only required to do this once.
2. Find or create a JIRA ticket / GitHub issue to associate with your pull request.
All pull requests that get integrated into the Titanium SDK have an associated Jira ticket. To make sure that your pull request gets accepted, you also need to have an associated ticket. Community members cannot submit tickets directly to the Titanium Mobile (TIMOB) Jira project, so you have 3 options:
- Find an existing Titanium Mobile (TIMOB) ticket with which to associate your ticket. You can search the TIMOB project for an existing feature request or bug with the following link: Titanium Mobile (TIMOB) Jira project
- Find or create a new ticket in the Titanium Community (TC) Jira project. Community members have the ability to create new tickets here, unlike the TIMOB project. If you want to add a feature or fix a bug that has not yet been logged in either Jira project, you can do so at the following link: Titanium Community (TC) Jira project
- File a new GitHub issue on the main repository (appcelerator/titanium_mobile) by filling out the template with the feature, bugfix or improvement you want to contribute. Our team links GitHub issues with Jira, so it can be tracked by the internal engineering team
Once you have created/found the Jira ticket or GitHub issue that you would like to address with your pull request, remember it. The ticket number will be used to identify your development branch in a later step. In addition, code for testing your pull request should be included in the Jira ticket.
For comprehensive instructions on everything associated with submitting Jira tickets, see How to Report a Bug or Make a Feature Request.
3. Fork the Titanium SDK Repository on GitHub.
To be able to submit changes to the Titanium Mobile SDK, you first need
your own forked copy of the titanium_mobile project available on GitHub. You'll need a GitHub account of your own
to be able to do so. To create your own fork of titanium_mobile, you simple
need to:
- Log in to your GitHub account.
- Go to the appcelerator/titanium_mobile project on GitHub.
- Click the "Fork" button at the top of the screen.
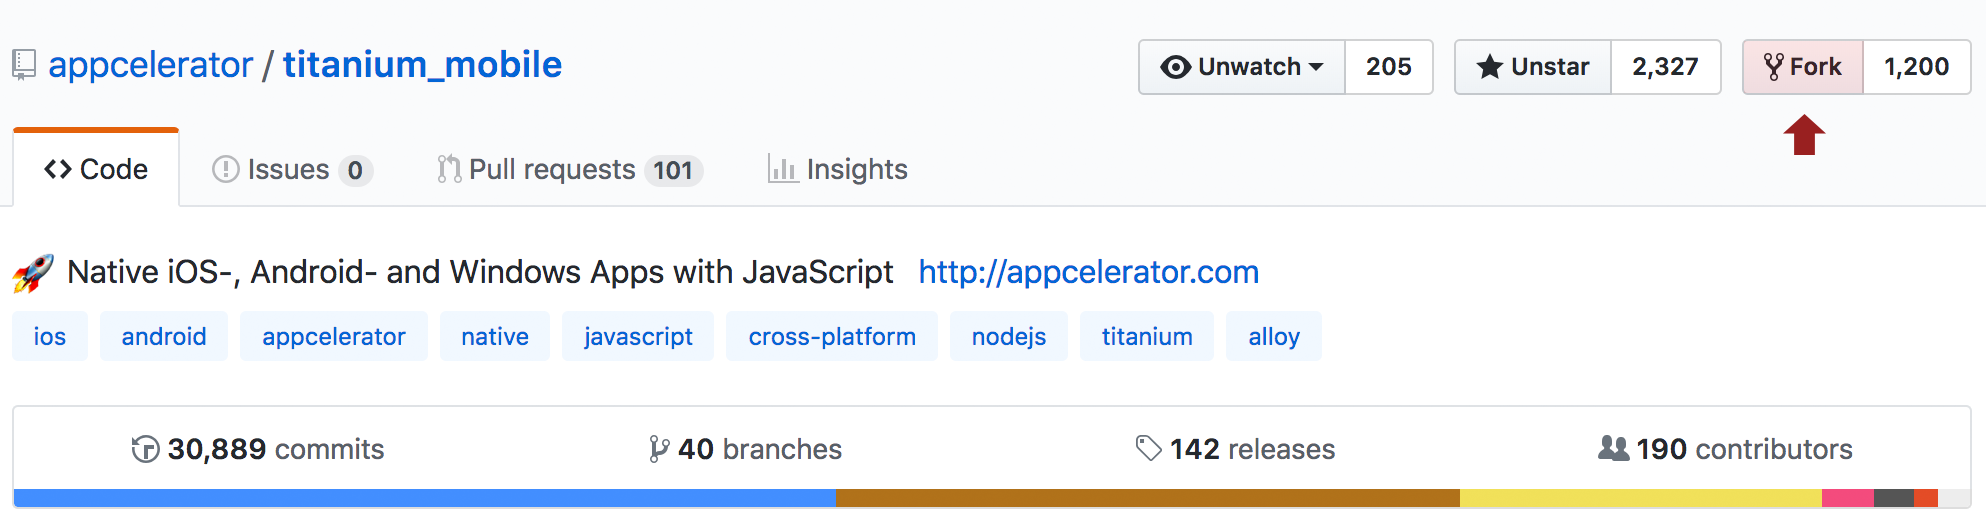
That's it. You will now have a forked copy of the appcelerator/titanium_mobile repository under your GitHub account. Instead of being called appcelerator/titanium_mobile, though, it will now be called YOUR_ACCOUNT/titanium_mobile, where YOUR_ACCOUNT is your GitHub account name.
4. Clone, setup remotes, and branch.
There are multiple ways to clone the Titanium project locally. You can either use a Git desktop app like Tower, GitHub Desktop and Source Tree, or alternatively the CLI. Guides for the desktop apps can be found on their documentation. To clone your project from the CLI, you need to do
git clone git@github.com:YOUR_ACCOUNT/titanium_mobile.git # YOUR_ACCOUNT is your Github account name cd titanium_mobilegit remote add appcelerator git://github.com/appcelerator/titanium_mobile.git git checkout mastergit checkout -b PROJECT-NUMBER # PROJECT-NUMBER is from step 2. For example, TIMOB-1234 or TC-432 |
It is assumed that if you are planning to develop against the titanium_mobile project, you already have git installed for your system. If you do not, please use our guide for getting
set up: Installing Git
In the commands above, we are performing 3 distinct git operations to prepare for developing against the titanium_mobile project.
git clone
Given a remote repository,clonewill create a local copy of the recently forked repository that you can modify. As noted above, you need to replaceYOUR_ACCOUNTwith your Github account namegit remote add
This command adds the originalappcelerator/titanium_mobilerepository as a remote source for your local repository. This allows you to update your local repository with any changes that are made to the mainappcelerator/titanium_mobilerepository.-
git checkout
This command, when given the-boption, creates a local development branch by the namePROJECT-NAME. As mentioned above, the name should correspond to the Jira ticket that you identified in step 2. So if you are planning to address ticket number 1234 in the TIMOB project, your full command would look like this:git checkout -b TIMOB-1234
You only need to clone your Github repo and set up the remote repository once. For any subsequent pull requests, you'd do the following:
git checkout master
# return to the master branchgit pull appcelerator master # update the master branch with the latest code from the main repogit checkout -b PROJECT-NUMBER # create a new branch based on the current state of the master branch |
5. Make your changes to the development branch.
This is where you will make your changes to the Titanium SDK. There's a few things to consider when doing so:
- Follow the Titanium coding standards: Coding Standards.
- Functionality added in a pull request must work on all supported versions of our platform. For example, any pull request submitted for both Android and iOS must support Android 2.2+ and iOS 4.0+ as of Titanium Mobile 1.8.
- Parity between platforms must be preserved when adding functionality, where
possible. To achieve this, you have 2 options
- Submit any pull requests for both Android and iOS
- Submit your pull request for one platform, then submit a "parity" Jira ticket for the unsupported platform.
For example, let's assume you submitted a new feature on Android that has a corresponding feature on iOS, but you did not implement it on iOS. What you would do it submit the Android-only pull request, then create a Titanium Community Jira ticket indicating that your pull request is not implemented in iOS. That way our platform engineers, as well as other community members, will have an opportunity to resolve the parity issue.
It takes the burden of implementing on multiple platforms out of your hands, but it is in turn likely that your pull request will take longer to accept as the parity issues are resolved.
6. Compile and test the modified titanium_mobile project.
For now, compiling and testing your modified SDK is a very basic process.
- Go to titanium_mobile/build
- Run
npm installto update the required Node modules - Run
node scons.js cleanbuildto do a clean build for iOS and Android that also packages and installs the SDK. If you only want to build for one platform, add either "ios" or "android" to the command - Run your test app in Appcelerator Studio / CLI against your newly installed SDK.
See Building the Titanium SDK From Source for detailed instructions for building the SDK.
Code that you use to test your pull request should be included in the associated Jira ticket. This test case will be part of the validation process.
7. Add or modify the API docs (if necessary)
If the changes you've made to titanium_mobile have added to or changed the public Javascript API in any way, you need
to change the API docs to reflect that. Let's assume you have added a property
named myNewProperty to Titanium.UI.View. Let's tak a look at how we would modify the API docs to document the
new property.
The API docs are part of the titanium_mobile project and can be found at:
/path/to/titanium_mobile/apidoc |
The directory structure inside titanium_mobile/apidoc is organized by namespace, just as the API docs are in the Developer Center.
In our case, we are looking for Titanium.UI.View, so we go to the following directory:
/path/to/titanium_mobile/apidoc/Titanium/UI |
and then we open the View.yml file in our favorite editor. We would then scroll down to the properties section of the YML document and find where we would put our new property,
alphabetically. In our case, myNewProperty would be between the existing layout and opacity properties. The updated documentation would look something like this:
// layout documentation - name: myNewProperty summary: Useful new property for keeping track of stuff. description: | This property is added as an example of how to add/modify existing API docs documentation. The description here is a more comprehensive overview of the property which can include information regarding its functionality, usage, and limitations. type: String default: 'stuff'// opacity documentation |
When you are done making your modifications, be sure to build and validate the new API docs. You can do that with the following commands.
cd /path/to/titanium_mobile/apidocnode validate.js
# 1. validate the generates API docsnode docgen.js
# 2. generate the API docs in /path/to/titanium_mobile/dist/apidoc/ |
For a more detailed account of this process, see:
8. Rebase your development branch with master (optional)
If you have made a number of commits related to your fix over time, you may want to rebase your changes on the master titanium branch. This step is optional.
git commit ...
# commit code changes as usualgit checkout master
# go back to the master branchgit pull appcelerator master
# make sure the master is up to dategit checkout PROJECT-NUMBER
# go back to your development branchgit rebase master
# rebase your development branch as the master |
9. Submit pull request in GitHub.
To raise a Github pull request, follow these steps:
-
Push your changes to your Github fork.
git push origin PROJECT-NUMBER - Go to the
appcelerator/itanium_mobilerepository. Usually, it will be highlighted automatically and prompt you to create a pull request. If not, open a pull request manually (steps 3-6) - Open your GitHub
titanium_mobilerepository in your browser, select the development branch that you have pushed using the branch selector on the left. - Confirm that your last commit is displayed beneath.
- Click the "New pull request" button:

- Click the "compare across forks" link, select your fork
and branch from the list:
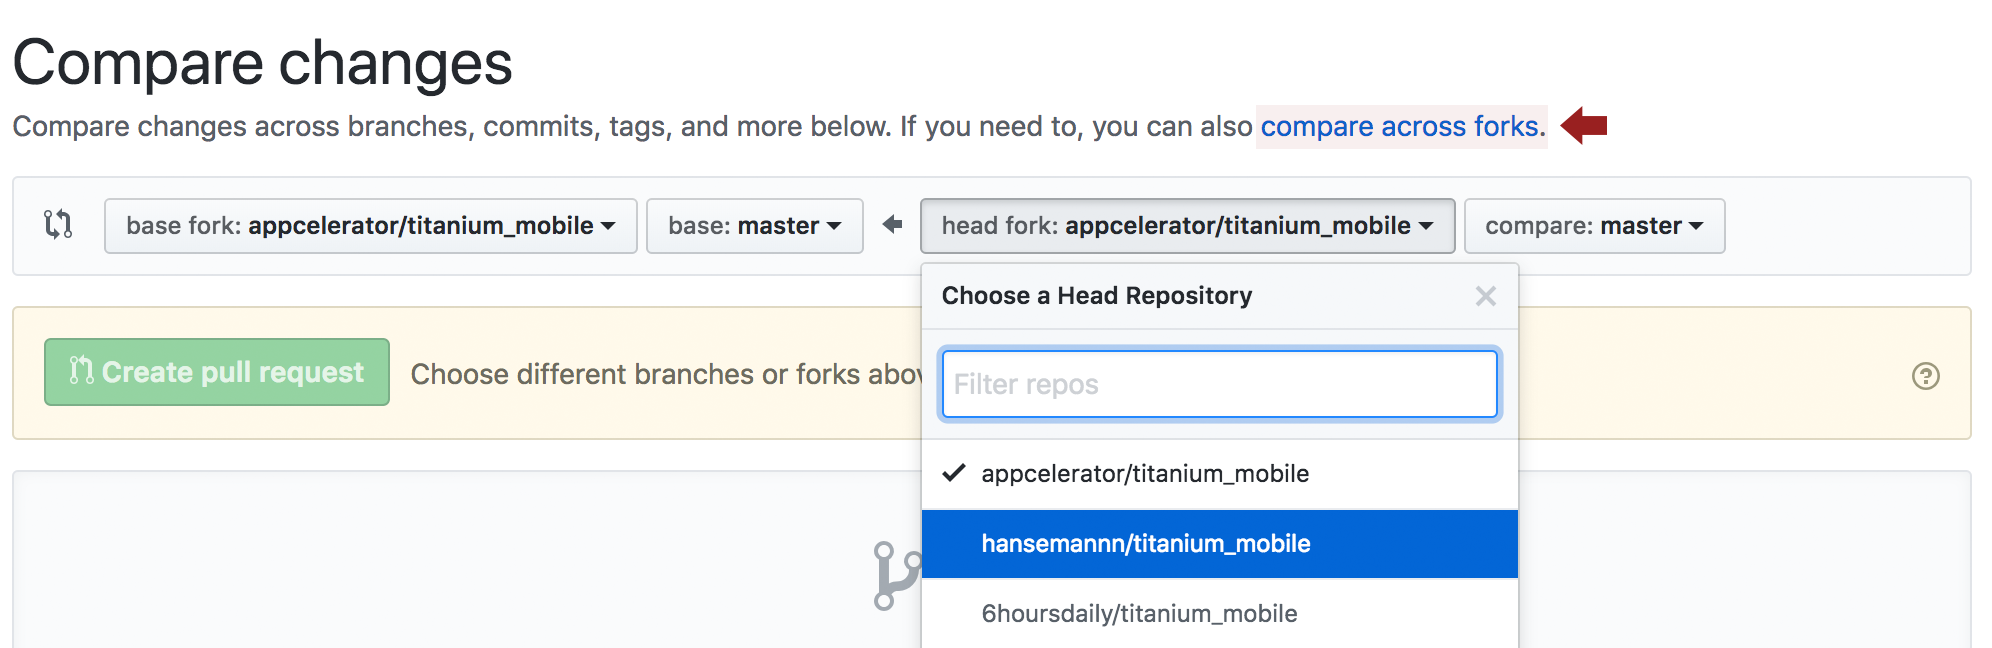
Add a message using the form on the following page, and click the "Create Pull Request" button to submit it. Some guidelines:- Put the JIRA ticket first, in brackets, e.g.: [TIMOB-26010] Android: Add a missing null check in getResponseHeaders
- If you have multiple JIRA tickets, list them. You should only have 1 ticket per PR, e.g.: [TIMOB-10350] [TIMOB-9558] Anvil test case for xml test suite
- If you are doing a back port, put the branch name after the JIRA number in parenthesis. Use the ACTUAL name of the branch, e.g.: [TIMOB-25936] (7_1_X) iOS: Fix appendSection & appendRow on main-thread
- Use the title of the JIRA ticket (or a close approximation) for titling the PR.
- Add a link to the JIRA ticket in the description of the PR.
At this point, your request is ready for review. In most cases a member of the Titanium core team should review your request within a few days. Reviews may take longer if there is a large volume of pull requests outstanding.
Frequently Asked Questions
Q. What does it mean if my PR is rejected? Does Rejected in bold mean they really don't like it?
A. It's common for a PR to be rejected when it is first made. This could be because it fails functional testing, needs changes to the code style, or because the description of the issue and/or solution is not clear enough for the reviewer to test the change. In this case, the reviewer should give clear guidance about what needs to be fixed for the PR to be processed.
A PR can also be rejected if the feature is determined to be a bad fit for the project – for example, something that would be better implemented as a module.
And many reviewers use bold for Accepted or Rejected so they stand out from the rest of the text. It's not personal – really.
Q. What happens if I need to make changes to my pull request? Do I need to submit a new one?
A. If your PR hasn't been merged, simply pushing new changes to your Github branch will update the pull request. If the reviewer requests changes to your PR, simply add a new commit on the branch and push it to Github.