Introduction
This guide walks through the setup of the AMPLIFY Appcelerator Services
for iOS applications. The AMPLIFY Appcelerator Services SDK gives you access
to the Appcelerator Analytics and Cloud services. To enable the Appcelerator
Test for a project, run the appceletator-test utility against either the project or the IPA file.
Not developing a native iOS application with Objective-C?
See the following topics to use the AMPLIFY Appcelerator Services on other platforms:
For native Android applications built with Java, see Quick Start Guide for Android APS SDK.
For native iOS applications built with Swift, see Quick Start Guide for iOS APS SDK using Swift.
For Titanium Applications, see Quick Start.
Requirements
You should be familiar with developing native iOS applications using Xcode and Objective-C. The SDKs supports the following base SDK and target iOS versions:
|
Maximum SDK version
|
Minimum SDK version
|
Maximum target iOS version
|
Maximum target iOS version
|
|---|---|---|---|
| 9.0.x | 8.0.x | 9.0.x | 7.1.x |
Setup
Before you can use Appcelerator Services in your application you need to:
- Create an application in Dashboard
- Download the SDK and
appcelerator-testutility - Get the application keys
Register an APS SDK application
Appcelerator Platform Services (APS) SDK for iOS and Android provides support for Appcelerator Analytics and Cloud services for your Android applications built with the native Android APIs and Java and iOS applications built with the native iOS APIs and Objective-C or Swift.
To register an APS SDK application for services:
- Sign in to the AMPLIFY Platform.
- Click the Add menu (+) and select Register App for Services to open the Register App for Services form.
- Enter the Name of the application.
- Select APS SDK from the Type selection menu.
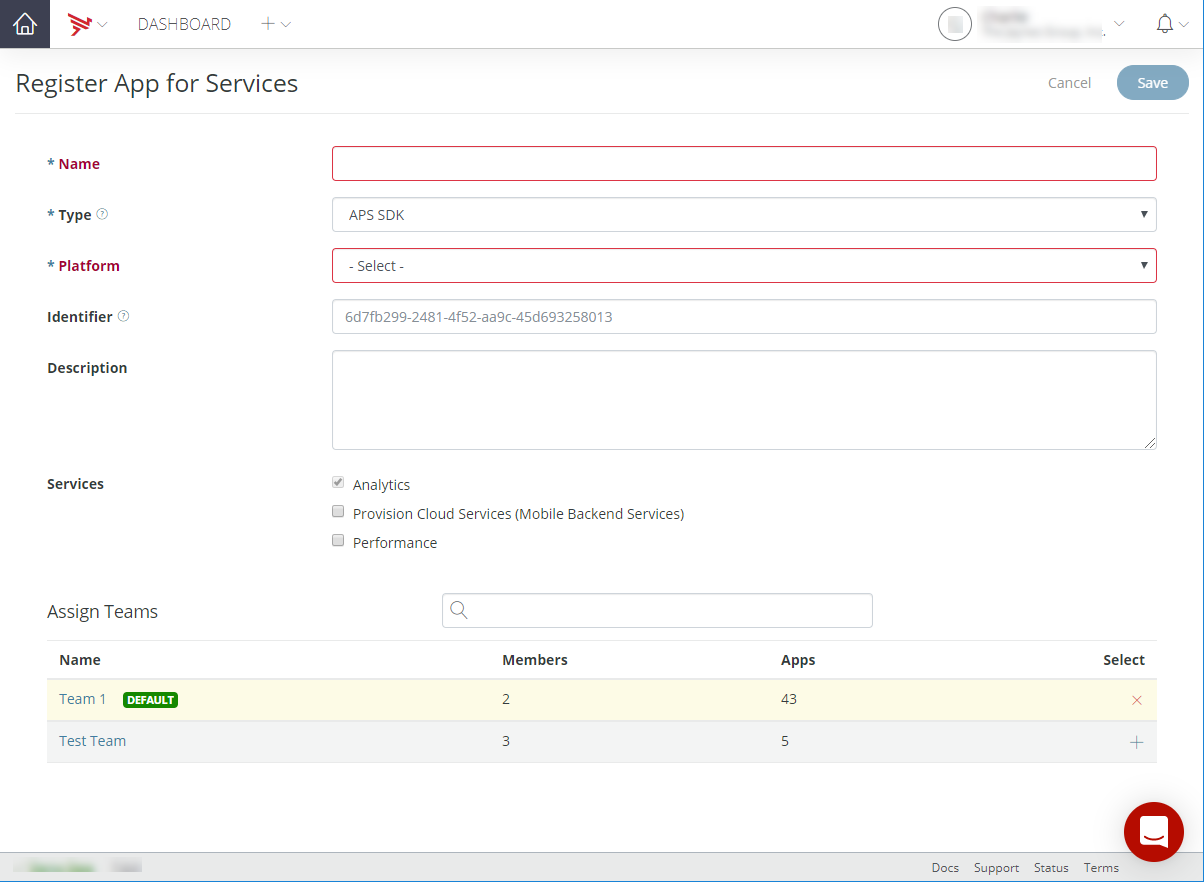
- Select a Platform (Andriod or iOS).
- Optionally, enter a unique Identifier for your application.
- Optionally, enter a Description for your application.
- Select Services for your application by selecting or deselecting the check-boxes for the
following:
- Analytics
- Provision Cloud Services (Mobile Backend Services)
- Add teams to the application from your organization by clicking the add (+) button in the Assign Teams list.
- Click OK.
Appcelerator Dashboard displays the Services tab for your application. Follow the directions to add Platform Services to your application.
Register an API or Microservice application
To register an API or microservice application:
- Sign in to the AMPLIFY Platform.
- Click the Add menu (+) and select Register App for Services to open the Register App for Services form.
- Enter the Name of the application.
- Select API/Microservice from the Type selection menu.

- Enter a Platform for your application.
- Optionally, enter a unique Identifier for your application.
- Optionally, enter a Description for your application.
- Select Services for your application by selecting or deselecting the check-boxes for the
following:
- Analytics
- Provision Cloud Services (Mobile Backend Services)
- Add teams to the application from your organization by clicking the add (+) button in the Assign Teams list.
- Click OK.
Register a Website or Web application
To register a Website or Web application:
- Sign in to the AMPLIFY Platform.
- Click the Add menu (+) and select Register App for Services to open the Register App for Services form.
- Enter the Name of the application.
- Select Website/Web App from the Type selection menu.

- Enter a Platform for your application.
- Optionally, enter a unique Identifier for your application.
- Optionally, enter a Description for your application.
- Select Services for your application by selecting or deselecting the check-boxes for the
following:
- Analytics
- Provision Cloud Services (Mobile Backend Services)
- Add teams to the application from your organization by clicking the add (+) button in the Assign Teams list.
- Click OK.
Register a Custom application
To register a custom application (other than APS SDK, API/Microservice, or Website/Web applications):
- Sign in to the AMPLIFY Platform.
- Click the Add menu (+) and select Register App for Services to open the Register App for Services form.
- Enter the Name of the application.
- Select Other from the Type selection menu.
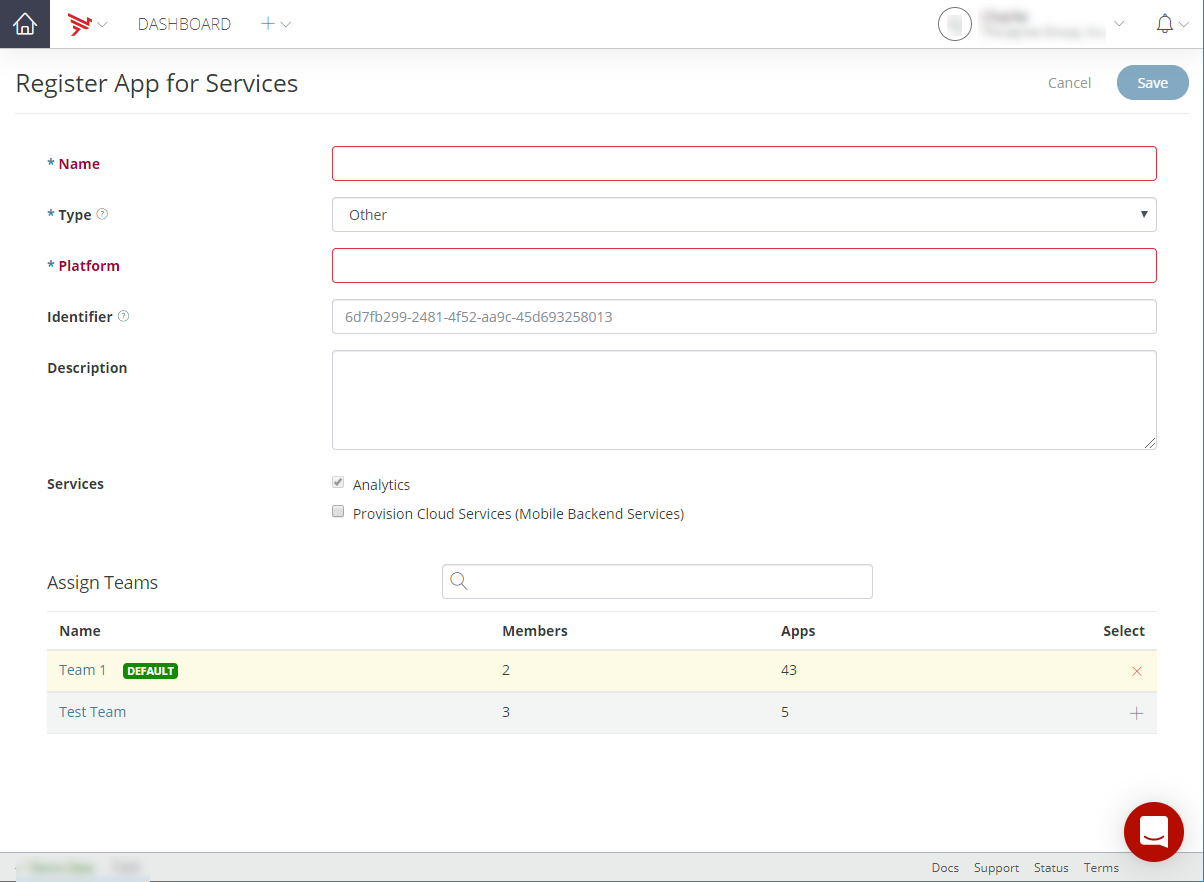
- Enter a Platform for your application.
- Optionally, enter a unique Identifier for your application.
- Optionally, enter a Description for your application.
- Select Services for your application by selecting or deselecting the check-boxes for the
following:
- Analytics
- Provision Cloud Services (Mobile Backend Services)
- Add teams to the application from your organization by clicking the add (+) button in the Assign Teams list.
- Click OK.
Dashboard displays the Platform Services tab for your application. In the tab, you can download the APS SDK
and appcelerator-test utility, and get code snippets to copy and paste into your application.
For more information, refer to Managing Non-Titanium Client Applications in Dashboard.
Quick Tutorial
The following tutorial demonstrates the basic setup and usage of Analytics and Cloud libraries in an Xcode project. To complete the tutorial, you will need your APS application key for the Cloud and Analytics services. Download a complete version of the project.
To create a basic application using APS:
- In Xcode, create a new iOS Project (Single View Application).
- Unzip
appcelerator-sdk-ios-<VERSION>.zipfile and drag theAppcelerator.frameworkfolder into the root project folder if you are using Xcode 6 and above, or theFrameworksfolder if you are using Xcode 5 or below. - Select Copy items into destination… and click Finish.
- Select your project in the Project Navigator and click the Build Phases tab.
- Expand the Link Binary With Libraries section and add the
libsqlite3.tbdandlibz.tbdframeworks. Before Xcode 7, the framework extension isdylibrather thantbd. - Click the Build Settings tab, then click the All button in the top-left corner of the tab.
- If you are using Xcode 7, you will need to disable bit code since some third-party libraries do not have bit code enabled. Expand the Build Options section and set Enable Bitcode to No.
- Expand the Linking section and add
-ObjCto Other Linker Flags. -
In your application delegate implementation file, import Appcelerator/Appcelerator.h.
#import <Appcelerator/Appcelerator.h> -
Add the following initialization code to your application delegate's
application:didFinishLaunchingWithOptionsmethod, replacing the placeholder string with your APS application key:[[APSServiceManager sharedInstance] enableWithAppKey:@"APS_APP_KEY"];The iOS application is now ready to make method calls using the APS SDK APIs.
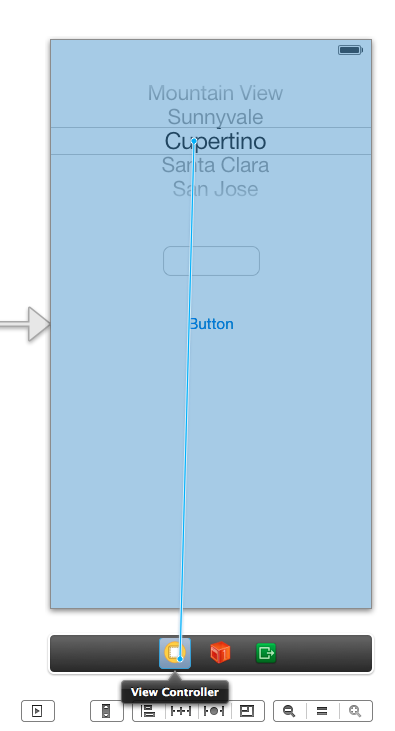
Modify the Application
Customize the application's UI to display a picker, text field and button, and add some logic to respond to user interaction. The picker will display a list of available user accounts. The user can enter their password in the text field, then click the button to log in.
- Open your project's
Main.storyboardfile. - Drag a Picker View, Text Field, and Button from the Object library to the view.
- Open the Assistant Editor. (From the menu, select View > Assistant Editor > Show Assistant Editor or click the Assistant Editor button in the top-right corner.)
- In the right pane, display the
ViewController.hfile. - Control-drag the Picker View to View Controller icon at the bottom of the storyboard. Select dataSource. Repeat for the delegate option.
- Drag the Picker View to the header file to create an IBOutlet. Name the
outlet
pickerand click Connect. Repeat the same procedure for the Text Field and name ittextField.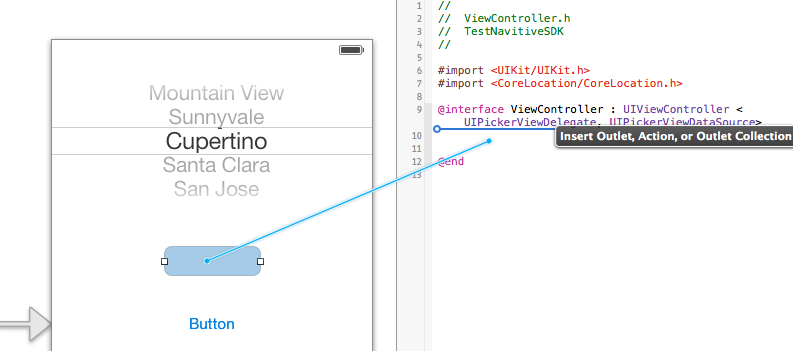
-
In the
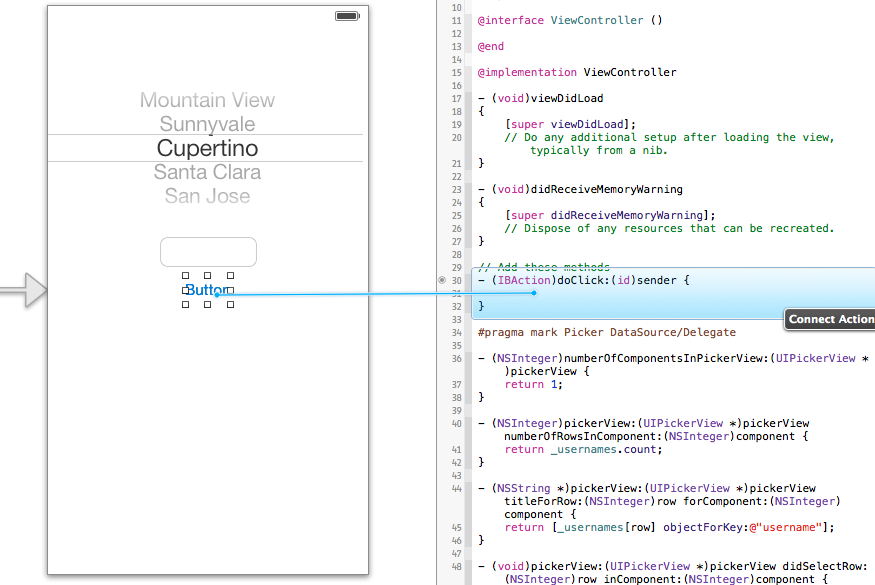
ViewController.hfile, declare the View Controller to implement theUIPickerViewDelegate,UIPickerViewDataSource, andUITextFieldDelegateprotocols. Add an NSArray property calledusernamesto keep track of the Picker View's data source and an NSString property calledusernameto reference the current selection. The final header file should look like:ViewController.h#import <UIKit/UIKit.h>#import <CoreLocation/CoreLocation.h>@interface ViewController : UIViewController <UIPickerViewDelegate, UIPickerViewDataSource, UITextFieldDelegate>@property (weak, nonatomic) IBOutlet UIPickerView *picker;@property (weak, nonatomic) IBOutlet UITextField *textField;@property (strong, nonatomic) NSArray *usernames;@property (strong, nonatomic) NSString *username;@end -
In the
ViewController.mfile, create an IBAction for the button nameddoClick. In the following sections, you will add code to this handler that calls Cloud and Analytics services. The View Controller needs to implement the methods ofUIPickerViewDelegate,UIPickerViewDataSourceandUITextFieldDelegateprotocols. Add the following code to the file:ViewController.m#import "ViewController.h"// Add this import statement#import <Appcelerator/Appcelerator.h>@implementation ViewController- (void)viewDidLoad{[superviewDidLoad];// Add these statements to dismiss the keyboardself.textField.delegate = self;[self.textField resignFirstResponder];}- (void)didReceiveMemoryWarning{[superdidReceiveMemoryWarning];}// Add these methods- (IBAction)onClick:(id)sender {}#pragma mark Picker DataSource/Delegate- (NSInteger)numberOfComponentsInPickerView:(UIPickerView *)pickerView {return1;}- (NSInteger)pickerView:(UIPickerView *)pickerView numberOfRowsInComponent:(NSInteger)component {return_usernames.count;}- (NSString *)pickerView:(UIPickerView *)pickerView titleForRow:(NSInteger)row forComponent:(NSInteger)component {return[_usernames[row] objectForKey:@"username"];}- (void)pickerView:(UIPickerView *)pickerView didSelectRow:(NSInteger)row inComponent:(NSInteger)component {_username = [_usernames[row] objectForKey:@"username"];}#pragma mark TextField Delegate- (BOOL)textFieldShouldBeginEditing:(UITextField *)textField{returnYES;}- (BOOL)textFieldShouldReturn:(UITextField *)textField{[textField resignFirstResponder];returnYES;}@end - Control-drag the Button to the
onClick:sendermethod to create an action connection.
Send an Analytics Feature Event
The Analytics library automatically captures and sends application life-cycle events to the backend Analytics service. You can also send custom analytics events, as shown in this example. You can use feature events as one type of custom events.
In the doClick method, add a sendAppFeatureEvent: method call to send a feature event with the string "sample.feature.login".
The optional payload parameter is set to nil for this example, but it lets you send additional data along with
the event.
- (IBAction)doClick:(id)sender { // Call Analytics method [[APSAnalytics sharedInstance] sendAppFeatureEvent:@"sample.feature.login" payload:nil];} |
Query Cloud Users
To use the APS Cloud component, most of the methods require a user to be
logged in. This sample uses the Picker View to select a Cloud user account.
To populate the Picker View values, the application needs to retrieve a
list of users. Call the query:withBlock: method to retrieve a list of user accounts from inside the viewDidLoad method.
Every APS Cloud method includes a withBlock parameter that specifies the callback to handle the server response. The
callback is passed an APSResponse object that contains response metadata (such as success or failure)
and the response payload.
ViewController.m
- (void)viewDidLoad{ [super viewDidLoad]; // Call the APSUsers query method [APSUsers query:nil withBlock:^(APSResponse *e){ if (e.success) { _usernames = [e.response objectForKey:@"users"]; [self.picker reloadAllComponents]; } else { UIAlertView *alert = [[UIAlertView alloc] initWithTitle:@"Error" message:@"Unable to retrieve user accounts!" delegate:nil cancelButtonTitle:@"OK" otherButtonTitles: nil]; [alert show]; } }];} |
Log in to a Cloud Account
To log in to a Cloud account, you need the username and password. Since
the application was modified to get all available user accounts and populate
the Picker View, the application needs to get the current value of the
picker and the text entered in the Text Field. These values are passed
to the login:withBlock: method. Modify the doClick method to login to a Cloud user account.
ViewController.m
- (IBAction)doClick:(id)sender { [[APSAnalytics sharedInstance] sendAppFeatureEvent:@"sample.feature.login" payload:nil]; // Construct the request parameters NSDictionary *params = [[NSDictionary alloc] initWithObjectsAndKeys:_username,@"login", [_textField text],@"password", nil]; // Call the APSUsers login method [APSUsers login:params withBlock:^(APSResponse *e){ if (e.success) { NSLog(@"Successfully logged in as %@", _username); } else { NSLog(@"ERROR: Failed to log in!"); } }];} |
Log a Handled Exception
The Performance library automatically logs application crashes (unhandled exceptions) and handled exceptions to the backend Performance service. You can also leave breadcrumbs in your application, which are developer-defined text strings (up to 140 characters) that are analogous to log messages.
For example, you can replace the Log calls in the catch statements with logHandledException calls. Instead, the application will generate a runtime exception,
and then call the logHandledException method to log that exception to the Performance backend. To the doClick method, add the following new code:
- (IBAction)doClick:(id)sender { // Analytics call... // Cloud call... @try { [NSException raise:NSGenericException format:@"Something happened..."]; } @catch (NSException *exception) { [[APSPerformance sharedInstance] logHandledException:exception]; }} |
Set a Username for Crash Logs
To help differentiate crash logs, use the username property. When the application successfully logs in to the Cloud user
account, the application sets the username property.
ViewController.m
- (IBAction)doClick:(id)sender { [APSUsers login:params withBlock:^(APSResponse *e){ if (e.success) { NSLog(@"Successfully logged in as %@", _username); // Add this APS Performance method call [[APSPerformance sharedInstance] username] = _username; } else { NSLog(@"ERROR: Failed to log in!"); } }];} |
Testing the tutorial sample
Before testing the sample, you need to create user accounts for the application to query. To create Cloud user accounts:
- Login to the AMPLIFY Platform.
- On the Dashboard tile, select Go to Dashboard.
- Select your application from the Projects menu.
- In the left navigation bar, click Manage Data.
- Click Users, then the Create User button.
- In the Username field, enter the user's username.
- In the Password field, enter the new user's password (four-character minimum).
- Click Save Changes.
After you have created a few Cloud user accounts, build the sample and launch it on either a device or emulator.
Once the application launches:
- Click on the Picker/Spinner. You should see a list of all the Cloud user accounts you added.
- Select a user account from the Picker/Spinner and enter that user's password. Click the Button. In the log output, you should see an info log that login command was successful or not.
- Go back to the Dashboard.
- In Dashboard, select your application from the Apps menu in the upper-left corner.
- In the left navbar, click Search by User. Enter the username of the account that successfully logged in. Click the username. You should see a crash report for the user.
- In the left navbar, select Analytics.
- In the Real-Time view, you should see at least one active session.
- In the left navbar, click Events. You should see the "sample.feature.login" feature event.
Next Steps for Appcelerator Analytics and Cloud
This tutorial only covers a small portion of what the Analytics and Cloud services can provide. For more in-depth information about these features, see the following topics: