Introduction
This guide walks through the setup of the AMPLIFY Appcelerator Services for
Android applications. The AMPLIFY Appcelerator Services SDK gives
you access to the Appcelerator Analytics and Cloud services. To enable
the Appcelerator Test for a project, run the AppceletatorTest utility against either the project or APK file.
See the following topics to use the AMPLIFY Appcelerator Services on other platforms:
![]()
For native iOS applications built with Objective-C, see Quick Start Guide for iOS APS SDK.
![]()
For Titanium Applications, see Quick Start.
Requirements
This document assumes you have an existing Android application and are familiar with the Android toolchain to create, build, and package Android applications. The following prerequisites are also needed:
- Android SDK 2.3.x (API Level 10) or greater
- Android NDK
- Eclipse 3.6 or later with the ADT plug-in (see Android Developers: ADT Plugin), or the Apache Ant command-line tool (see Apache Ant).
Setup
Before you can use Appcelerator Services in your application you need to:
- Create an application in Dashboard
- Download the SDK and
appcelerator-testutility - Get the application keys
Register an APS SDK application
Appcelerator Platform Services (APS) SDK for iOS and Android provides support for Appcelerator Analytics and Cloud services for your Android applications built with the native Android APIs and Java and iOS applications built with the native iOS APIs and Objective-C or Swift.
To register an APS SDK application for services:
- Sign in to the AMPLIFY Platform.
- Click the Add menu (+) and select Register App for Services to open the Register App for Services form.
- Enter the Name of the application.
- Select APS SDK from the Type selection menu.
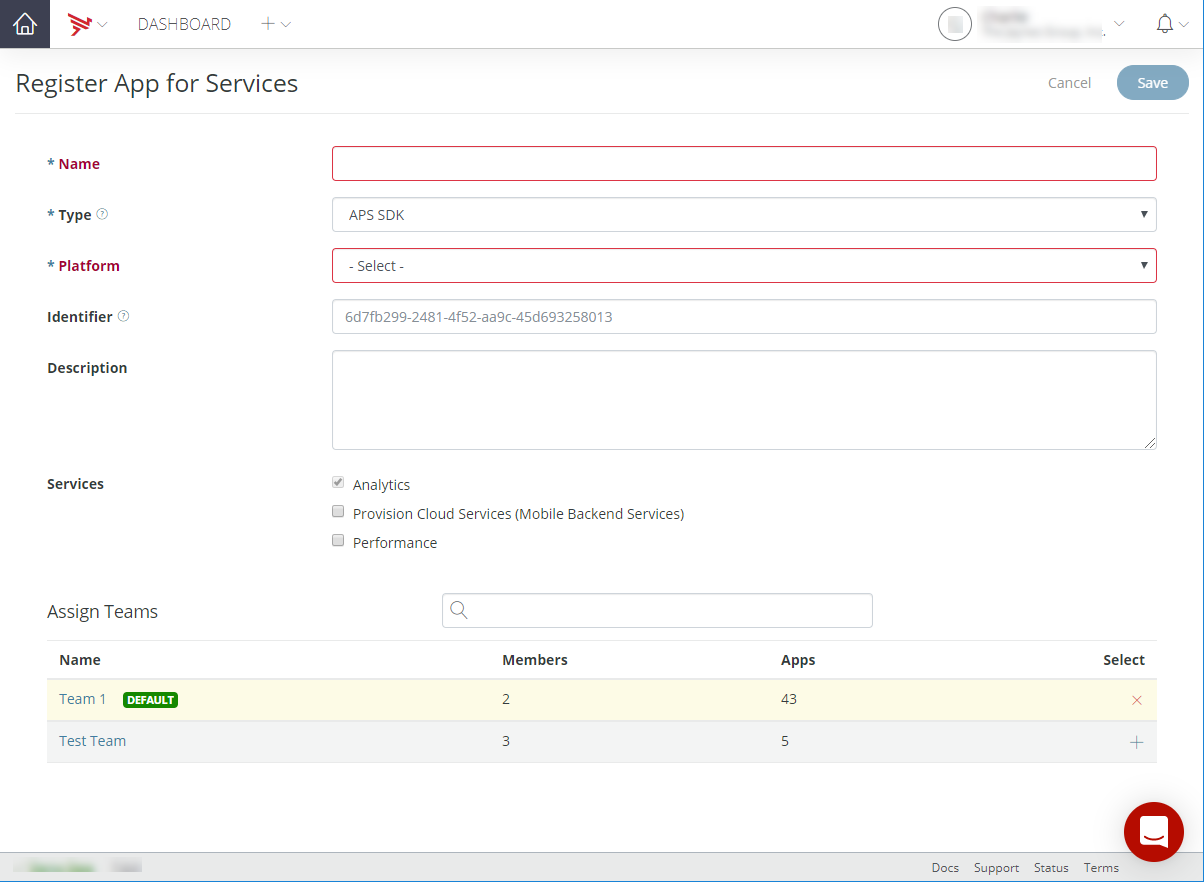
- Select a Platform (Andriod or iOS).
- Optionally, enter a unique Identifier for your application.
- Optionally, enter a Description for your application.
- Select Services for your application by selecting or deselecting the check-boxes for the
following:
- Analytics
- Provision Cloud Services (Mobile Backend Services)
- Add teams to the application from your organization by clicking the add (+) button in the Assign Teams list.
- Click OK.
Appcelerator Dashboard displays the Services tab for your application. Follow the directions to add Platform Services to your application.
Register an API or Microservice application
To register an API or microservice application:
- Sign in to the AMPLIFY Platform.
- Click the Add menu (+) and select Register App for Services to open the Register App for Services form.
- Enter the Name of the application.
- Select API/Microservice from the Type selection menu.

- Enter a Platform for your application.
- Optionally, enter a unique Identifier for your application.
- Optionally, enter a Description for your application.
- Select Services for your application by selecting or deselecting the check-boxes for the
following:
- Analytics
- Provision Cloud Services (Mobile Backend Services)
- Add teams to the application from your organization by clicking the add (+) button in the Assign Teams list.
- Click OK.
Register a Website or Web application
To register a Website or Web application:
- Sign in to the AMPLIFY Platform.
- Click the Add menu (+) and select Register App for Services to open the Register App for Services form.
- Enter the Name of the application.
- Select Website/Web App from the Type selection menu.

- Enter a Platform for your application.
- Optionally, enter a unique Identifier for your application.
- Optionally, enter a Description for your application.
- Select Services for your application by selecting or deselecting the check-boxes for the
following:
- Analytics
- Provision Cloud Services (Mobile Backend Services)
- Add teams to the application from your organization by clicking the add (+) button in the Assign Teams list.
- Click OK.
Register a Custom application
To register a custom application (other than APS SDK, API/Microservice, or Website/Web applications):
- Sign in to the AMPLIFY Platform.
- Click the Add menu (+) and select Register App for Services to open the Register App for Services form.
- Enter the Name of the application.
- Select Other from the Type selection menu.
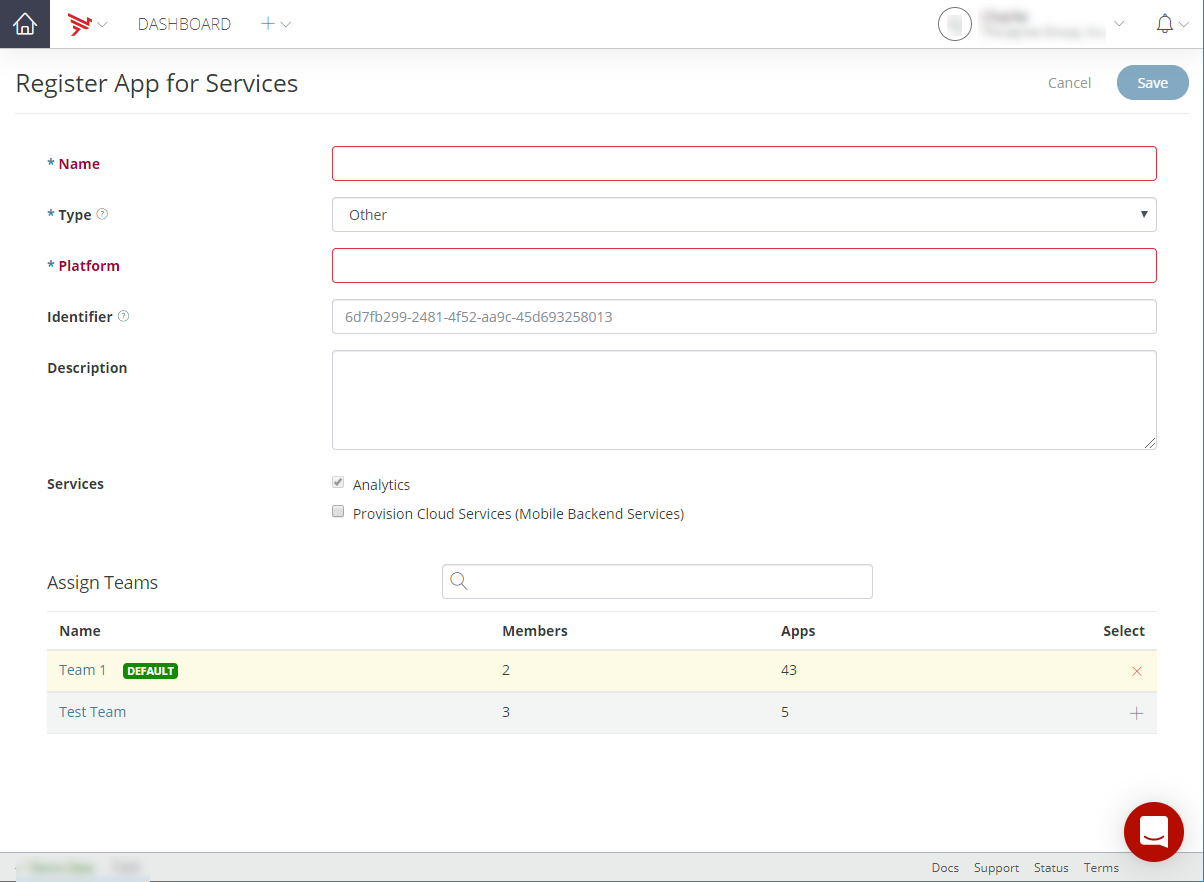
- Enter a Platform for your application.
- Optionally, enter a unique Identifier for your application.
- Optionally, enter a Description for your application.
- Select Services for your application by selecting or deselecting the check-boxes for the
following:
- Analytics
- Provision Cloud Services (Mobile Backend Services)
- Add teams to the application from your organization by clicking the add (+) button in the Assign Teams list.
- Click OK.
Dashboard displays the Platform Services tab for your application. In the
tab, you can download the APS SDK and appcelerator-test utility, and get code snippets to copy and paste into your application.
For more information, refer to Managing Non-Titanium Client Applications in Dashboard.
Quick tutorial
The following tutorial demonstrates basic setup and usage of Analytics and Cloud libraries in an Eclipse project. To complete the tutorial, you will need your application key for the Cloud and Analytics services. Download a complete version of the project.
To create a basic application using APS:
- In Eclipse, create a new Android project with a Blank Activity.
- Unpack the
appcelerator-sdk-android-<VERSION>.zipfile. - Copy the
appcelerator-sdk-android-<VERSION>.jarfile to thelibsfolder of your Android project (if you wish to use Maven or Gradle, see "Building the Application" below for setup instructions). -
Modify the project's
AndroidManifest.xmlfile to include theACCESS_NETWORK_STATE,ACCESS_WIFI_STATE,GET_TASKS,INTERNET,READ_LOGS, andWRITER_EXTERNAL_STORAGEuser permissions and declare thecom.appcelerator.aps.AnalyticsServiceas a Service class, which allows the APS library to send analytic events to the APS servers while the application is in the background:AndroidManifest.xml1234567891011121314151617181920212223<?xmlversion="1.0"encoding="utf-8"?>package="com.appcelerator.sample"android:versionCode="1"android:versionName="1.0"><!-- Add these permissions to enable Analytics and Cloud --><uses-permissionandroid:name="android.permission.ACCESS_NETWORK_STATE"/><uses-permissionandroid:name="android.permission.ACCESS_WIFI_STATE"/><uses-permissionandroid:name="android.permission.INTERNET"/><uses-permissionandroid:name="android.permission.WRITE_EXTERNAL_STORAGE"/><uses-permissionandroid:name="android.permission.GET_TASKS"/><uses-permissionandroid:name="android.permission.READ_LOGS"/><application><activity>...</activity><!-- Add this service to enable Analytics --><serviceandroid:name="com.appcelerator.aps.APSAnalyticsService"android:exported="false"/></application></manifest> -
Add the following import statement to the main Activity of the project:
MainActivity.javaimport com.appcelerator.aps.APSServiceManager; -
In the main Activity's
onCreate()method, add the following method call to enable the APS services.MainActivity.javaAPSServiceManager.getInstance().enable(getApplicationContext(),"APP_KEY");The Android application is now ready to make method calls using the APS SDK APIs.
Modify the application
Customize the application's UI to display a spinner, text field and button, and add some logic to respond to user interaction. The spinner will display a list of available user accounts. The user can enter their password in the text field, then click the button to log in.
- Open the fragment layout XML file (
res/layout/fragment_main.xml) in the Graphical Layout editor. - Remove the "Hello World!" label.
-
Drag a Spinner widget, EditText widget (password text field), and Button widget into the view.
-
In the
MainActivity.javafile, modify the code to save an instance of the current activity, Spinner and EditText widgets. Modify the application to bind adoClickmethod to the Button'sonClicklistener and create an empty function calledpopulateSpinner. You also need to import additional packages. In the following sections, you will add code to these handlers that call the Cloud and Analytics services.MainActivity.java12345678910111213141516171819202122232425262728293031323334353637383940414243444546474849505152535455565758596061626364656667686970717273747576777879// Import the following packagesimportandroid.app.Activity;importandroid.util.Log;importandroid.widget.ArrayAdapter;importandroid.widget.Button;importandroid.widget.EditText;importandroid.widget.Spinner;importjava.util.HashMap;importorg.json.JSONArray;importcom.appcelerator.aps.APSAnalytics;importcom.appcelerator.aps.APSCloudException;importcom.appcelerator.aps.APSPerformance;importcom.appcelerator.aps.APSResponse;importcom.appcelerator.aps.APSResponseHandler;importcom.appcelerator.aps.APSServiceManager;importcom.appcelerator.aps.APSUsers;publicclassMainActivityextendsActionBarActivity {// Handle to current activityprivatestaticActivity currentActivity;@OverrideprotectedvoidonCreate(Bundle savedInstanceState) {super.onCreate(savedInstanceState);setContentView(R.layout.activity_main);// Save the current activitycurrentActivity =this;APSServiceManager.getInstance().enable(getApplicationContext(),"APP_KEY");if(savedInstanceState ==null) {getSupportFragmentManager().beginTransaction().add(R.id.container,newPlaceholderFragment()).commit();}}publicstaticclassPlaceholderFragmentextendsFragment {// Handle to Spinner and EditText widgetsSpinner spinner;EditText textField;publicPlaceholderFragment() {}@OverridepublicView onCreateView(LayoutInflater inflater, ViewGroup container,Bundle savedInstanceState) {View rootView = inflater.inflate(R.layout.fragment_main, container,false);// Bind the Button do the doClick methodButton button = (Button)rootView.findViewById(R.id.button1);button.setOnClickListener(newButton.OnClickListener(){@OverridepublicvoidonClick(View v){doClick();}});// Save the Spinner and EditText instancesspinner = (Spinner)rootView.findViewById(R.id.spinner1);textField = (EditText)rootView.findViewById(R.id.editText1);// Place holder for the next tutorial stepspopulateSpinner();returnrootView;}// Placeholder for next tutorial stepspublicvoiddoClick() {}publicvoidpopulateSpinner() {}}}
Building the application
If you use Maven or Gradle as part of your build process, you will need to publish the APS SDK to your local Maven repository and add the APS SDK as a dependency to your project.
First, unzip the APS SDK and install the dependencies into your local Maven repository:
unzip appcelerator-sdk-android-1.0.0.zipmvn install:install-file -Dfile=appcelerator-sdk-android-1.0.0/appcelerator-sdk-android-1.0.0.jar -DgroupId=com.appcelerator -DartifactId=appcelerator-sdk-android
-Dversion=1.0.0 -Dpackaging=jar |
Next, add the following lines of code to your Maven or Gradle POMs:
dependencies { compile 'com.appcelerator: appcelerator-sdk-android:1.0.0'} |
|
1
2
3
4
5
6
7
|
<dependencies> <dependency> <groupId>com.appcelerator</groupId> <artifactId>appcelerator-sdk-android</artifactId> <version>1.0.0</version> </dependency></dependencies> |
Capture user session events
Unlike the iOS and Titanium platforms, you need to explicitly make analytic method calls in the application to send user session events to the Analytics service to capture user activity.
Use the Activity's lifetime events to track when the user is actively using
your application. Call the APSAnalytics' sendAppEnrollEvent() method in the onCreateMethod(), which indicates the first installation or upgrade of the application.
Before calling API calls to the APSAnalytics class, you need to get a shared
instance of the APSAnalytics class using the getInstance() method.
|
1
2
3
4
5
6
7
8
9
|
@Overrideprotected void onCreate(Bundle savedInstanceState) { super.onCreate(savedInstanceState); setContentView(R.layout.activity_main); APSAnalytics.getInstance().sendAppEnrollEvent(); // Other init calls...} |
Use onPause() and onResume() to call the APSAnalytics' sendAppBackgroundEvent() and sendAppForegroundEvent(), respectively. These two APSAnalytics methods send user session events
to the APS Analytics servers to track how long a user engages with your
application.
|
1
2
3
4
5
6
7
8
9
10
11
|
@Overridepublic void onPause(){ super.onPause(); APSAnalytics.getInstance().sendAppBackgroundEvent();}@Overridepublic void onResume(){ super.onResume(); APSAnalytics.getInstance().sendAppForegroundEvent();} |
Send an Analytics feature event
Besides user session events, you can also send custom analytics events, as shown in this example. You can use feature events as one type of custom events.
In the doClick() function, add an APSAnalytics' sendAppFeatureEvent() method call to send a feature event with the string "sample.feature.login". The optional second parameter is set to null for this
example, but you can send additional data as a JSON object with the event.
public void doClick(View view){ APSAnalytics.getInstance().sendAppFeatureEvent("sample.feature.login", null);}; |
Query Cloud users
To use the APS Cloud component, most of the methods require a user to be
logged in. This sample uses the Spinner widget to select a Cloud user account.
To populate the Spinner values, the application needs to retrieve a list
of users. Use the APSUsers.query() method to retrieve a list of user accounts.
Every APS Cloud method includes a handler parameter that specifies the callback to handle the server response. The
callback is passed an APSResponse object that contains response metadata (such as success or failure) and
the response payload.
|
1
2
3
4
5
6
7
8
9
10
11
12
13
14
15
16
17
18
19
20
21
22
23
24
25
26
27
28
29
30
31
32
33
34
|
public void populateSpinner() { try { APSUsers.query(null, new APSResponseHandler() { @Override public void onResponse(final APSResponse e) { if (e.getSuccess()) { try { JSONArray payload = e.getResponse().getJSONArray("users"); String[] items = new String[payload.length()]; for (int i = 0; i < payload.length(); i++) { items[i] = payload.getJSONObject(i).getString("username"); } ArrayAdapter spinnerArrayAdapter = new ArrayAdapter(currentActivity, android.R.layout.simple_spinner_item, items); spinner.setAdapter(spinnerArrayAdapter); } catch (Exception ex) { Log.e("ACSUsers", "Error parsing JSON object: " + ex.toString()); } }
else { Toast.makeText(currentActivity, "ERROR: Unable to get users.", Toast.LENGTH_SHORT).show(); Log.e("ACSUsers", e.getResponseString()); }
} @Override public void onException(APSCloudException e) { Log.e("ACSUsers", e.toString()); } }); } catch (APSCloudException e) { Log.e("ACSUsers", e.toString()); } } |
Log in to a Cloud account
To log in to a Cloud account, you need the username and password. Since
the application was modified to get all available user accounts and populate
the Spinner, the application needs to get the current value of the spinner
and the text entered in the EditText widget. These values are passed to the APSUsers.login() method. Modify the doClick() method to login to a Cloud user account.
|
1
2
3
4
5
6
7
8
9
10
11
12
13
14
15
16
17
18
19
20
21
22
23
24
25
26
27
28
29
30
31
32
33
34
|
public void doClick(){ APSAnalytics.getInstance().sendAppFeatureEvent("sample.feature.login", null); // Get the current value of the Spinner and EditField widgets final String username = spinner.getSelectedItem().toString(); String password = textField.getText().toString(); // Use a HashMap to send the method parameters for the request HashMap<String, Object> data = new HashMap<String, Object>(); data.put("login", username); data.put("password", password); try { APSUsers.login(data, new APSResponseHandler() { @Override public void onResponse(final APSResponse e) { if (e.getSuccess()) { Log.i("ACSUsers", "Successfully logged in as " + username); } else { Log.e("ACSUsers", e.getMessage()); }
} @Override public void onException(APSCloudException e) { Log.e("ACSUsers", e.toString()); } }); } catch (APSCloudException e) { Log.e("ACSUsers", e.toString()); } } |
Log a handled exception
The Performance library automatically logs application crashes (unhandled exceptions) and handled exceptions to the backend Performance service. You can also leave breadcrumbs in your application, which are developer-defined text strings (up to 140 characters) that are analogous to log messages.
For example, you can replace the Log calls in the catch statements with the APSPerformance's logHandledException() calls. Instead, the application will generate a runtime exception, and
then call the logHandledException() method to log that exception to the Performance backend.
Before making API calls to the APSPerformance class, you need to retrieve
a shared instance of the class using the getInstance() method.
To the doClick method, add the following new code:
|
1
2
3
4
5
6
7
8
9
|
public void doClick(){ // Analytics call... // Cloud call... try { throw new Exception("Something happened..."); } catch (Exception exception) { APSPerformance.getInstance().logHandledException(exception); }} |
Set a username for crash logs
To help differentiate crash logs, use the APSPerformance's setUsername() method. When the application successfully logs in to the Cloud user account,
the application calls APSPerformance's setUsername() method.
|
1
2
3
4
5
6
7
8
9
10
11
12
13
14
|
APSUsers.login(data, new APSResponseHandler() { @Override public void onResponse(final APSResponse e) { if (e.getSuccess()) { Log.i("ACSUsers", "Successfully logged in as " + username); // Add this method call APSPerformance.getInstance().setUsername("username"); } else { Log.e("ACSUsers", e.getMessage()); }
}}); |
Testing the tutorial sample
Before testing the sample, you need to create user accounts for the application to query. To create Cloud user accounts:
- Login to the AMPLIFY Platform.
- On the Dashboard tile, select Go to Dashboard.
- Select your application from the Projects menu.
- In the left navigation bar, click Manage Data.
- Click Users, then the Create User button.
- In the Username field, enter the user's username.
- In the Password field, enter the new user's password (four-character minimum).
- Click Save Changes.
After you have created a few Cloud user accounts, build the sample and launch it on either a device or emulator.
Once the application launches:
- Click on the Picker/Spinner. You should see a list of all the Cloud user accounts you added.
- Select a user account from the Picker/Spinner and enter that user's password. Click the Button. In the log output, you should see an info log that login command was successful or not.
- Go back to the Dashboard.
- In Dashboard, select your application from the Apps menu in the upper-left corner.
- In the left navbar, click Search by User. Enter the username of the account that successfully logged in. Click the username. You should see a crash report for the user.
- In the left navbar, select Analytics.
- In the Real-Time view, you should see at least one active session.
- In the left navbar, click Events. You should see the "sample.feature.login" feature event.
Next Steps for Appcelerator Analytics and Cloud
This tutorial only covers a small portion of what the Analytics and Cloud services can provide. For more in-depth information about these features, see the following topics: