This page explains how to use the Rake Tasks View in RadRails.
Contents |
Introduction
Use the Rake Tasks View to invoke Rake tasks for your Rails projects.
Instructions
You can run rake tasks either using the Rake Tasks View or from the Rake Tasks context menu.
Displaying the Rake Tasks View
To use the Rake Tasks View:
- If you have not used the Rake Tasks View before, you will need to specify
your Rake path in your preferences:
- From the Window menu, select Preferences... and in the tree in the left pane, expand Rails > Configuration.
- In the Rake path field, browse to your Rake path.
- Click OK.
- In the upper right corner of the Rake Tasks view, click the Refresh button
 to refresh the list of Rake tasks.
- Select a Rake task from the list on the left.
When you select a Rake task, the large text box on the right displays a description of the task (shown below).

- In the upper text box on the right, type any parameters for your Rake task.
- Click the Go button to invoke the task.
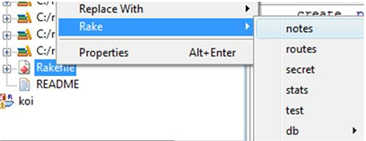
Using the Rake Tasks context menu
As of the RadRails 1.0 release, you can run rake tasks on a ruby project by right-clicking within the project in the Ruby Explorer view and navigating the Rake context menu (shown below). The context menu offers a faster way of running rake tasks than using the Rake Tasks view. Within the context menu, Rake Tasks are sorted alphabetically, and namespaces appear as submenus.

